|
New Features and Enhancements
- See the discussion of various EDI 810 invoice enhancements in the Materials Management section.
ERP Materials Management
 Users can set a notification flag for requisition lines not written to purchase orders. Users can set a notification flag for requisition lines not written to purchase orders.
Normally, non-stock, non-file, and direct delivery items on approved requisitions are written directly to purchase orders. On occasion, the system cannot write one or more requisition lines to a PO, for various reasons; for example, if a file item on the requisition is inadvertently made “inactive.” In this situation, the requisition appears to be complete, but in fact, lines are missing from the PO.
To handle this situation, a new flag is available to alert the person who originated the requisition that a line is not written to a PO, and that the item is not backordered. The user can then communicate with the relevant supply staff to determine the reason for the missing PO line.
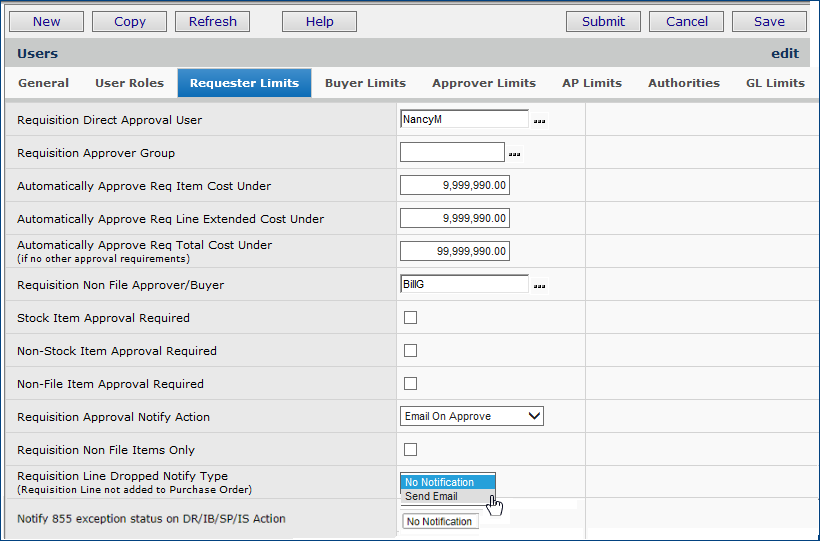
The new field is Requisition Line Ordered Qty Dropped Notify Type on the User Profile Requester Limits tab. This field allows a user making requisitions to select if he/she would like to be notified if a requisition line's ordered quantity was dropped from the associated PO. If the user wishes to be notified, an email message appears when a requisition line is dropped.
Usage: To set the Requisition Line Ordered Qty Dropped Notify Type field:
- From the Work in Administration main Contents, click Administration > Users. The list of users appears.
- Locate the User ID for the person who needs the flag selected (or unselected).
- Click the edit icon
 next to the User ID to edit the User Profile. next to the User ID to edit the User Profile.
- Click the Requester Limits tab. The panel appears (Figure 1).
Work in Administration > Administration > Users >edit user
- Set the field Requisition Line Ordered Qty Dropped Notify Type as desired. Values are:
No Notification - No email is sent when requisition lines are dropped from a PO.
Send Email - An email message is sent to the user if one or more requisition lines are not written to a PO. The email message identifies the requisition number and description, the user making the request, the item number(s), the quantity requested, the quantity killed, and the reason the lines were dropped from the PO.
Figure 2 is an example of a message for a non-stock item dropped from a PO because the item catalog record was set to Inactive. Other sample error messages are in the detailed online topic.

 You can automatically match EDI 810 invoices that contain zero-dollar lines with no associated PO lines. You can automatically match EDI 810 invoices that contain zero-dollar lines with no associated PO lines.
This enhancement addresses EDI 810 invoices containing lines that have zero-dollar amounts, with no matching lines in the associated purchase order(s). This situation can occur with invoices that include “information only” lines with no amounts (examples are bill-only or capitated pricing invoices, among others). Previously, EDI 810 invoices with zero-dollar lines could not be processed and had to be handled manually. This enhancement lets each organization allow (or disallow) EDI invoices with zero-dollar lines to be automatically matched successfully.
Usage: Check a new field on the Organization panel to Bypass Zero-Dollar EDI 810 Invoice Lines:
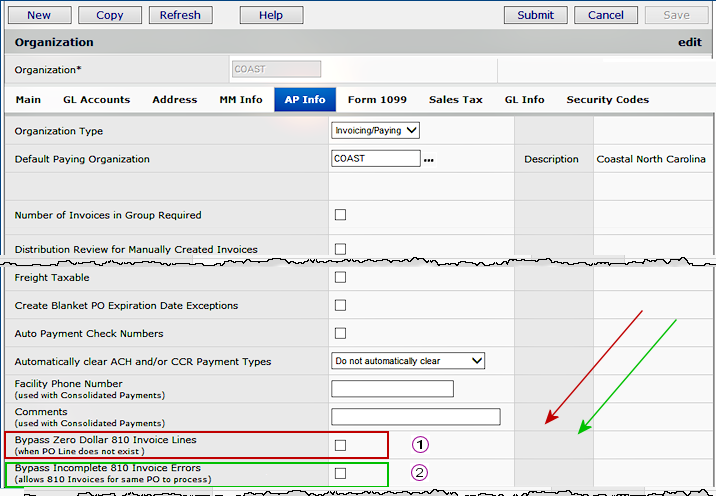
You can bypass processing of zero-dollar invoice lines by setting the new field on the organization record's AP Info panel: Bypass Zero Dollar 810 Invoice Lines (Figure 3, red).
AP main Contents > Tables > Organizations
When an EDI 810 is imported and the Bypass Zero Dollar... field has been selected, the 810 detail line Status shows the new value Bypass - $0 Line Amt and PO Line Does Not Exist (Figure 4). The invoice is then matched, assuming that no other errors are present. The 810 header status is Invoiced.

AP main Contents > Imports/Exports > Invoice Imports > locate invoice > Menu > View Import Details > Menu > Detail Lines
When the field is not selected, the 810 detail Status is Exception - PO Line Does Not Exist and the invoice is created as an exception (Figure 5). The 810 header status is Partially Invoiced and the invoice is created as Incomplete.

AP main Contents > Imports/Exports > Invoice Imports > locate invoice > Menu > View Import Details > Menu > Detail Lines
 You can allow an 810 invoice for a PO to process when an exception invoice also exists for the PO. You can allow an 810 invoice for a PO to process when an exception invoice also exists for the PO.
The enhancement addresses this situation: multiple EDI 810 invoices for a PO have arrived, one is incomplete — with exceptions -- but the others are available for matching. Previously, this situation required the 810 exception(s) invoice to be resolved, so that any other available 810 invoices would process. A new field allows available invoices for a PO to process when an exception invoice also exists.
Usage: Select the new field on the Organization panel to Bypass Incomplete 810 Invoice Errors:
You can bypass incomplete, error EDI 810s by checking the new field on the organization record's AP Info panel:
Bypass Incomplete 810 Invoice Errors (Figure 3, green,  ). ).
- Field not selected: A new EDI 810 will not process when an incomplete invoice is present for the same PO.
- Field selected: A new EDI 810 will attempt to process when an incomplete invoice is present for the same PO. The system deletes the existing incomplete invoice and resets the 810 that created the invoice to a status that will allow it to reprocess as a new import.
 You can now edit lines with errors in an imported EDI 810 invoice, and then process the invoice for automatic matching. You can now edit lines with errors in an imported EDI 810 invoice, and then process the invoice for automatic matching.
A new option on the 810 Invoice Exceptions panel lets you reset an invoice with errors back to the way it was when it arrived as an import before it was processed. The system deletes the processed version of the invoice with errors, and makes the original 810 version available for editing. You can then edit the 810 invoice to correct issues such as line numbers that do not match the POs, incorrect vendor item numbers, and other errors that are keeping an otherwise correct invoice from matching. When editing is complete, the 810 invoice can be submitted again for processing and matching.
For a details on this feature, and a discussion of the procedures, see the online documentation topic "To correct errors on imported EDI."
 Audit records for several EDI 810 import processing and exceptions
panels are available. Audit records for several EDI 810 import processing and exceptions
panels are available.
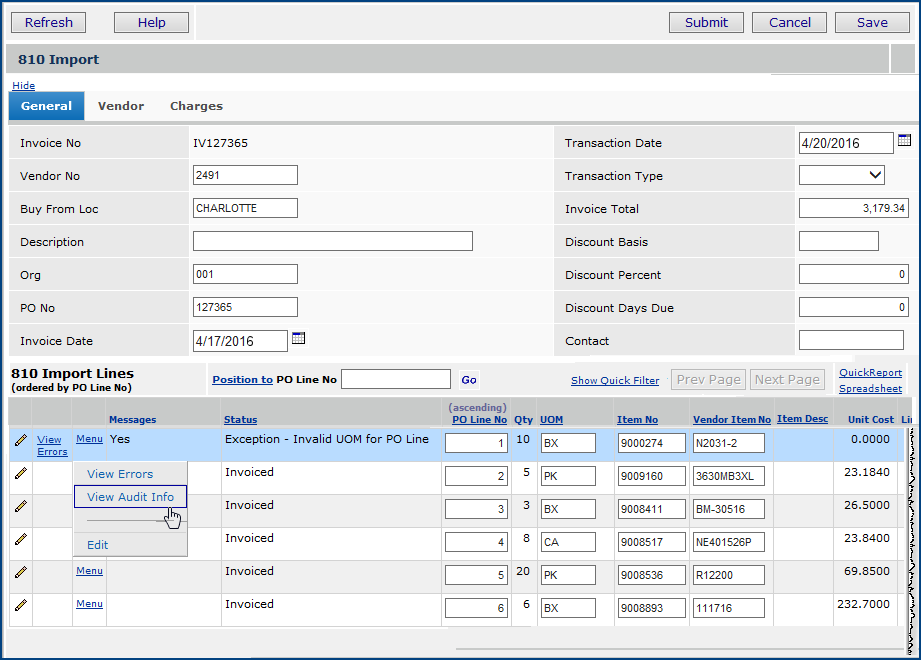
The audit trail lets users track activities for invoices. For some EDI 810 import and exception panels, in the past, no audit was available. Now, you can get audit information. Figure 6 and Figure 7 are examples for an EDI 810 exception line.
Materials Management or AP main Contents > Invoicing > (Invoice (810) Import Exceptions > Edit Invoice
- Click Menu > Edit to display audit information (Figure 7)

Materials Management or AP main Contents > Invoicing > (Invoice (810) Import Exceptions > Edit Invoice > Menu > View Audit Info
 The EDI 810 matching process has been improved to reduce the number of exceptions and “Receipt not found” errors when matching EDI 810 invoices and non-EDI purchase orders. The EDI 810 matching process has been improved to reduce the number of exceptions and “Receipt not found” errors when matching EDI 810 invoices and non-EDI purchase orders.
The 810 match process has been changed to better handle EDI 810 invoices that originate from non-EDI POs. Normally, the system matches non-file lines on EDI 810s that do originate with EDI 850s using the PO number, PO line number, invoice quantity, and invoice UOM.
For EDI 810 invoices that do not originate with an EDI purchase order, the vendor does not necessarily use the same line numbers that were used in the purchase order. So, for these EDI 810s, the match logic uses the vendor item number instead to achieve a higher number of matches, and to eliminate the need to resolve a large number of exceptions.

The Inventory Group and Supply Type fields from the Item Catalog have been included in item record export fields.
To create item exports, from the Materials Management main Contents, select Imports/Exports & Financials > Item Export.
Instructions on export files are in the online documentation topic "Export Item Information Files to Other Systems Manually."
 Optionally print the quantity in the Requisition UOM on the receipt Pick List. (This feature is enabled by an asset location flag.) Optionally print the quantity in the Requisition UOM on the receipt Pick List. (This feature is enabled by an asset location flag.)
For non-stock items, receipt documents contain quantities in the lowest unit of measure.
Distribution staff need to see the same UOM on the Receipt Pick List as is shown on the requisition to compare the two UOMs without having to use a calculator to convert up or down.
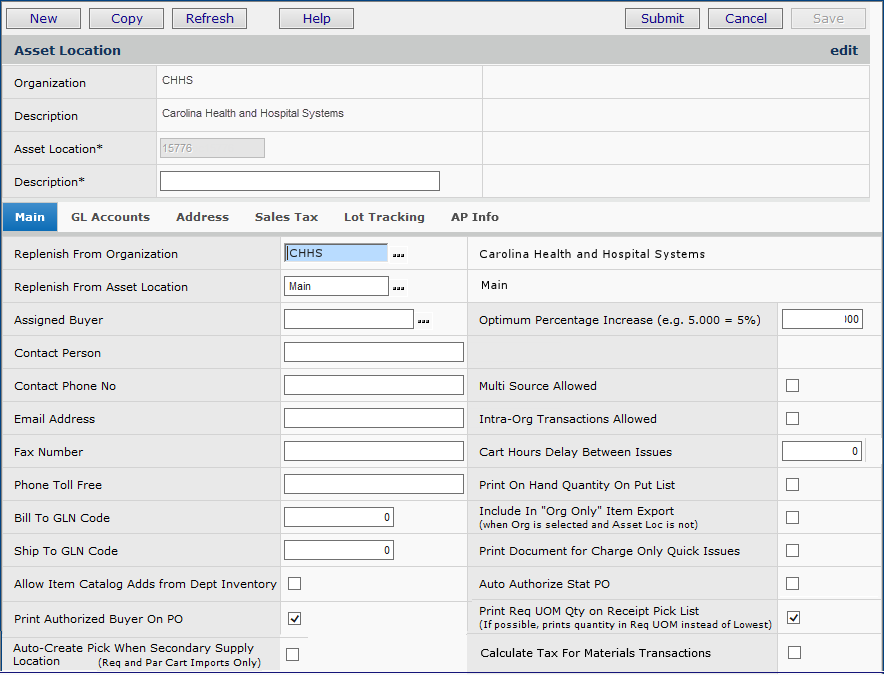
With this enhancement, the requisition unit of measure and quantity for non-stock items can be included on pick lists. This feature is controlled by a setting for the asset location, as described below (Figure 10).
Figure 8 is an example of a requisition in which 10 PK (equal to 1 CA) of a non-stock item was ordered. Case (CA) is the purchasing UOM. The first shipment of the item was a partial shipment, and only 3 PK were received. Figure 9 is the receiving document that displays the UOM as PK.

Materials Management main Contents > Requisitions - Current Dept/Requisitions - All Depts > locate requisition on list > click i

Materials Management main Contents > Receiving > All Receipts > locate receipt > Print Delivery Document
 Usage: To set the flag that includes the requisition UOM on pick lists: Usage: To set the flag that includes the requisition UOM on pick lists:
- From the Materials Management main Contents, select Tables > Asset Locations.
The asset location list appears.
- On the list, find the asset location of interest.
- Edit the asset location record.
- Select the field Print Req UOM Quantity on Receipt Pick List (Figure 10, bottom right). (Click Submit to finish.)
Materials Management main Contents > Tables > Asset Locations > edit
 For bill-only POs, requisitions, and invoices, authorized users can now select whether uploaded documents should have ePHI protection, or should be available generally. For bill-only POs, requisitions, and invoices, authorized users can now select whether uploaded documents should have ePHI protection, or should be available generally.
For users who are authorized to work with ePHI information, the Contains ePHI Data checkbox on the document list can be toggled (selected and unselected). This change gives authorized users more flexibility to allow documents with no ePHI contents to be broadly available. See Figure 11.
Previously, for bill-only documents, if this field were selected for a document, the field could not be unselected except by a System Administrator.

Materials Management or AP main Contents > Invoices > edit Invoice > Documents tab
 A new protection in invoice processing prevents users from accidentally paying "on-hold" invoices. A new protection in invoice processing prevents users from accidentally paying "on-hold" invoices.
When a hold amount exists on an invoice, a partial payment on the invoice that includes the hold amount cannot be made until the hold is removed.
For example, imagine an invoice originally entered for $100.00 with a hold of $50.00 on the invoice.
-
If you were to try to create a partial payment of $50.00 or more, the system would not allow it.
-
However, the system would accept a partial payment of $25.00, because the remaining amount to pay is more than $50.00.
 Usage: To remove a hold on an invoice: Usage: To remove a hold on an invoice:
- From the Materials Management or AP main contents, select Invoicing > Invoices. The list of invoices appears.
- In the middle set of tabs, click the Payment tab. The Payment panel appears.
- Locate the Amount to Hold field (right side).
- Set the Amount to Hold value to 0.00 to remove all holds.
 Approvers can link directly from the email notification to a check request, invoice, or requisition that needs approval. Approvers can link directly from the email notification to a check request, invoice, or requisition that needs approval.
A link within an approval email notification takes you directly to the transaction needing approval, and avoids your having to navigate manually through ERP after receiving an email message. Figure 12 is an example of an email for requisition approval, with the new link.
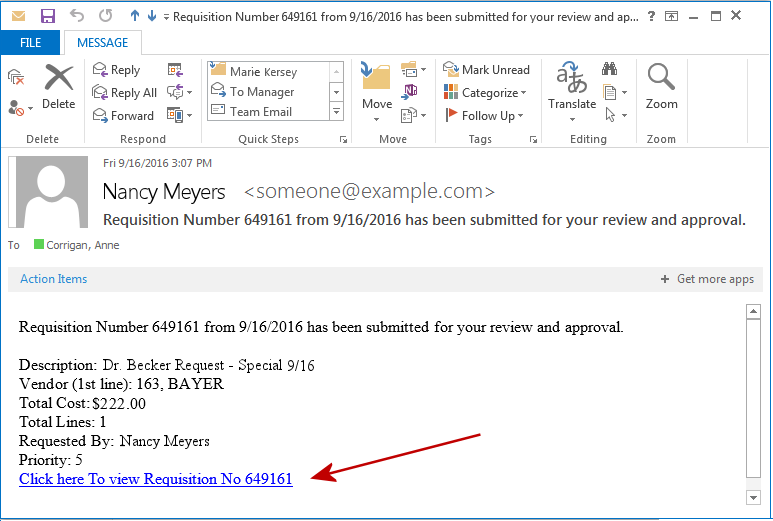
If you are not logged in to the application, clicking the link opens the login panel, and you can log in. The system displays the transaction needing approval. The application remains open for other work.
To use this feature, your User Profile must be set up for email notifications for the transactions that you approve. See the online documentation topic "Setting Approver Limits."
Note: This feature is only available for Microsoft Internet Explorer. Mobile browsers, Firefox, Chrome, and others are not supported.
 Panel Changes Panel Changes
On the "Vendor" page, Buy From Location panel (used to create a new vendor), the field that sets the buy from location to the same address as the AP location has been moved back to the top of the panel, and checked to indicate "yes," by default. See Figure 13. For a different buy-from location address, uncheck the field, and enter the address information.
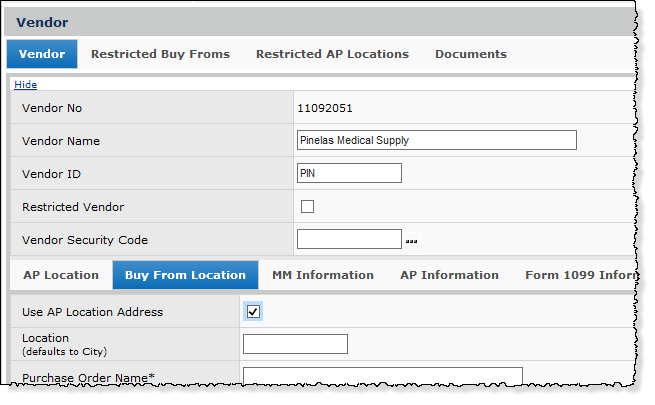
MM or AP main Contents > Vendors > New
ERP Financials - Accounts Payable and General Ledger
See the discussion of several enhancements in the Materials Management section.
Sourcing and Contract Management (SCM)
 The new Incentives Feature offers powerful tools for defining incentives and tracking earnings and payments. The new Incentives Feature offers powerful tools for defining incentives and tracking earnings and payments.
The Incentives Feature in Sourcing and Contract Management offers robust options for defining incentive terms, and sophisticated tracking of earnings, payments made, payments due, and written-off amounts.
Incentives replaces the previous Fees feature. Incentives significantly broadens the capabilities of Fees, and offers better ease of use.
The Incentives Feature lets you...
- Set up incentive definitions that contain the supplier's incentive terms and requirements for any supply or services contract.
- Display earnings and understand how they are calculated for each incentive.
- Proactively review spend and earnings to make purchasing decisions that exploit favorable incentives.
- Summary earnings can be filtered by type of incentive, supplier (entity), contract, and organization over a selected timeframe.
- Details on earnings, payments, and spend proximity to threshold requirements (volume, market share or growth) can be displayed by contract, incentive type, and supplier (entity).
-
For quick reference, a link sends the summary of incentive earnings to your Dashboard.
- Quickly target contracts with volume, market share, or growth incentives where you are close to earning incentive dollars.
- Spend that is within 10% of a required threshold (volume, market share or growth) is flagged so that you can see it at a glance.
- You can also filter the entire list of incentive earnings to display only contracts whose spend is within 10% of thresholds.
- Red text shows you the difference between total spend and a threshold amount required to begin earning incentives.
- Potential earnings are calculated and appear for incentives with threshold terms.
- Unit volume thresholds are translated to dollars on the Earnings display for easy comparison.
- Record payments on earned incentives, and write-off earned amounts that you do not expect to be paid.
- Review current earnings due from incentives, the cumulative total due, and earned amounts past due formatted in an aging breakdown.
- Generate purchasing evidence by contract and incentive to send to suppliers via a downloaded Excel spreadsheet.
- The spreadsheet contains: spend summary by item; spend details by item, purchase order, and purchase order line; incentive earnings by month; payments made and payments due by month, and more.
With the incentives setup tools, you can...
- Create incentives of various types that you define; for example, rebates, sharebacks, loyalty incentives, and others.
- Set up different incentives for the same contract/supplier; for example, a contract that has both administration and shareback incentives.
- Create multiple details for the same incentive type; for example, a rebate incentive that has different terms for each of five years.
- Exclude spend from selected organizations in the calculation of an incentive.
- Include spend only from selected items in an incentive calculation.
- Set a start date for calculating contract incentives.
- Recalculate incentives when terms change.
- Define incentives for contracts whose prices are not yet activated.
- Define and calculate incentives for expired contracts.
All incentive definitions include:
- Incentive Type.
- Payment Schedule.
- Calculation Start Date (which can be different from the contract effective start date).
- Incentive Percent or Flat Amount. (You can specify both, as applicable.)
- Recurring time period/frequency for which an incentive is available.
Within each recurring period, incentive terms are newly applied to contract spend.
For example, if the recurring frequency is three months, the incentive terms must be met over each three-month period to generate earnings for that period.
- Days until payment is due for earned incentives.
A payment may be calculated quarterly, for example; but you can set the payment to be due ten days after a quarter ends.
Depending on the incentive terms, you can specify additional details, such as:
- Volume requirements: a total spend threshold, a total spend range, a unit volume quantity threshold, and/or a unit volume range.
- Growth requirements: comparing spend in a current time frame to a previous time frame.
- Market share requirements for one or more contract categories.
- Limits for the maximum and minimum payable incentive dollars.
How to Access the Incentives Feature:
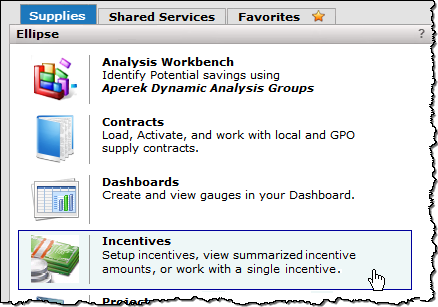
- From the top of the Sourcing and Contract Management main Contents, click either the Supplies or Shared Services tab.
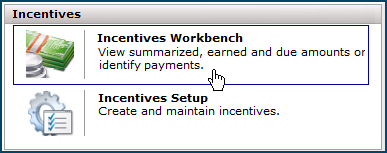
- To work with existing incentives on the Incentives Workbench, select Incentives > Incentives (Figure 14).
- To set up incentives, select Incentives Setup.
The Incentives Feature must be enabled for any site that wishes to use it. Contact the Help Desk/Solutions Center for assistance.
Details on using this feature are in the online topic "Setting Up and Working with Incentives."
 For manual activation of item prices, a new flag Exp warns you when an item's price has expired. For manual activation of item prices, a new flag Exp warns you when an item's price has expired.
When you activate a price manually on the "Work with Contract" Activate Items panel (Figure 15), the Select Items for Activation panel (Figure 16) appears. You can select the items whose prices you wish to activate. If an item price has expired, the notation Exp appears next to the item. This flag will prevent mistakes in price activation when a price is no longer available.

SCM main Contents > Supplies > Contracts > Load and Activate Contract > Accept/Activate Contracts > select contract
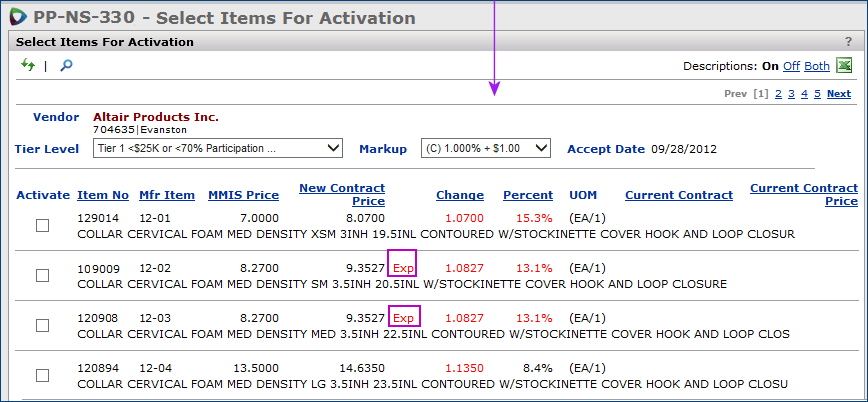
SCM main Contents > Supplies > Contracts > Load and Activate Contract >Accept/Activate Contracts > select contract > Manually Activate Contract
 Worksheets in the Excel single-tier or multi-tier contract template can be unlocked. Worksheets in the Excel single-tier or multi-tier contract template can be unlocked.
You can unlock columns in the single-tier or multi-tier contract worksheet using the Review tab on the Excel ribbon (Figure 17). (Previously, columns were locked and protected by a password.)
- Click Review > Unprotect Sheet.
When you turn off protection, you can edit values in columns that were previously locked.

Warning: Keep in mind that if you unprotect a worksheet, and insert incorrect values -- or incorrectly formatted values -- in columns that were once locked, the contract may not upload. Or, if the contract does upload, the system may not be able to import the data. Also, if you alter the position of columns, or change the column header labels, the contract will not import.
 You can now edit Standard UOM (Non-MMIS UOMs) conversion factors to better align MMIS records with contract pricing. You can now edit Standard UOM (Non-MMIS UOMs) conversion factors to better align MMIS records with contract pricing.
Definition of Standard UOM: Alternate UOMs automatically loaded into SCM from Premier’s Master Data.
An MMIS item record may contain a unit of measure that is the same as a contract UOM for the item, but with a different conversion factor. To align the item record with the contract pricing UOM, you can edit Standard UOM conversion factors for item records.
Note: Prior to this change Standard UOMs were not editable. This new feature complements the current feature that lets you create item UOMs to match contract UOMs.
Usage: To locate and edit an item's Standard UOMs:
- In SCM, locate the item information using the Search box set to Items. Figure 18 is a search for an item containing "glove" in its description.
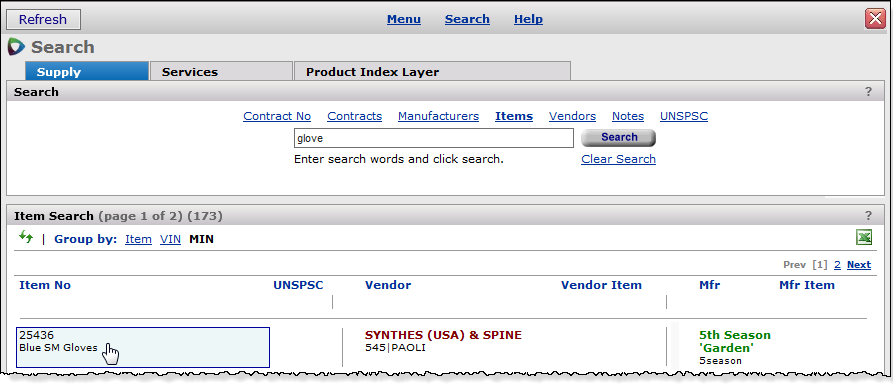
SCM main Contents > Supplies > any page > click Search at top
- Click the item listed in the search results (Figure 18).
The Item Catalog Info panel appears (Figure 19).
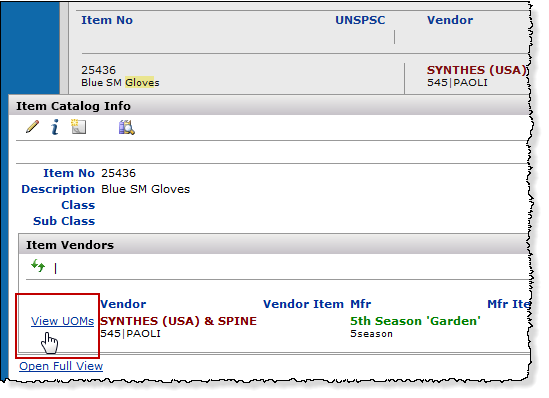
SCM main Contents > Supplies > any page > click Search at top > search for item > click item on results
- Click View UOMs. A list of units of measure for the item appears (Figure 20).
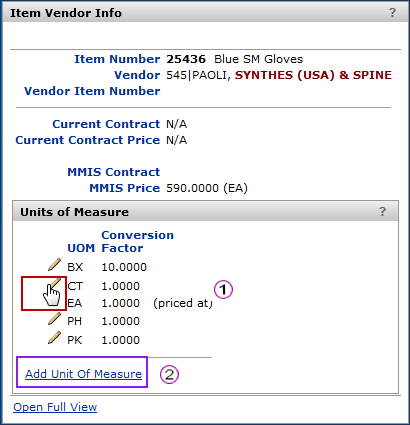
Standard UOMs (Non MMIS UOMs) are now editable. The edit icon (pencil) appears next to the UOM record.
- Click the edit icon
 next to the Conversion Factor that you wish to edit (Figure 20, red box, next to the Conversion Factor that you wish to edit (Figure 20, red box,  ). ).
An edit panel appears (Figure 21).
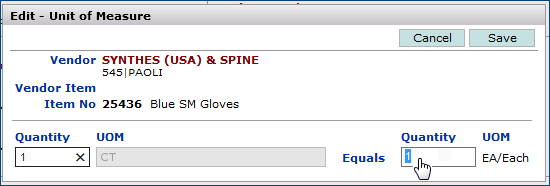
- Edit the Conversion Factor field as needed to match the contract pricing UOM.
- Click Save.
The conversion factor is changed, and system identifies the changed UOM as a manually created UOM.
(Note: In Figure 20, Clicking Add Unit of Measure  adds a UOM). adds a UOM).
 Premier PIM enabled sites: The Analysis Workbench uses the new Category "Unknown" for item spend with no assigned category value. Premier PIM enabled sites: The Analysis Workbench uses the new Category "Unknown" for item spend with no assigned category value.
When the Premier Item Master (PIM) is enabled...
-
Sourcing and Contract Management uses the Category descriptor Unknown for spend that is not matched to a Premier item.
- Spend that is matched to a Premier item, but has not been assigned to a category will also appear as Unknown.
See Figure 22.

SCM main Contents > Supplies > Analysis Workbench
 On the Services Analysis Workbench, the Dept and Expense Code (if available) have been added to the Invoices view. On the Services Analysis Workbench, the Dept and Expense Code (if available) have been added to the Invoices view.
The Invoices view includes columns for the Dept and Expense Code, if used by the site, and included in the data available to the system (i.e., for stand-alone sites, these values would need to be passed in via a connector). If not available in the spend data, the columns do not appear. These columns (if used) also appear on Excel output for the Invoices panel.
 Premier Managed Contracts: Enhancements Premier Managed Contracts: Enhancements
These enhancements apply only to sites with Premier Managed Contracts (i.e., contracts synchronized between Sourcing and Contract Management (SCM) and Supply Chain Advisor (SCA).
- The SCM application protects Premier managed contract items from EDI 810 and EDI 855 price changes.
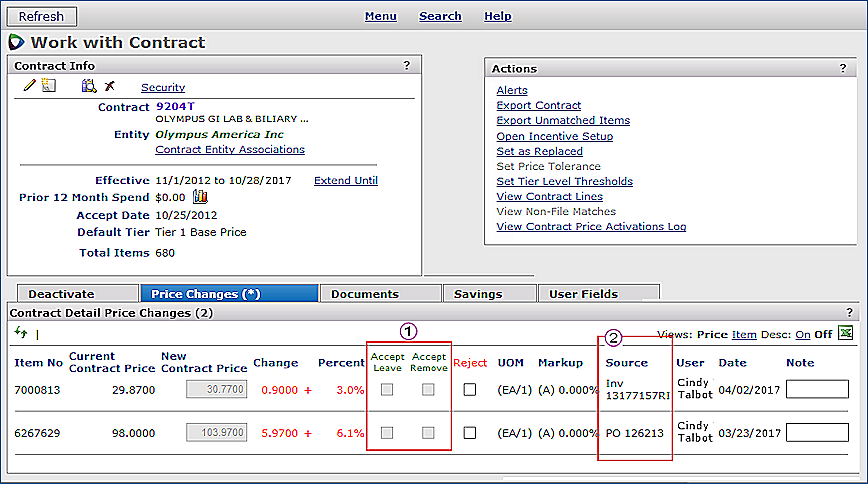
For sites with SCM and Premier managed contracts, contract item price changes that originate in Premier Materials Management – through users’ actions or through the system -- are not allowed. Included are EDI 855 (PO confirmations) price changes and price changes from EDI 810 invoice processing. This rule applies regardless of price change tolerance settings.
Figure 23 is an example of the Price Changes panel for a contract. Notice that the options for accepting prices  (Accept Leave and Accept Remove) are grayed out. Also, the source of each price change is in the Source column (Accept Leave and Accept Remove) are grayed out. Also, the source of each price change is in the Source column  . .
SCM main Contents > Supplies > Contract Workbench > open contract > Price Changes
- A contract manager using SCA may occasionally add a facility to a contract price activation. The date when the facility is added does not affect the Accept Date on the contract in SCM: the Accept Date does not change.
- The Accept Date in SCM will change when a new tier is activated for an already accepted contract.
Reports
 New Report Objects/Report Fields New Report Objects/Report Fields
- The fields UnitCost and GLAcctSegment2Raw have been added to report object “GL Transactions MM and AP.”
- The field GLAcctSegment2Raw has also been added to report object “GL Transactions MM.”
- The fields VendorNo, VendorItemNo, and MfrItemNo have been added to the report objects "Department Expense Report" and "Department Expense Report Custom."
Administration - GL
 Auditing the JV Uniqueness Timeframe will help users determine when and why journal vouchers with the same number, period, and year are allowed to post, or not post. Auditing the JV Uniqueness Timeframe will help users determine when and why journal vouchers with the same number, period, and year are allowed to post, or not post.
JV Uniqueness Timeframe -- one of the system values parameters -- is now an audited field.
To audit this field, and other system values fields, from the System Values table (Work in Administration > Administration > System Values), click Menu > View Audit Info A list of audited fields and changes in their values appears. Figure 24 is an example:

Work in Administration > Administration > System Values > Menu > View Audit Info
Problem Resolutions
 ERP - Materials Management/Accounts Payable/General Ledger ERP - Materials Management/Accounts Payable/General Ledger
Problem Summary: System not updating Period/Year for reprocessed EDI 810 invoices and manual invoices with distribution approval.
This problem was resolved as follows: When an 810 invoice is reprocessed (after an exception is cleared), the period and year are set to the current period and year when the invoice is successfully completed. Similarly, when a manual invoice eligible for distribution review is approved, the period and year are set to the current period and year.
Problem Summary: GL account validation (when enabled for a site) was not working with credit requisitions. This problem has been resolved: GL account validation is performed across all requisition lines before a credit requisition can process and be set to Complete. If any bad GL account combinations are found on any lines, an error informs the user, and processing stops.
Copyright © 2023 by Premier Inc. All rights reserved.
|


