What's New in Release 7.00
|
||||||||||||||||||||||||||||||||||||||||||||||||||||||||||||||||||||||||||||||||||||||||||||||||||||||||||||||||||||||||||||||||||||||||||||||||||||||||||||||||
|
New Features and Enhancements - Release 7.00A summary of enhancements made in updates since Release 6.10 is also included in this document. Important: Internet Explorer Browser Support
Support for all versions of Internet Explorer prior to Version 11 will end when Release 7.0 is available. ERP Materials Management and Financials
Sourcing and Contract Management (SCM)
ReportsAdministration
Problem Resolutions
|
||||||||||||||||||||||||||||||||||||||||||||||||||||||||||||||||||||||||||||||||||||||||||||||||||||||||||||||||||||||||||||||||||||||||||||||||||||||||||||||||

Field Label |
Data Type |
Length |
| Account Code | varchar | 50 |
| Account Code Desc | varchar | 50 |
| Charge Dept Desc | varchar | 50 |
| Charge To Dept | varchar | 15 |
| Charge To Org | varchar | 15 |
| Issue Dept Desc | varchar | 50 |
| Issue To Dept | varchar | 15 |
| Issue To Org | varchar | 15 |
| Last Payment Period | numeric | 2 |
| Last Payment Year | numeric | 4 |
| Open PO Amt | numeric | 19 |
| Paying AP Location | varchar | 15 |
| Paying Vendor No | varchar | 15 |
| PO Create Date | datetime | 23 |
| PO Last Update Date | datetime | 23 |
| PO Line Desc | varchar | 100 |
| PO Line No | numeric | 5 |
| PO No | varchar | 15 |
| PO Ordered Qty | numeric | 9 |
| PO Ordered UOM | varchar | 2 |
| PO Org | varchar | 15 |
| PO Unit Cost | numeric | 19 |
| Project Code | varchar | 10 |
| Project Desc | varchar | 50 |
As purchase orders are fully paid, they drop off the report.
Notes:
Only non-stock, non-file, and direct-delivery lines (those tied to a department) will appear on the report. Stock items that are not direct delivery will not be included. Credit POs are not included. Incomplete and unauthorized POs are not included.
PO line cost differences are calculated after any adjustment is made; for example, to clear a price exception. Or, if a Next Estimated Receipt Unit Cost is entered, that amount will be used to calculate the unreceived total amount, instead of the regular PO line Unit Cost.
Reports using the "PO Lines with Open Balances" report object do not match figure-for-figure with GL accounts. For this reason, you should not use this report object for reconciliation reports. Also, reports using this report object are not secured by data profile settings. Use a report profile to authorize access.
Administration
 A new role object is available to control editing access to departmental records.
Sites would like the ability to control which users are able to display and edit departmental data. Department records are available from this location: Materials Management main Contents > Requisitioning > Departments.
A new role object "DeptReqView" controls users' ability to create, edit, and view department records. This new role object works in tandem with the existing role object "DeptReq" to provide access as follows:
| Role Object Setting (All, Create, Modify, View, or None) | Results for User | |
DeptReq |
DeptReqView |
|
All |
View/None |
Cannot create a new department. |
Create |
View/None |
|
Modify |
View/None |
|
View |
View/None |
|
None |
View/None |
Will not be able to access a department. The Departments menu option is removed from the Contents. |
All |
Modify/Create/All |
Will be able to create, edit and delete departments. |
Create |
Modify/Create/All |
Can create and edit departments. |
Modify |
Modify/Create/All |
Can edit departments. |
View |
Modify/Create/All |
Cannot create a new department. |
None |
Modify/Create/All |
Will not be able to access a department. The Departments menu option is removed from the Contents. |
The online documentation topic "Set Up and Maintain Users, Administration, Security" outlines user security in detail.
A new data import feature populates approver groups, and assigns approvers to organizations and departments, making setup easier for administrators.
These features allow administrators to create and populate new requisition and invoice approver groups via mass import into ERP. The import avoids the need to go into the ERP application and populate each approver group manually.
Once you have uploaded newly completed approver groups and direct approvers, you can assign them to departments using another new upload feature. These features allow administrators to quickly create approver groups and incorporate approvers from newly acquired units and facilities into medical center operations by assigning them to departments via a mass import.
The approver group import tool applies to invoices, requisitions (including bill-only requisitions and invoices), and check requests. You can create both requisition and invoice approver groups and populate them in the same import.
Detailed information on approvers and approver groups, including setup and how to assign users, is in the online topic "Set Up Approvers and Approver Groups."
For creating and populating approver groups, and assigning approvers/groups to departments, the role object "Approver Group Import" (Approver Group Import Processing) must be set to Create, Modify, or All. The default setting is None.
Note: If a check request approval route and limits are the same as the requisition approval route and limits, only one approver group is needed. Otherwise, if the check request approval route and limits need to have differing approver paths, users, or dollar levels, then a second approver group is needed.
- To define a requisition approver group, from the Materials Management main Contents, click Requisitioning > Approver Groups.
- To define an invoicing approver group, from the Materials Management or Accounts Payable main Contents, select Invoicing > Invoice approver groups.
- Users who will be designated as approvers must exist in the application, and have the appropriate roles ("approver"), approver settings, and authorizations in their User Profiles.
- Roles, role objects, organizations, departments, and data profiles must exist and be assigned to the users who will serve as approvers.
- If your site uses Approval Profiles, they must also be set up.
Populating New Approver Groups
Note: This feature enables mass population of approver groups with members. Mass maintenance of approver groups is already available in ERP.
-
To use mass maintenance, from the Materials Management main Contents, select Requisitioning > Mass Approver Change.
Security: The new role object: "Approver Group Import Processing" controls access to the Approver Group Import Template and the import menu options. The initial setting is None. Settings All and Create allow administrators to create and import approver groups.
To populate approver groups, use the new Excel template for entering fields.
You then upload and import the spreadsheet into ERP as a .csv file.
- From the Materials Management or Accounts Payable main Contents, select Imports/Exports & Financials > Approver Group Import Template.
Follow the instructions to open the template in Excel. Figure 8 is an example.

Excel Template for Creating New Approver Groups
- On the template, enter the Approver Group name and values for approver group fields in the appropriate columns.
- Fields highlighted in yellow are required. Be sure that the B1 cell contains your Customer ID. and the C1 cell contains the date.
- Enter information right over the text that says <required>. For the Appr Group Type, enter an R (requisition) or I (invoice).
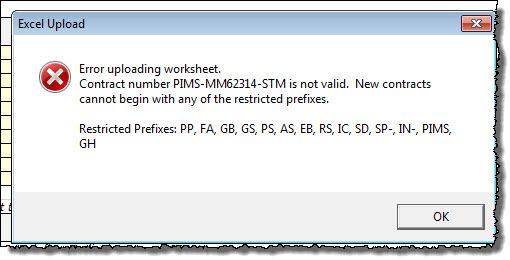
- If you import the spreadsheet with the <required> word and other words still in a cell, the application will take it as an invalid value, and will send an error message.
- Click the worksheet tab Info for instructions on completing and saving the template.
- The last entry on the template must be <EOF>. - When you finish entering values in the fields, save the spreadsheet as a .csv file on your local network.
- Upload and import the spreadsheet to ERP.
Importing New Approver Members Groups to ERP
After you assign approver group members on the template, you can import them back to ERP.
Important: The file you import must be in .csv (comma-separated values) format.
To display imported Approver Group files and upload a new one,
From the Work in Administration main Contents, select Materials Management or Accounts Payable > Imports/Exports & Financials > Approver Group Imports.
The Approver Group Imports list appears (Figure 9). Uploads appear on the list, if there are any. Otherwise, No Data appears.
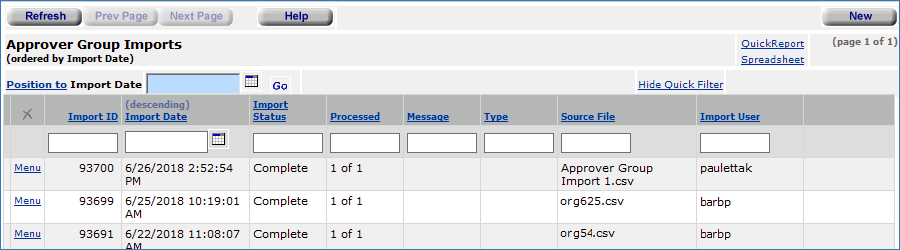
The Approver Group Imports List
Materials Management or AP main Contents > Imports/Exports (& Financials) > Approver Group Imports
General instructions for uploading .csv files are in the section below: General Instructions for Importing .csv Files Using the Standard ERP Upload.
Assigning Approvers and Approver Groups to Departments and Organizations
This feature lets you link an existing approver group or direct approver to an organization and department within your ERP application. The link is implemented by a process in which you download a department's current approval setup parameters; enter approver groups and direct approvers; and upload the approver data. You can use the upload to add or change approver assignments. This capability supports acquisition of new units at a medical center, and quarterly audit compliance. The feature uses the standard import. An audit capability is also provided.
Prerequisites:
Approval Groups must exist before you can assign users to them via the mass import. The department must also have associated Approval Profiles.
Users assigned as direct approvers or members of approver groups must have the correct authorizations in their User Profiles, the appropriate security objects set in their roles, and the organization/department permitted in their Data Profiles.
Notes:
If a site wants an AP check request approver group at the department level, they select one from the invoice or requisition approver types.
Assigning departmental approvers has these steps:
- Downloading the department's approval settings. The download generates a template that you can use to enter direct approvers and approver groups.
- Entering approvers in the template, saving it, and uploading it to ERP.
To download department templates,
- From the Materials Management main Contents, select Imports/Exports and Financials > Department Approval Template.
The Department Approval Template list appears with organizations and departments (Figure 10). The organizations and departments are based on the department/organizations allowed in your data profile.
- Use the Quick Filters and the column sort to filter the list so that it displays only the department of interest.

Department Approval Templates List
- Click the organization/department of interest. (The row turns blue.)
- Click Spreadsheet (Figure 10). An Excel spreadsheet template opens.
- Save the spreadsheet to a local network folder where you can work on it.
- On the spreadsheet, enter the direct approver names, or the approver groups as needed. Figure 11 is an example.
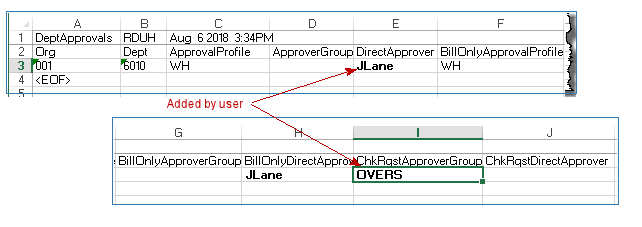
The Department Approval Template Spreadsheet
- When you have entered all the approvers that you need, save the spreadsheet to a local file. Be sure to save the spreadsheet as a .csv file. The last cell in the spreadsheet (following your data) must be <EOF>.
To import the Departmental Approvals Spreadsheet,
- From the Materials Management main Contents, select Imports/Exports and Financials > Department Approval Import. The Department Approval Import appears (identical to Figure 19).
- Follow the instructions in the section below General Upload Instructions.
When the file imports, you can open the Department record (Materials Management > Requisitioning > Departments > Edit ) and display the approvers or approver groups that you have added. Figure 12 is an example from the data in Figure 11.
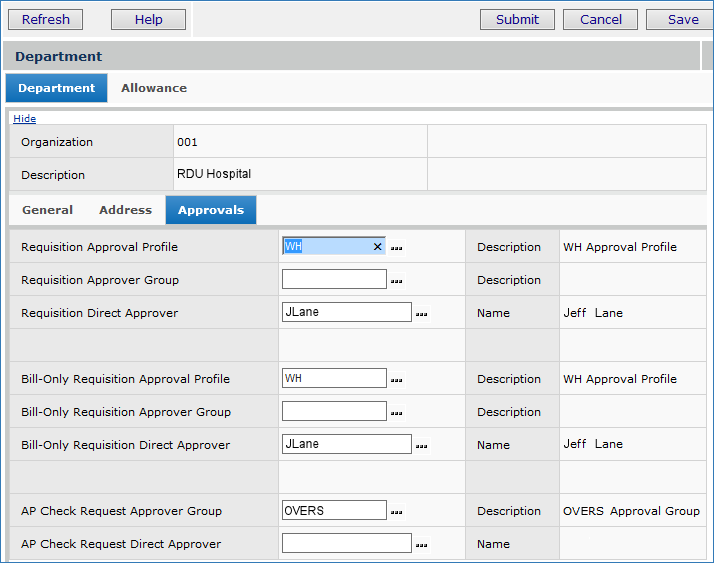
Imported Departmental Approvers/Groups on Department Record
User maintenance is more efficient with the user record import and export in this release.
The new user record mass maintenance import/export feature is available. This feature allows a security administrator to create new users and to maintain and audit an existing user base without having to go into the ERP application and update each user individually, or create new users manually.
Some sites find it convenient to use the import to create one or more "generic" users with particular User Profile settings. Then, once in the application's Administration module, they copy the "generic" users and enter values for real, new users.
For maintenance purposes, administrators can export all user settings in the ERP application, make changes and import that data back into the ERP application to update users' profiles.
Security: This feature is controlled by the "Administrator" role object.
Creating New User Records
To create user records, an Excel template is available for entering fields that you will upload and import into new User Profiles.
- From the Work in Administration main Contents, select Administration > User Create Import Template.
Follow the instructions to open the template in Excel. Figure 13 is an example.
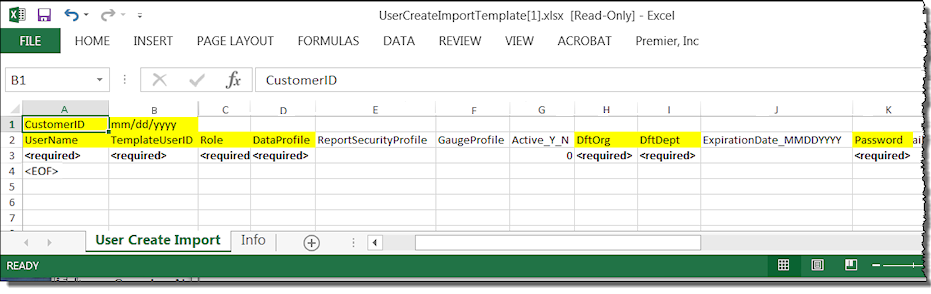
Excel Template for Creating New User Profiles
- On the template, enter values for User Profile fields in the appropriate columns.
Important:
- The fields highlighted in yellow are required.
- Enter information right over the text that says <required>. If you import the spreadsheet with the <required> word still in a cell, the application will take it as an invalid value, and will send an error message.
- Click the worksheet tab Info for instructions on completing and saving the template.
- The last entry on the template must be <EOF>. - When you finish entering values in the fields, save the spreadsheet as a .csv file on your local network.
- Upload and import the spreadsheet to ERP using the General Instructions for Importing .csv Files Using the Standard ERP Upload.
Maintaining Existing Users - Exporting User Data from ERP
For maintenance, first export existing user records to an Excel worksheet. Then, using the worksheet as a template, make changes as needed to the user data, Save the worksheet as a .csv file, and finally upload it to the application.
The upload is the standard upload process. A panel lets you work with uploaded user records.
Export data from the User Settings (All Columns) list.
- From the Work in Administration main Contents, select Administration > User Settings (All Columns). Figure 14 is an example.
- You can click Search to filter the list of users by organization, department, role, and other parameters to identify a subset for import/export, if you wish.

The All Users Panel with the Spreadsheet Link for Exporting
Work in Administration > Administration > User Settings (All Columns)
- Click the Spreadsheet link (Figure 14, red arrow, upper right). If you have a large number of user records, the application sends a request for you to identify the number of records that you would like to download (Figure 15).
- Click the number.
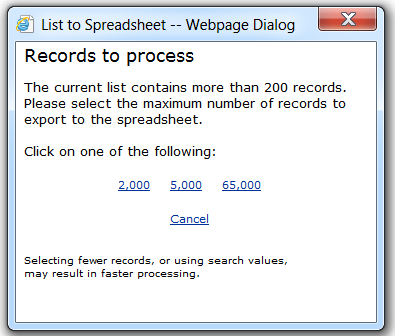
How Many Records Would You Like to Download?
Download and security information appears.
- Follow the message panels to either open the export file, or save the file, and then open it. The export file opens in Excel. Figure 16 is an example of part of an export. The downloaded file is formatted according to what the application will expect when you import the file back to ERP.
Note: You will need to save the file as a .csv file for the export.

Sample Downloaded User List
- Edit values for users in the spreadsheet. Here are some tips:
- Columns that are defined as "YN" are shown with column headings ending in _ Y _ N. Enter only a 0 (No) or 1 (Yes) in these columns.
- Columns that are defined as dates are shown with column headings ending in _MMDDYY.
- Columns that normally contain a valid value (e.g. 0,1,2, etc.) are shown with the actual value description. This value will be translated on import back to the actual valid value.
- Enter <EOF> in the first cell of the row following the last line of data. This value is critical, so that the import can find the end of the file (Figure 17).
- Save the file as a .csv (comma-separated) file. You are now ready to import the file back to ERP.

Entering the End-of-File Marker <EOF>
Importing New or Edited User Data to ERP
After you create or edit user records, you can import them back to ERP.
Important: The file you import must be in .csv (comma-separated values) format.
Follow the steps below and those in General Upload Instructions.
-
Select the import panel from ERP Work in Administration main Contents > Work in Administration > Administration.
- For new user records, select User Create Imports.
- For maintenance to existing user records, select User Maintenance Imports.

The List of User Record Imports
Work in Administration > Administration > User Maintenance Imports
General Instructions for Importing .csv Files Using the Standard ERP Upload
- Open the appropriate list of imported files: Users and User Settings, Approver Groups, etc.
- On the list of imports, click New (upper right). An Import Panel appears (Figure 19).
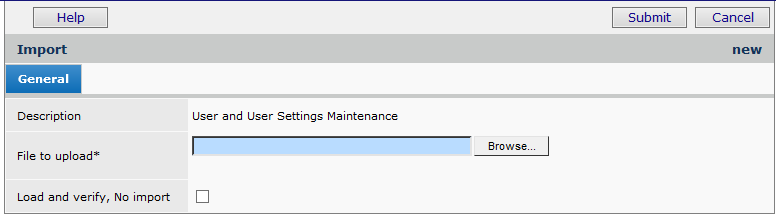
The User Maintenance Upload Panel
- Enter the file that you wish to import in the File to Upload field.
- Click Browse to locate the file on your network, then click the file to select it. - At this step, you have a choice. You can work through the import process in either one stage or two stages.
-
If you have uploaded files to the application before, use the one-stage approach, as follows:
- Click Submit. The system attempts to upload your file and validate it. The appropriate imports list appears.
- Click Refresh to see your file listed. - For users working with import files for the first time, we recommend the two-stage import approach. The two-stage approach first loads the file and validates it. Click Load and verify, no import. Once the file has successfully loaded, you can process it manually from the Imports panel Menu.
- On the list of imports, each import has a Menu that lets you Reprocess, View Details, Download or Delete an import file. Clicking Menu > View Details lets you display messages and edit the import record.
- Uploaded files that process completely with no errors have the Import Status of Complete.
User Record Imports - Notes:
- For new user records, the import creates a new User ID with the settings from the uploaded template that you entered for each User ID on the template.
- For existing user records that you edited, the changes that you made are in the Users' Profiles.- You can view the new or changed User Profiles from either list:
Work in Administration > Users or User Settings (All Columns).
When you import a user as inactive, click Show All on the list to make the user data appear.
Handling Import Errors
Valid rows on the spreadsheet will import into the application. If some rows are valid, and other are not, the invalid rows will not be imported.
When the Import Status of the uploaded user record file is not Complete, the import encountered errors.
To work with errors, you need to review the import details, make corrections, and reprocess the data.
- Next to the import, click Menu > View Import Details to display any errors or warnings that may have occurred.
- On the Import Details panel, each imported record appears. The Messages column contains Yes if errors or warnings exist for any record.
- Click Menu > View Messages.
- Click Menu > Edit to edit any unprocessed data and correct it. - After making corrections, from the import list, click Reprocess to rerun the process for any imports that do not have an Import Status of Complete.
Problem Resolutions
No major issues to report for Release 7.0. Several problems were resolved in 6.10 Updates.
Documentation Correction
- The criteria for moving file and non-file items to the Recoverable Savings list has been corrected in documentation.
The Recoverable Savings Help window now contains the following corrected criteria that must be met for file and non-file items to be moved from the Overpayments list to the Recoverable Savings list:
- Non-File Items
- Purchase price equals the contract price
- OR
- Last purchase price is less than the contract price
- File Items
- Purchase price equals the contract price
AND
Purchase price equals MMIS price - OR
- Last purchase price is less than the contract price
Enhancements from Updates 6.10.1 to 6.10.9
The following changes to ERP and SCM were covered in previously released Update Notes for each update.
ERP
- For invoices that are pending Distribution Review approval, the Payment tab is now View Only.
- Problems resolved in ERP updates
- You can now edit escheat invoices.
- Discount amounts and additional non-file line quantities on purchase orders.
- An enhancement to the application’s behavior is available for organizations that populate item inventory CDM values from the item catalog record
- Blanket requisitions can now be approved via email.
- Blanket purchase orders can now be transmitted to vendors using email.
- Report updates in ERP
![]() For invoices that are pending Distribution Review approval, the Payment tab is now View Only.
For invoices that are pending Distribution Review approval, the Payment tab is now View Only.
During Distribution Review of invoices that are pending approval, the fields on the Payment tab (vendor name, address, etc.) are protected from input and cannot be modified while in the approval queue.
![]() Escheat invoices that have been approved can now be edited.
Escheat invoices that have been approved can now be edited.
This enhancement will make it easier for sites that need to generate escheat payments in different formats; e.g., paper check, electronic transaction, etc. Also, it will allow sites to put approved escheat invoices “on hold” until payment is required.
To edit an approved escheat invoice,
- From the Accounts Payable main Contents, select Payments > Escheats. The list of escheat runs appears.
- Locate the escheat run of interest and click w to work with the escheats in the run. The Work with Escheat Run panel appears.
- Click View Escheat Invoices and Go to display a list of invoices in the run.
- Locate the invoice of interest and note its Invoice Number.
- Open the Invoice List in Accounts Payable (Accounts Payable main Contents > Invoicing > Invoices).
- Locate the approved escheat invoice using the Invoice Number you found in Step 4.
- Click Menu > Edit to edit the invoice.
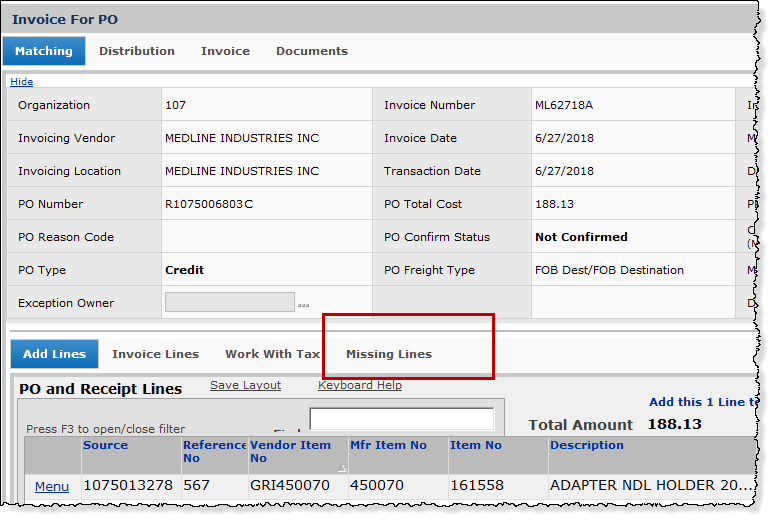
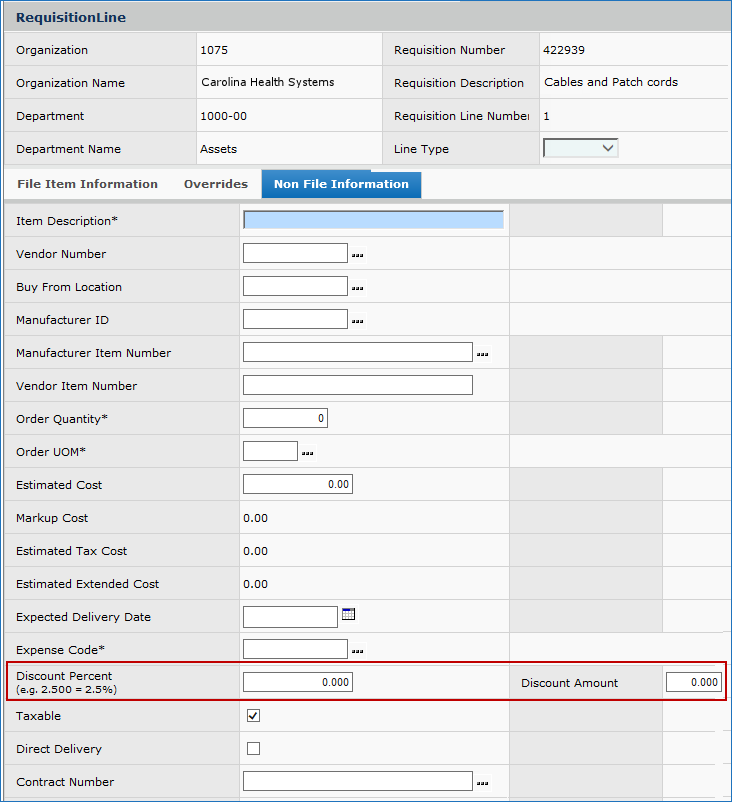
![]() Discount amounts and additional non-file line quantities on purchase orders.
Discount amounts and additional non-file line quantities on purchase orders.
Users sometimes need to add a non-file line with a unit cost of $0.00 and a discount amount to a purchase order. However, it was also possible to enter an item quantity of zero, and/or a line that produced a discount greater than the PO amount. The result was incorrect GL transactions.
If you wish to add an additional non-file line item on a PO to reflect a discount, you can do so. You can add a non-file item with a unit cost of $0.00 and a discount amount. However, the item quantity cannot be zero and the discount amount or discount percentage cannot be greater than the PO amount.
![]() An enhancement to the application’s behavior is available for organizations that populate item inventory CDM values from the item catalog record.
An enhancement to the application’s behavior is available for organizations that populate item inventory CDM values from the item catalog record.
On the Organization panel (Figure 20), a field enables the application to populate item inventory records with the CDM number and Pass Through Code from the item catalog record. When an item is reset to Patient Non-Chargeable, the CDM number (Figure 21) needs to be removed from the item catalog and from associated item inventory records. In the past, the value could not be removed from the item inventory records.
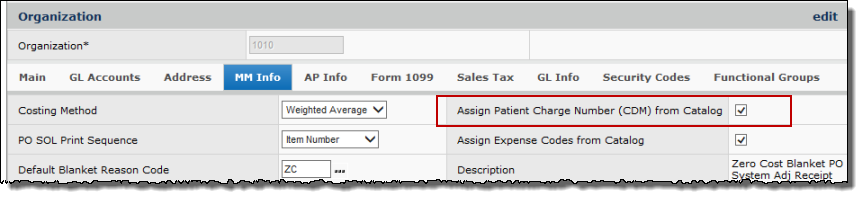
The Organization Record MM Info Panel
This enhancement changes the application’s behavior as follows. For organizations with the Assign Patient Charge… field set, when the Patient Chargeable field on an item catalog record is reset from “on” to “off,” the CDM number and Pass Through Code are automatically removed from the item catalog record, and from all inventory records for the item.
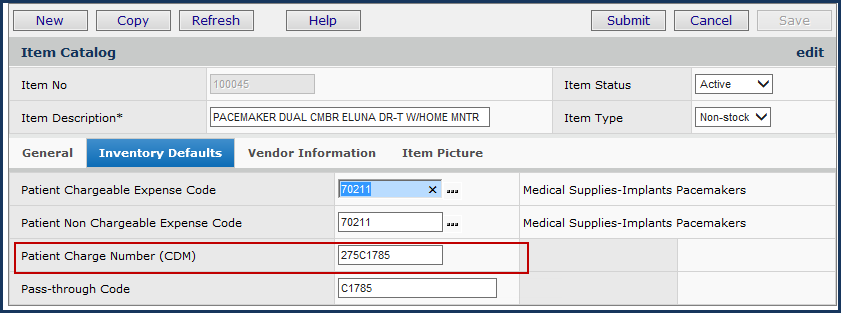
The Item Catalog Record Inventory Defaults Panel
![]() Blanket requisitions can now be approved by email, just as other requisitions.
Blanket requisitions can now be approved by email, just as other requisitions.
Blanket requisition approvers can now receive notification via email and can approve or reject the requisition within the email, without having to log in to ERP.
For details see the online documentation topic Using Email Requisition Approvals/Rejections.
![]() Blanket purchase orders can now be transmitted to vendors using email.
Blanket purchase orders can now be transmitted to vendors using email.
The process for sending a blanket PO via email is the same as using email for any other PO, as follows:
On the Blanket Purchase Order Edit panel, set the field PO Comm Type* to Email. This field is located in the center of the panel under the PO tab.
Problems Resolved in ERP Updates
- Ordering multiples of an item with a 4-decimal unit cost were not rounding correctly in all cases; the Requisition interface panels sometimes displayed incorrect estimated costs.
The issue causing certain cost calculations to round decimal places incorrectly was identified and fixed. Requisition and Requisition Line inquiry and edit panels now display correct cost estimates, rounded to two decimal places as expected.
Report Updates in ERP
- New fields are available on the "PO Requisition Analysis and "Vendor AP and BuyFrom Locations" report objects.
- The Req Description (Requisition Description) field has been added to the "PO Requisition Analysis" report object.
- The Min Order Amt (Minimum Order Amount) field has been added to the "Vendor AP and BuyFrom Locations" report object. - Several fields have been added to the “Invoice Match Header” report object to improve sites’ reporting options.
The fields are:
- Payment Method (only for consolidated payments: otherwise, this field is empty.)
- PO Type
- PO Type Description.
SCM
![]() You can designate a services or supply contract as "Health System Preferred."
You can designate a services or supply contract as "Health System Preferred."
A Health System Preferred flag for supply and services contracts can now be enabled from the “Work with Contract” or the "Work with Services Contract" page using one of the following methods:
- Click the Edit icon (red arrow in Figure 22) in the Contract Info (or Services Contract Info) panel to open the contract header for editing. Check the box next to Health System Preferred to add or remove the flag.
- In the Actions panel, click the Set Contract as Health System Preferred link (red box in Figure 22). Click Yes to confirm. (The link text changes to Remove Health System Preferred Setting, which disables the flag when clicked.)
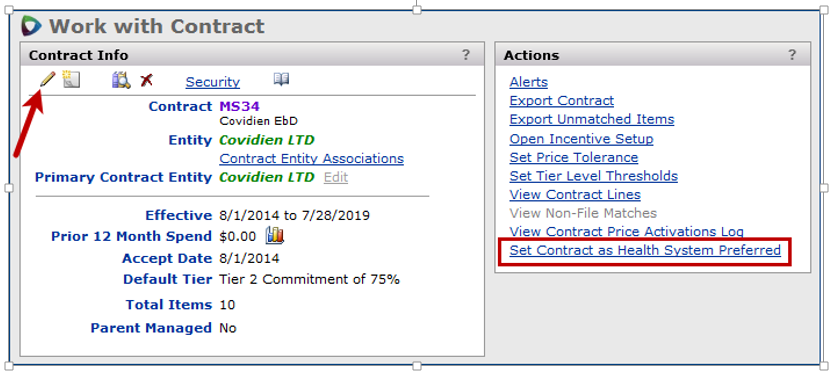
Set the Health System Preferred Flag for a Contract
Contracts flagged as Health System Preferred are indicated by two red asterisks ** in the SCM panels and reports.
This visual indicator (**) identifies all "Health System Preferred" contracts in the SCM interface (see example in Figure 23). So, if a contract has the Health System Preferred flag enabled, the two red asterisks will appear next to it in searches, contract information panels, and all other locations where contract numbers are displayed.
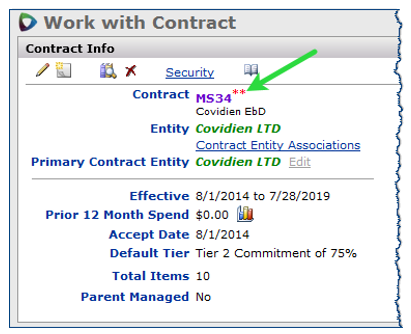
Health System Preferred Contract Indicator
A Preferred filter (Figure 24) is located on the Supply Contract Workbench, the Services Contract Workbench, and other panels that list contracts. When this filter is selected, only contracts that have been flagged as Health System Preferred are displayed in the contract list.
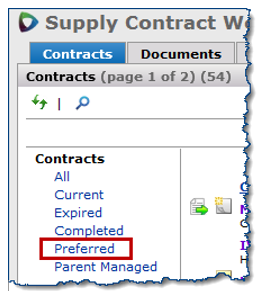
Health System Preferred Filter on Supply Contract Workbench
The Health System Preferred contract flag (**) also appears next to the contract number on reports (Figure 25). The field Health System Preferred YN is available on reports, and on the report export.
Figure 25 is an example of part of a report with the new flag ** and the new HealthSystemPreferredYN field.
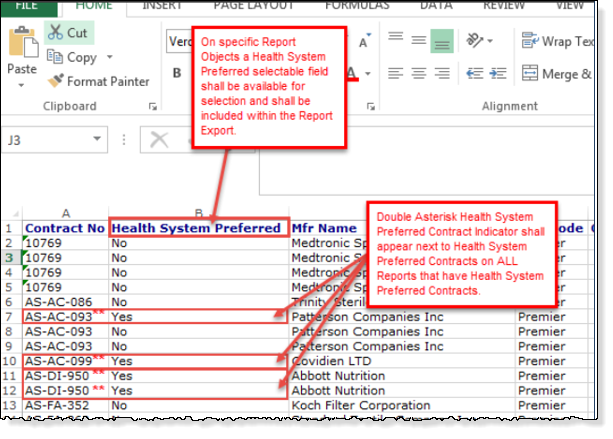
Health System Preferred Filter on a Report (in Excel Format)
The ** flag appears and Health System Preferred YN is a selectable field on these report objects:
Contract |
CustDeptSpend |
ItemVendorUom |
ContractActivation |
DeptIssueSpend |
LotTrackInventoryTransactions |
ContractCaA |
DeptUsage |
Overpayments |
ContractDetail |
DeptUsageSummary |
POandReceipt |
ContractDetailAccepted |
InventoryTransactions |
POReuisitionAnalysis |
ContractDetailActivated |
InventoryTransactionsAll |
PriceChange |
ContractFeeInvoiceDetailPIL |
InvoiceMatchDetailPOLine |
PurchaseOrderDetails |
ContractHeaderDetail |
InvoiceMatchDetailPOLineView2 |
PurchaseOrderDetailsPlusInvoice |
ContractHeaderDetailCaA |
InvoicePO |
PurchaseOrderHeaders |
ContractHeaderDetailWithPrices |
ItemCatalog |
RecoverableSavings |
ContractPriceActivationLogLst |
ItemCatalogUserFields |
ServicesContract |
ContractPriceActivations |
ItemInventory |
ServicesContractApprovals |
ContractPriceChangeLog |
ItemInventoryAllVendors |
ServicesContractUserFields |
ContractSecurity |
ItemInventoryExtract |
ServicesContractUserFieldsAlt |
ContractStatistics |
ItemInventoryUsage |
SpendItemDetail |
ContractStatisticsSummary |
ItemInventoryUsageSummary |
SpendItemSummary |
ContractUserFields |
ItemInventoryUserFields |
VendorFees |
![]() For relevant contracts, the Preferred Contract ** flag has been added to graphs in SCM.
For relevant contracts, the Preferred Contract ** flag has been added to graphs in SCM.
Graphs with the ** designator include several Dashboard graphs, Savings graphs, and Tier graphs.
Copyright © 2023 by Premier Inc. All rights reserved.