|
Release 7.13, April 2022 PremierConnect® Supply Chain ERP & Sourcing and Contract Management |
||||||||||||||||||||||||||||||||||||||||||||||||||||||||||||||||||||||||||||||||||||||||||||||||||||||||||||||
New Features and Enhancements - Release 7.13A summary of enhancements made in updates since Release 7.12 is also included in this document. ERP Materials Management and Financials
Sourcing and Contract Management (SCM)
Web Financial ReportingAdministration for SSO Sites
ERP Materials Management and Financials
|
||||||||||||||||||||||||||||||||||||||||||||||||||||||||||||||||||||||||||||||||||||||||||||||||||||||||||||||


 |
 |
|
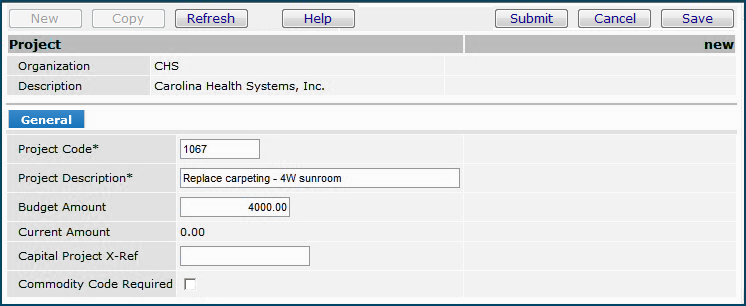
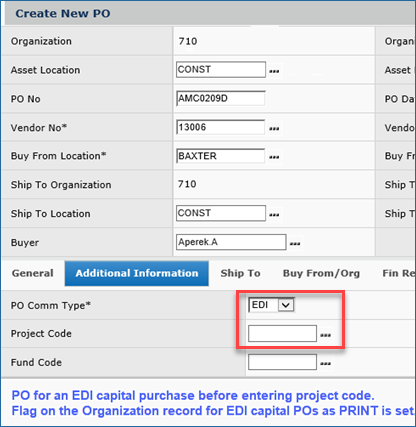
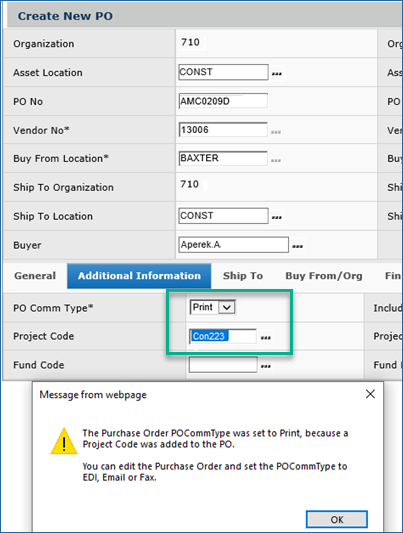
A. Capital PO Before Entering a Project Code |
B. Capital PO After Entering a Project Code |
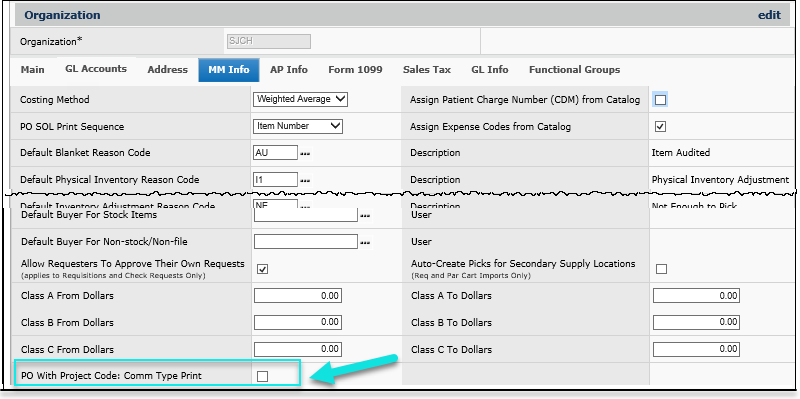
Using the PO With Project Code: Comm Type Print Organization Setting for a Capital PO
Materials Management main Contents > Purchasing >Purchase Orders by PO or Create Date > New
In Figure 5A, the user has not yet entered a project code, so the EDI PO Comm Type setting is still visible. In Figure 5B, when the user enters a project code, the PO Comm Type changes to Print. The PO Comm Type is still editable, if desired, and can be changed.
 Bill-only requisitions can now be imported into ERP.
Users need to import bill-only requisitions into ERP, in particular, because bill-only requisitions must often be passed between surgery management programs and ERP. A bill-only requisition import is available with this release.
The new bill-only requisition import uses a revision of the existing requisition import, with additional fields and the Type REQUISITIONBILL (Table 1). Protection rules for ePHI apply to bill-only and all requisition imports.
The bill-only requisition import contains these additional fields:
- Receipts Required YN
- Physician ID
- Patient ID
- Patient Account Number
- Case Number
- CaseType
- Case Date
Additionally, for bill-only requisitions, values are required in fields Vendor, Buy From Location, Manufacturer ID, Manufacturer Item Number, Vendor Item Number. Bill-only requisition lines created from imports default to Receiptless, unless the Receipts Required column is set to "yes.".
Bill-only requisitions can be imported as "mixed" with other non-bill-only requisitions. A new requisition is created when the department, case information, or Vendor/Buy From Location changes in the import batch.
Note: Stock items are not allowed in bill-only requisitions. If you enter stock items on the bill-only import template, upon upload, the line will fail to be imported, and an error message will result.
The bill-only requisition import uses the standard import from the menu location: Materials Management > Requisitioning > Requisition Imports. See the online documentation topic "Requisition Import and Replenishment of Supply-Dispensing Units" for details on the import process.
In the ERP application, the new fields are visible on the Requisition Import Details list (Figure 6). If the user is not allowed to work with ePHI data, the case and physician columns do not appear (Figure 7).

Requisition Import Details for a Bill-Only Requisition - ePHI Allowed
Materials Management main Contents > Requisitioning > Requisition Imports > menu > View Import Details
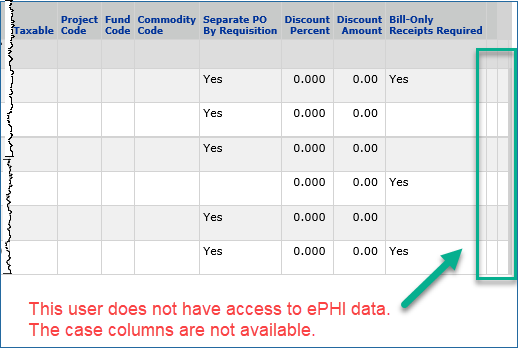
Requisition Import Details for a Bill-Only Requisition - ePHI Not Allowed
Materials Management main Contents > Requisitioning > Requisition Imports > menu > View Import Details
A new Bill Only tab is available on the requisition import lines edit detail (Figure 8). This tab displays values for the new case and physician fields above. The values are protected by the ePHI rules and user settings.
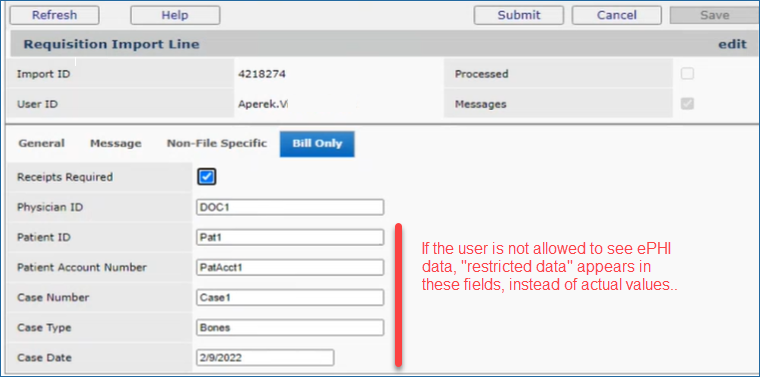
Requisition Import Line Bill Only Tab: ePHI Data Allowed for User
Materials Management main Contents > Requisitioning > Requisition Imports > menu > View Import Details > Edit
The revised import file fields are described below in Table 1. The new columns AM to AS for bill-only imports have been added. The import must be in .csv format with the final line <EOF>
Contact the Help Desk for a copy of the template. It includes detailed instructions on the worksheet tabs.
Table 1 - CSV File Fields for Importing Requisition Item Data |
|
| Field | Entry |
| Row 1 - Header | |
| Column A: REQUISITION | The word REQUISITION or one of the following words is required: Requisition - used for standard requisitions (required pick and confirmation) RequisitionBill - used for bill-only requisitions |
| Column B: CustomerID | Your customer ID as defined by the system. Contact customer support if you do not know your ID. |
| Column C: Time Stamp | The date of the export
in MM/DD/YYYY format; e.g., 05/06/2022 for May 6, 2022. |
| Row 2
- Column Names Enter the column names exactly as they appear below, e.g., SUPPLYINGORG in Column C. |
|
| Column A: Org | Your organization's ID, up to 15 characters. This field is required. |
| Column B: Dept | Your
department ID, up to 15 characters. This field is required. (You can also specify an asset location in this field.) |
| Column C: SupplyingOrg | The code for the organization that supplies you, up to 15 characters. This field is required. |
| Column D: SupplyingAssetLoc | Your supplying asset location, up to 15 characters. This field is required. |
| Column E: ItemNo | An item number, up to 15 characters. Required. |
| Column F: OrderedQty | The ordered quantity -- a whole number up to 9 places long. Required. |
| Column G: OrderedUOM | The ordered UOM, up to two characters (e.g., CS). If no UOM is given, the system
uses the default issuing UOM. |
| Column H: AllowBackordYN | Allow backorders? 0 if No; 1 if Yes. Required field. |
| Column I: CaseCartLineID | The ID associated
with a line on a case cart, if there is one. Must be a whole number up to 10 places long. If no value exists, enter 0. Required field. |
| Column J: RequestedDate | The requested date in MM/DD/YYYY format. This field is optional. |
| Column K: UserID | The user's
ID, up to 20 characters. This field is optional. If a value is
not entered, the default is the UserID performing the import. If a value is entered, it must be the same for each row of data. |
| Column L: ReqDescription | A description of the requisition. |
| Column M: ChargeType | 0=Regular Req, 1=Credit Req, 2=Charge Only Req For Pyxis units, use the ChargeType of 0. |
| Column N: LotNo | Optional, indicates Lot Number for a Lot Tracking enabled item. |
| Column O: ExpDt | Optional, indicates Expiration Date for a Lot Tracking enabled item date in MM/DD/YYYY format. On import, the date is dropped if its format is invalid. |
| Column P: SerialNo | Optional, indicates the Serial Number for a Lot Tracking enabled item. |
| Column Q: BypassQtyAdjustYN | Optional, determines whether the Order Qty should be adjusted based on previous activity. |
| Column R: PatientID | Optional. If used a patient charge is created. |
| Column S: ChrgDeptOvrd | Optional. If used, populates the Charge Department Override on a requisition line. The requisition line Charge Organization Override is derived from the organization record. |
| Column T: ItemDesc | Required if the import line is a non-file line. Non-file lines use this column, instead of Item Number. If both an Item Description and Item Number are present on the import line, the import returns an error, and the import line is bypassed. Both file and non-file line can be included in the same import. |
| Column U: VendorNo | Required for bill-only requisition imports. Otherwise, optional. Contains the vendor's identifier in the application. |
| Column V: BuyFromLoc | Required for bill-only requisition imports. Otherwise, optional. Contains the vendor buy-from location name. |
| Column W: MfrID | Required for bill-only requisition imports. Otherwise, optional. Contains the manufacturer's identifier in the application. |
| Column X: MfrName | Optional. Contains the manufacturer's name. |
| Column Y: MfrItemNo | Required for bill-only requisition imports. Otherwise, optional. Contains the manufacturer's identifier for the item. |
| Column Z: VendorItemNo | Required for bill-only requisition imports. Otherwise, optional. Contains the vendor's identifier for the item. |
| Column AA: UnitCost | Optional. |
| Column AB: ExpenseCode | Optional. |
| Column AC: TaxableYN | Defaults to not taxable (N). |
| Column AD: ProjectCode | Optional ID for a project. |
| Column AE: FundCode | Optional ID for a fund. |
| Column AF: CommodityCode | Optional commodity code. |
| Columns AG, AH, AI: Financial reporting fields |
Optional fields for financial reporting, if defined at a site. |
| ColumnAJ: SepPOByReqYN |
Optional code to generate separate purchase orders for requisitions. 1=Generate separate POs 0=Do not generate separate POs (default). |
| Column AK: DiscountPct |
Required for non-file items. 7 characters max. |
| Column AL: DiscountAmt |
Required for non-file items. 19 characters max. |
| Column AM: BO ReceiptsReqYN |
Used with REQUISITIONBILL type. Indicates if receiptless (0) or receipts required (1). No= 0; Yes =1. Sets to 0 (zero) if not entered. |
| Column AN: BOPhysicianID |
50 characters max. Optional for bill-only requisition imports |
| Column AO: BOPatientID |
50 characters max. Optional for bill-only requisition imports |
| Column AP: BOPatientAcctNo |
50 characters max. Optional for bill-only requisition imports. |
| Column AQ: BOCaseNo |
50 characters max. Optional for bill-only requisition imports |
| Column AR: BOCaseType |
50 characters max. Optional for bill-only requisition imports |
| Column AS: BOCaseDate |
20 characters max. |
| Rows 3 and on - Data records | |
| Last Row - <EOF> | |
Remitra users: The Invoice Create Date has been added to the existing invoice export file.
This enhancement will help Remitra sites to calculate metrics and improve invoice process performance. Figure 9 is an example of the import file with the new column. The Invoice Create Date on the import file appears on the invoice list drop down panel as the Create Date.
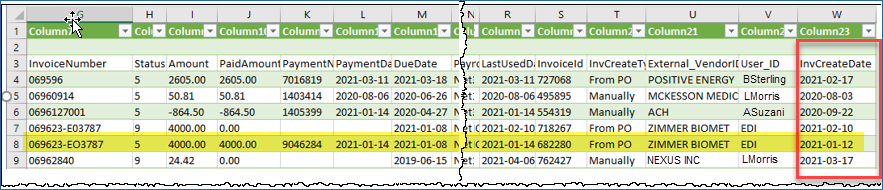
Portion of Remitra Import Table with New Invoice Create Date
Figure 10 displays an example of the field (Create Date) on a Remitra invoice on the ERP invoices list. For Remitra invoices, this date is the same as a date on the Excel spreadsheet in the column Invoice Create Date.
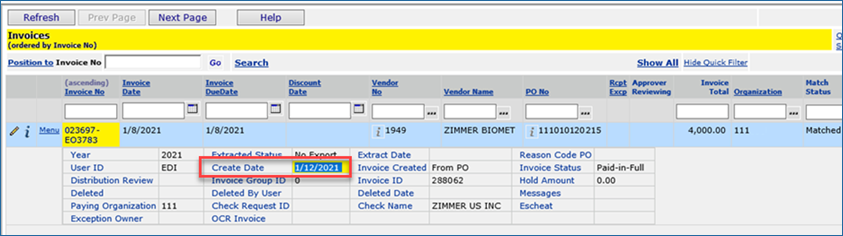
Remitra Invoice on the ERP Invoices List
Accounts Payable main Contents > Invoicing > Invoices
EDI Users: EDI 855 and EDI 832 records older than 30 days are now purged.
EDI users would like to archive old EDI records and remove them from the list so that they can manage their daily queue more efficiently.
With this release, EDI 855 and EDI 832 records older than 30 days are purged.
- In the PO Confirmation Imports and View All EDI Confirmation Exceptions lists, the Acknowledge Date will be used as the start of the 30 day count.
- For the Vendor EDI 832 Catalog Imports list, the date received will be used as the start of the 30 day count.
The current system rules already archive EDI 810 invoices and EDI 856 documents.
Financial reporting fields have been added to the order guide/par cart import.
Users needed the financial reporting fields (FinRptFld1 to FinRptFld3, defined by the site) to be included on the Order Guide (OG) / Par Cart (PC) imports. When financial reporting fields are required by a GL account associated with an order guide/par cart, the import would fail.
To resolve this issue, the columns (FinRptFld1 to FinRptFld3, as defined by the site) for financial reporting have been added to the View and Edit pages accessed from the Order Guide Par Cart Import Details panel, and to the import/export template in columns R, S, and T.
Sourcing and Contract Management (SCM)
Better contract information is available on the Contract Workbench Price Changes panel with the addition of several columns.
The Supply Contract Workbench Price Changes now contains these fields: Owner, Entity, and GPO. Figure 11 is an example.
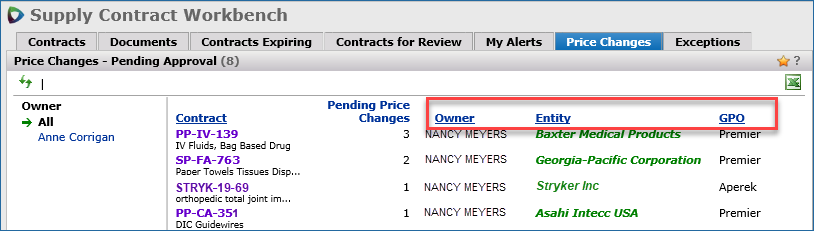
Price Changes Panel New Columns
On the Contract Lines panel, the tier displayed as the current tier defaults to the same active tier indicated on the contract header.
Activating a new tier deactivates the current tier. Previously, on the Contract Lines panel, SCM did not indicate which tier was the active one. So, users would need to refer back to the Tiers tab to determine which is the active tier. To help make users more productive, and avoid inefficiency, the Contract Lines panel now indicates inactive tiers with the label Inactive (Figure 12), and points to the current, active tier. Previously, the Tier filter was initially set to All; it now defaults to the active tier.
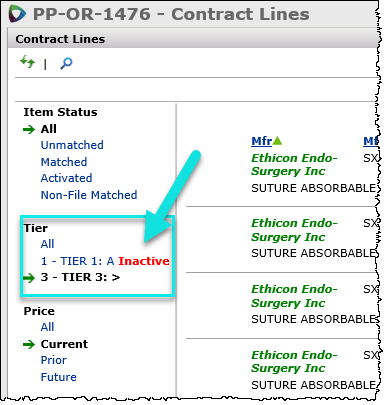
Contract Lines Panel Indicates Inactive Tier(s)
SCM main Contents > Contract Workbench > Contracts > locate contract > open contract > Actions > View Contract Lines
New columns for Prior 12 Month Spend and Total Contract Spend are available on the Expired Contracts panel Excel Output.
When you export the Expiring Contracts panel contents to Excel, you will see that two new columns (M and N) are available: Prior 12 Spend and Total Contract Spend (Figure 13).

New Columns on the Excel Output for Expired Contract Spend
SCM main Contents > Supplies > Contracts > Contract Workbench > Contracts Expiring > click Excel icon ![]() .
.
Price changes for Vizient contracts can no longer be set to "Accept Leave."
Price changes in Vizient contracts can only be set to Accept Remove or Reject. The field for Accept Leave is nonactive. If you mouse over Accept Leave, a message appears (Figure 14).
The reason the Accept Leave option is not available is that the contract data belongs to Vizient and the vendor. So if you want to change the price, you must remove the item from the Vizient contract. If the Vizient contract data is wrong, contact your Vizient Representative to get a resolution for future purchases.
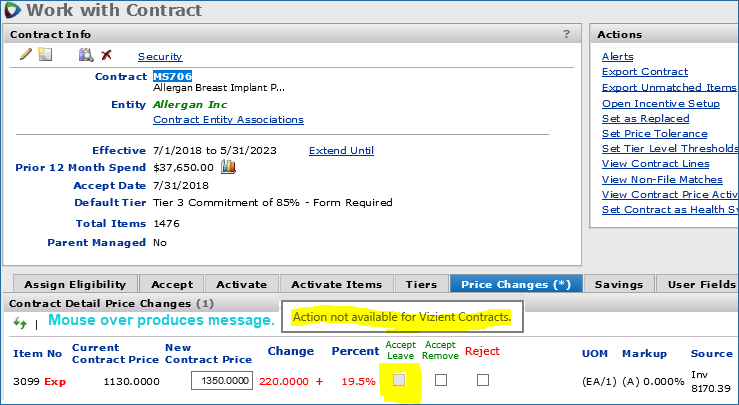
Price Changes Panel for a Vizient Contract: Accept Leave is Not Available
SCM main Contents > Supplies > Contracts > Contract Workbench > Price Changes > locate/select contract
Web Financial Reporting
Web Financial Reporting Users only: A new feature allows users to assign descriptions to expense account segments for use in financial reporting.
Web Financial Reporting requires the expense segments of account codes to have a description/name for detail reports. This enhancement lets users efficiently and easily create descriptions for account segments.
Security: To use this feature, the role object "AccountDesc" must be set to Modify or higher in a user's role. This is a new role object whose function is "Maintain GL Expense Account Part Descriptions."
Here is how this new account description feature works.
The application identifies all distinct expense account segments in a site's chart of accounts. These segments are either P2 or P3, whichever a site uses for expenses. This data, along with expense segment descriptions, populates a new table for use in Web Financial Reporting. Users can assign a description to individual expense segments, one at a time, from a list on a General Ledger panel, or by using an import to add descriptions for multiple expense segments.
The list of distinct account expense segments is available in this location:
General Ledger > Account Management > Account Descriptions (Figure 15).
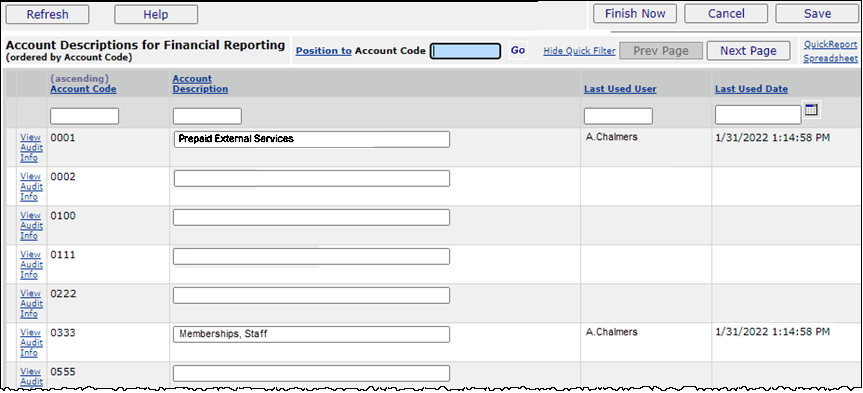
List of Expense Segments in Accounts for Entering Account Descriptions
General Ledger main Contents > Account Management > Account Descriptions
If an expense segment in the new table is also listed with a description in the Expense Codes table (Materials Management > Tables > Expense Codes) and you edit its description in the new table, the changed description also appears in the Expense Codes table. The changed description will apply to all organizations that use the expense code.
To add/change an expense segment description on the Account Descriptions... panel,
- Enter the description in the Account Description box.
- Click Finish Now.
To import expense segment descriptions,
This process uses the standard import.
- From the Account Descriptions for Financial Reporting panel (Figure 15), click Spreadsheet (upper right).
ERP downloads the data to a spreadsheet. - Open the spreadsheet for editing.
- For any account segment that you wish to assign a description to, enter the description in the AccountDesc column. For example, in Figure 16, the account description Staff Flex is assigned to Account Code 1002.
If you wish no description assigned, leave the cell for the description blank. - Make sure that the last data cell contains <EOF> by itself. This is "end of file." See Figure 16.
- Save the spreadsheet as a .csv file. This is the file that you will import.
- For the import, go to General Ledger > Imports/Exports > Account Description Import (Figure 17).
- Click New. The Import panel appears. This feature uses the standard import, as summarized below.
- Enter the file that you wish to import in the File to Upload field.
- Click Browse (on Microsoft IE or Edge) or Choose File (on Chrome) to locate the file.
- Click the file to select it.
- At this step, you have a choice. If you only want to upload the file, and import it later, select the box labeled Load and Verify, No Import. Click Submit.
- Otherwise, leave the Load and Verify... box blank and click Submit to upload and import the file.
The system attempts to upload your file and validate it. If successful, the system sends you a message. If the system cannot upload your file and validate it, error messages appear. - Read and close the error messages.
- Make changes as needed in your .csv file and try the upload again.
- Click Refresh to see your file listed. The account descriptions that you imported are applied to the accounts.
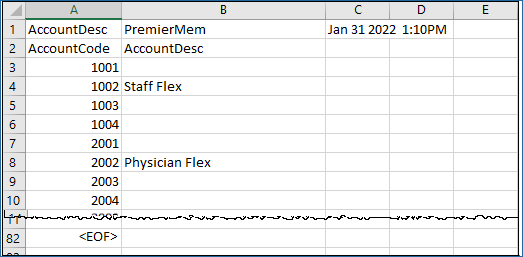
Spreadsheet for Importing Account Descriptions
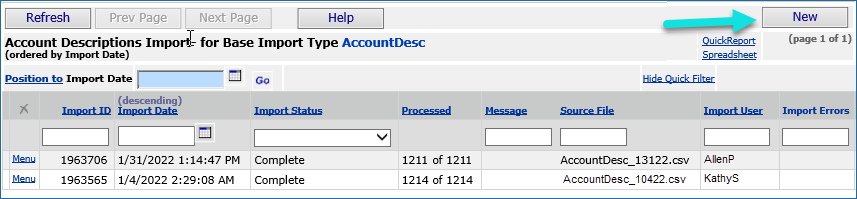
Import List for Account Descriptions
General Ledger main Contents > Imports/Exports > Account Description Import
Administration for SSO Sites - User Template and Import
The User Data Profile Template now allows administrators to delete a user's data profile (organization, department, and/or asset locations).
Previously, only "add" and "change" were allowed.
Note: Importing data profiles is explained in detail in the online documentation topic "Create New Data Profiles via Template Import."
Security: This feature is controlled by the "Administration" role object.
- On the template, enter "D" in the Action column of any data profile template row containing values that you wish to delete (Figure 18).
The yellow column -- Data Profile -- is required.

Data Profile Template: Deleting a Data Profile
ERP checks that the data profile is not assigned to any user before it runs the delete. If it is assigned to someone, the delete fails and a message appears.
Here are additional rules for data profile records that are to be deleted:
- When a Delete (D) record doesn't have an organization, department, or asset location entered, then the entire data profile will be deleted.
- When a Delete (D) record has only an organization entered, then the organization and all the departments and asset locations for that organization will be deleted from that Data Profile.
- When a Delete (D) record has an organization and department entered, then the department for that organization will be deleted from that Data Profile.
- When a Delete (D) record has an organization and asset location entered, then the asset location for that organization will be deleted from that Data Profile.
- When a Delete (D) record has an organization, department, and asset location entered, an error message appears.
- When a Delete (D) record has a department entered, but no organization, an error message appears because the same department name can be present in multiple organizations.
- When a Delete (D) record has an asset location entered, but no organization, an error message appears, because the same asset location name can be in multiple organizations.
Further detailed instructions are on the Data Profile Template worksheet tabs.
A new utility import is available that makes it easier to import and update missing information for SSO users of ERP.
Both a manual and an automated process are available for this import.
Security: Users working with this feature must have the role object "SSOUserMaintImport" set minimally to Modify.
When a user is provisioned for SSO, Premier staff create a "shell user profile." Once the user "shell" has been created, the site administrator must manually assign the role, data profile, default organization, default department, and other details. The process, until this release, relied on the existing user maintenance import template. That template has other fields in whose data the site administrator must manually key-in or copy. To improve the process, this release has a new user data import template available that handles more of the needed user data.
Manual import process
From the Administration menu, you can access a list of SSO users that are missing required information such as role, data profile, default organization, and department. A second menu element provides the import. See Figure 19.
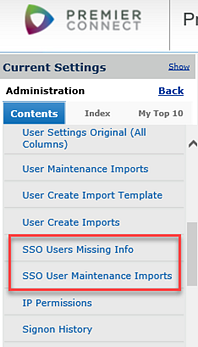
Administration Table of Contents with New SSO User Maintenance Elements
An example of the SSO Users List is in Figure 20.
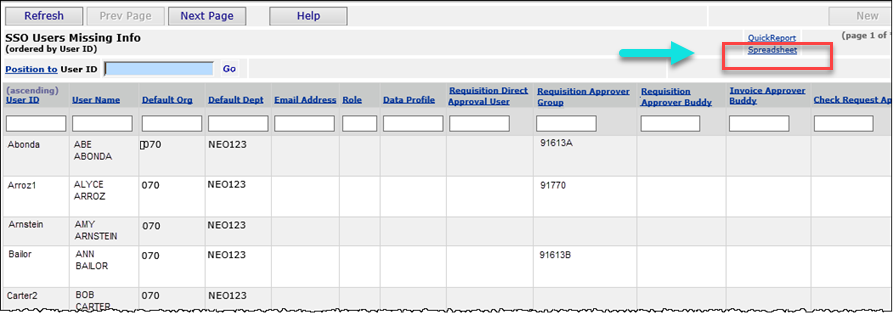
List of SSO Users Needing More User Profile Data
Administration main Contents > Administration > SSO Users Missing Info
On the list (Figure 20), the Spreadsheet link creates an Excel document in the format of a new SSO User Import. Administrators can open the spreadsheet and provide missing information, along with additional approval values, if needed by the user. Save the spreadsheet as a .csv file. The last field must be <EOF>.
You can then upload the .csv file to ERP using the new SSO user data import function that will apply the changes to the user profiles. The menu option SSO User Maintenance Imports (Figure 19) opens a list of existing imports. Figure 20 is the import list where you can see current imports and create new ones.
- To create a new import from a .csv file, click New (FIgure 21).
The import panel opens. This is the standard import where you select the file to bring in.
- Use the Browse button to locate the file.
- Click Submit to upload it.
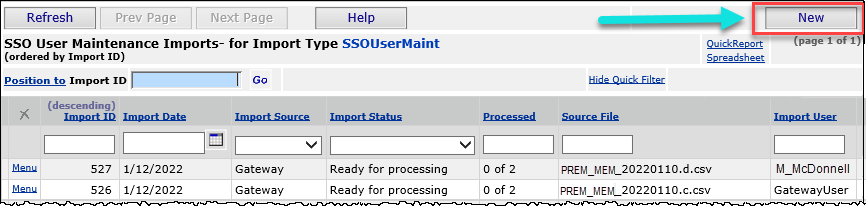
SSO Imports List with New Button to Create a New Import
Administration main Contents > Administration > SSO User Maintenance Imports
On the Imports List, the standard import functions are available, including the ability to view the details of the import, see messages, etc. The import process applies the changes from the import to the user and user settings tables in the application. Existing validations already in the ERP ensure that only correctly formatted data is used to update the actual user values.
Automatic import process
The automated process occurs through the Gateway when template files with completed data from an external application are dropped in a Gateway in-box. The import is available from the Imports List (Figure 21). This process needs no action by your site administrator; except in the case of errors which may require a conversation involving a corrected re-import.
Enhancements and Problem Fixes from Updates
Hotfix 7.12.0.1 and Update 7.12.1
ERP Problem Resolutions
- 1099 forms: Several 1099 .dat (1099-MISC and 1099-NEC) files were rejected by the IRS. Other files, not discernibly different from the rejected files, were accepted. The problem could have resulted from IRS requirements changes that only affected some files, and that were not captured in the ERP code. To resolve the problem, ERP code that generates the 1099 .dat transmission files was revised for all the 1099 changes in the IRS "Publication 1220 (Rev.10-2021)" PDF file, section 3.
If you have been notified that the IRS rejected your site's file upload, please contact the Help Desk. They will set the 1099 file status back to "ready for printing," which unlocks the 1099 year and allows them to regenerate their files for re-transmission to the IRS. - 1099 NEC: An additional problem with Address Line 2 not fully printing on 1099 NECs forms has been resolved.
- A problem occurred in Accounts Payable, for matching PO invoices, for manual invoices, and for check requests: When entering a distribution line and pressing Enter, the focus was returning to the Position To field instead of returning to the first available input field for the GL Account. The focus now returns correctly.
- With Internet Explorer, when selecting Range in any report filter, the second input box did not appear. The second input box for the end of the Range value has been restored.
- Users could over-receive (and receive) non-file item quantities after canceling an unreceived quantity. This situation caused lopsided inventory transactions and incorrect GL transactions.
Resolution: In the future, over-receiving of non-file items is not allowed. Here is a scenario:- A user partially receives a purchase order for non-file items.
- A user then cancels the Unreceived Quantity.
- The user creates an invoice from the purchase order for a higher quantity than was received.
This action produces a quantity exception, displayed in a warning on the invoice page.
- The user tries to clear the exception using the Invoice Exceptions panel, and selects "Invoice Correct."
- Clicking Submit displays an error with the message:
" Clearing this quantity exception using "Invoice Correct" causes the Purchase Order line affected to be over-received. Quantity exception can only be cleared using "Receipt Correct" option."
- With this release, the only way users can clear this kind of quantity exception is to select "Receipt Correct" (followed by Submit). - In some situations involving receiving exceptions, when matching POs invoices, ERP was not correctly updating partially matched and completely matched PO line counts. The invoice match status was Partially Matched, but no further lines were available for matching; so, the match status was incorrect.
This problem has been resolved so that updates on invoices with receiving exceptions are handled correctly, and the invoice match status is accurate, with lines available for matching when the status is "Partially Matched."
- With Internet Explorer, when selecting Range in any report filter, the second input box does not appear. The second input box for the end of the Range value has been restored.
- PO auto authorizations were failing for FAX POs because the application was looking for a
FAX number for both the Vendor Buy-From Location and the buyer. This problem has been resolved:
Buyers do not need a FAX number for a FAX PO to auto authorize.
Updates 7.12.2
ERP Problem Resolutions
- Better information is available when UOM conversion factors are changed, and new and old conversion factors are not evenly divisible. With this update:
- When a user changes a UOM factor to a value that is not evenly divisible by the original UOM conversion factor, a warning message appears. The user can continue, but the following is the result because this change is not allowed:
- The item vendor record changes to a status of "Incomplete."
- The item inventory/item catalog status is also be set to "Incomplete." The item cannot be used. Existing logic that syncs UOM conversion factors across multiple matching item vendors may also trigger the "Incomplete" status.
- The user can edit the item UOMs to make the new conversion factors evenly divisible with the old ones.
Then, the item vendor record returns to "Complete" status. The item inventory/item catalog record changes to "Complete" and is returned to "Active" status. The item is ready to use again.
The audit captures non-divisible UOM changes in the new field FactorErrYN which identifies an item vendor that has UOM factor errors.
- In Internet Explorer, some panels, such as editing a purchase order or creating an invoice, were not rendering correctly.
This problem has been resolved.
SCM Problem Resolutions
• In a multi-tier contract, when an item had multiple price records but no price existed for the selected activation tier, SCM was using an old price record (not the most current price) to populate contract prices in several areas, including:
- Activate Items tab > click the Activated count > Vendor Contract Items panel. New Contract Price was incorrect.
- Activate Items tab > click Manually Activate Items > Select Items For Activation panel. New Contract Price was incorrect.
- Contract export spreadsheet: Contract Price column was incorrect.This problem was traced to the code that syncs price records, and has been fixed. In these situations, contract prices are now correct.
Updates 7.12.3
ERP Problem Enhancements and Resolutions
- In-tolerance EDI PO confirmations on the EDI Confirm Exceptions list no longer display Clear Price Discrepancy in the first column.
These confirmations, which are in tolerance, no longer require clearing a price discrepancy. The Clear Price Discrepancy link does not appear. For these confirmations, a new column In Tolerance appears at the end of the row for the confirmation (Figure 22). The system sets this value to Yes for in-tolerance confirmations.
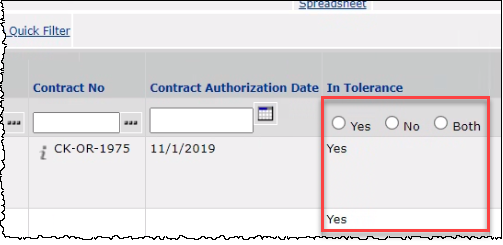
The New In-Tolerance Column on the EDI Confirmation Exceptions List
- Users would like to create one scheduled job to process recurring invoices every month.
In setting up a single scheduled job to process recurring invoices each month, ERP was displaying an error about the period and year being beyond the permitted AP boundaries. The impact was that a separate scheduled job had to be created for each month.
The problem occurred because removing the invoice date caused the period and year validation code to malfunction.
The scheduled job Parameters panel now allows the Invoice Date to be left blank so that one job can be set for multiple months. When the invoice date is blank, the scheduled job will set the Invoice Date to the current date. Likewise, if the current Period/Year are set, ERP will use the AP current period/year.
To set up a scheduled job to process recurring invoices monthly
- Open the Scheduled Jobs list. (Administration > Misc Functions > Scheduled Jobs).
- Click New.
- Select the Job Name as: "Process Recur Invoices."
- Clear the Invoice Date field in the Job Parameters panel (on the bottom).
- Clear the fields Process Recurring Invoices for Fiscal Period and Fiscal Year in Job Parameters.
- Click Submit.
The recurring invoices job is scheduled.
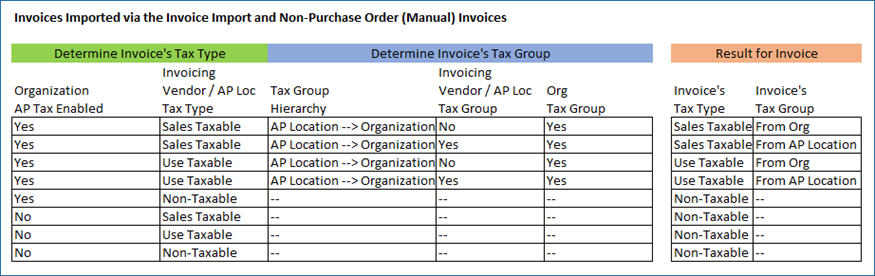
- Importing invoices and manually creating invoices was generating taxable invoices when the organization is non-taxable, but the AP location is taxable. Also, ERP was requiring users to enter an AP Tax Group even if the organization was taxable and had a Tax Group assigned.
In sum, ERP was not using the correct decision hierarchy to determine the tax group, but was only looking at the AP Location, and if none, an error occurred. Users need the correct taxable/non-taxable designation for an invoice based on the organization and the AP location setting, and not on just the AP location alone.
Resolution:
Sites have invoices in which the AP location is taxable, but the organization is not. In this case, invoices will be set as non-taxable. When the organization is taxable, ERP locates the Tax Group on the AP location. If none is assigned, ERP uses the default Tax Type and Tax Group from the organization AP Info record.Below is a table of the decision elements for taxes on imported/manual invoices:
Table 2 - Tax Decision Hierarchy for Invoice Imports