General Ledger Account Mass Maintenance Version
Contents
Overview
General Ledger account mass maintenance provides mass delete and mass update of GL accounts. Mass Maintenance also lets you restore deleted accounts and roll back account changes that you make. Mass Account Copy provides a way to copy accounts across departments within the same organization, or across organizations.
Mass Account Maintenance jobs run in async mode (i.e., as "batch" jobs).
Deleting and Reinstating Deleted Accounts
An account cannot be deleted if it contains data, or if it is referenced by a journal voucher. You can reinstate accounts that you have deleted using Mass Maintenance. When you delete one or more accounts, the settings for the account(s) are stored so that they can be retrieved. The system provides panels for reinstating the accounts.
Deleting Unused Balance Sheet Accounts
Enhanced validation in General Ledger allows you to delete unused balance sheet accounts. Previously (prior to Release 6.9), when a General Ledger user created a balance sheet account – possibly by mistake, intending to create a different kind of account – the account could not be deleted. The reason is that ERP assigns an open balance and period to the account. This enhancement allows users to delete unused balance sheet GL accounts.
To Delete a Single GL Account from the Accounts List
Also, see the discussion below about using account mass maintenance.
- From the General Ledger main Contents, select Account Management > GL Accounts.
The chart of accounts appears.
- Locate the account that you wish to delete.
- Select Menu > Delete.
The application displays a panel for you to verify that you want to delete the account.
- Click Delete.
The application performs these validations:
- Checks that the balance sheet account has had no activity (e.g., journal entries).
- Checks that all account data records are for period 0 and have 0 in the debit/credit amounts.
If both validations are successful, the account is deleted.
Updating Account Records and Rolling Back Updates
Mass Maintenance lets you update the values of the following fields in a GL account record:
| Account Type |
Summarize on JV Import (yes or no) |
| Account Sub Type |
Materials Transaction Account (yes or no) |
| Account Status |
User Defined Field 1 |
| Description |
User Defined Field 2 |
| Normal Balance |
User Defined Field 3 |
| Payroll Account (yes or no) |
Comments |
| Project Code Required on Requisition Line (yes or no) |
Mass Maintenance lets you "undo" updates that you make to accounts. The changes to the accounts can be rolled back to the original settings.
Before restoring changes to accounts, the system checks to determine if any changes were made to the account(s) since the Mass Maintenance job last ran. If the current settings for a changed account do not match the original settings stored when Mass Maintenance initially ran, the system displays a message. You can then decide if you wish to continue restoring the account information.
Security
Users are allowed to delete and update only accounts for organizations specified in their data profiles.
The field Allow Access to Mass Account Maintenance must be set on the user profile GL Limits tab (Figure 1) to give a user access to the feature. See Set Up and Maintain Users for details on working with user profiles.
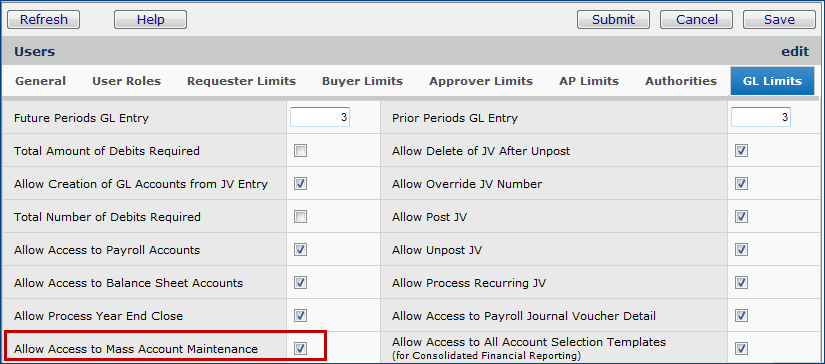
Figure 1 - User Security Setting for Account Mass Maintenance
Mass Account Copy
Mass Account Copy lets you copy accounts to other departments or other organizations.
Note: Your access to departments and organizations is controlled by your data profile.
- From the General Ledger menu, select Account Management > Mass Account Copy. On the Account Copy panel, click New.
- Choose the Organization from which to copy the account(s). (See Figure 2A.)
- Choose whether to copy the account(s) to other departments or organizations. (The procedure is the same.)
- Select Create as Suspended if you don't want the account active immediately.
- Click Next.

Figure 2A - Select Organization to Copy FROM
- On the Select Accounts to Copy From panel (Figure 2B), choose the department(s) from which you would like to copy the accounts.
- If you know the number of the department you want to copy, you may enter it as the From Department Beginning Segment, or you may select a department from the prompt. This field is required.
- You may narrow the Select Accounts list below by choosing a From Department Beginning Segment and a From Department Ending Segment. Making these
selections simply reduces the range of departments from which to choose at the bottom of the screen. After entering this information, hit Enter; the list below
will reflect your choices.
- To select all the departments on the list, click the down arrow on the Actions field and choose Select All. Hit Enter; all the departments in the list will be selected.
- Once you have selected the accounts you would like to copy from the Select Accounts list, click Next.
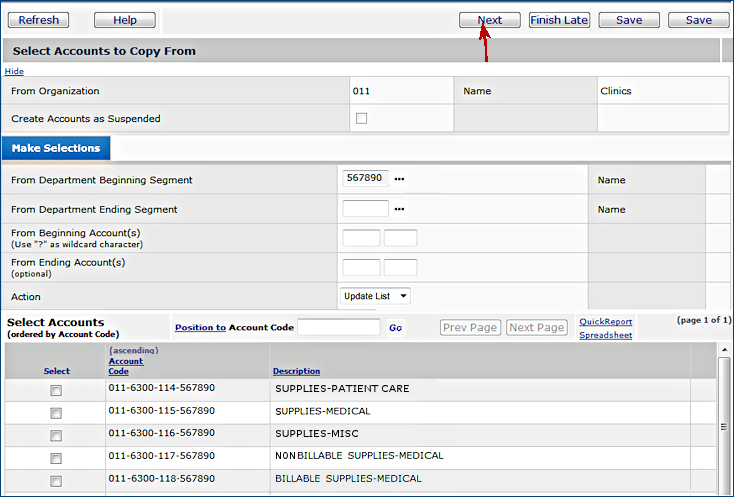
Figure 2B - Select Accounts to Copy
- On the panel Select Organizations to Copy To (Figure 2C), make your selections just as you did on the previous panel.
- Copy To Beginning Organization is a required field. Copy To Ending Organization is optional.
- After filling in these fields, you may hit Enter to update the Select Copy To Organizations list.
- Select the desired lines from the Select Copy To Organizations list.
- Click Copy.
- The transaction will be added to the queue of async jobs to be run. Until the job is run, it will be listed on the "Mass Account Copy" page.
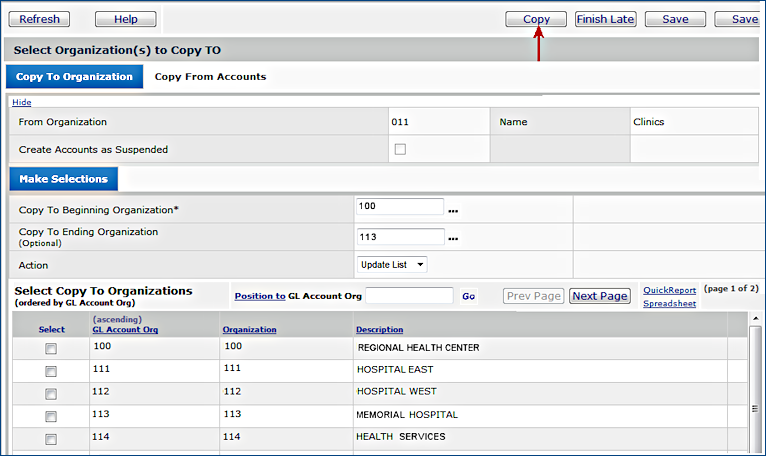
Figure 2C - Select Organizations to Copy To
Create and Run a Mass Account Maintenance Job
Creating an Account Mass Maintenance job involves defining the job and identifying the accounts. To delete accounts, you select the Delete option. To update accounts, you enter new record information for the accounts.
To set up a Mass Account Maintenance job:
- From the General Ledger menu, select Account Management > Mass Account Maintenance.
The list of account mass maintenance jobs appears, or No Data if no jobs have been created.
- Click New. The Mass Account Maintenance definition panel appears (Figure 3).

Figure 3 - Setting Up a Mass Maintenance Job
- Enter a name for the job in the field Account Maintenance Name.
- Enter a Description for the job.
- If you are deleting accounts, select the Mass Delete box. Otherwise, if you are only changing account information, leave the Mass Delete box blank.
- On the tab at the bottom of the panel, enter the organization and department account segments for the range of departments/organizations that you are working with.
- Enter the Beginning Organization account segment for the range of accounts.
- Enter the Beginning Department for the range of departments.
If you are only working with one organization's or one department's accounts, you do not need to enter the Ending Organization and Ending Department.
- Otherwise, if you are working with accounts from two or more organizations, enter the Ending Organization for the range.
- Similarly, if you are working with accounts from multiple departments, enter the Ending Department for the range.
- Click Next.
The Mass Account Maintenance - Select Accounts panel appears. (Figure 4 is an example.) The panel displays account codes that fall within the range you identified.
In Figure 4, the user has further specified Beginning Account(s) and Ending Account(s) segments to narrow the list of accounts to select from.
- To narrow the list of codes,
- Enter account segments value in Beginning Account(s) and Ending Account(s).
- Select Update from the Action field.
- Click Enter.
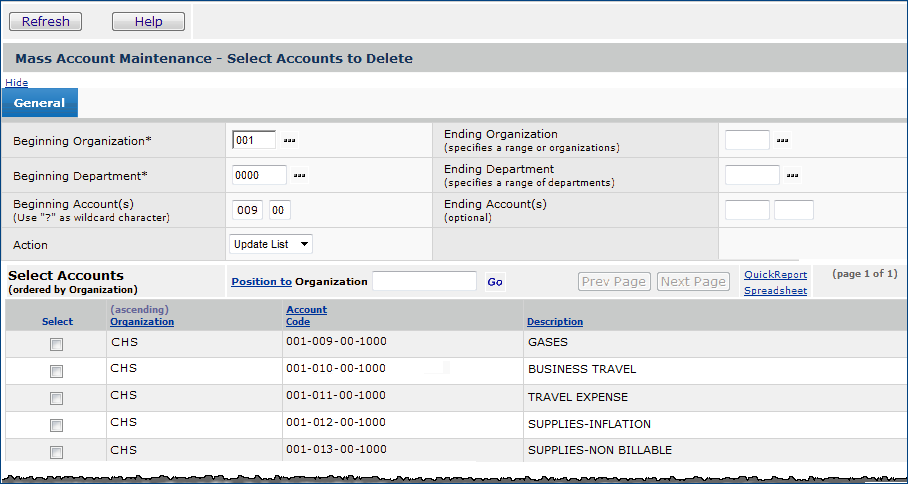
Figure 4 - The Mass Account Maintenance - Select Accounts Panel
- Select accounts from the list at the bottom of the panel.
- Select the box beside each account that you wish to delete or change.
- Or, to select all the account codes in the list, click the arrow in the Action field and choose Select All.
- Select Update List and press Enter. (Update List applies changes to the list.)
- The selection field for each account code is checked.
- When working with many account codes, choose Select All in the Action field.
-
Then uncheck the selection boxes for individual account codes that you do not want to update or delete.
- Select Update List, and press Enter.
- To unselect all account codes, choose Unselect All in the Action field.
-
Select Update List and press Enter.
- Click Submit.
The system displays an updated panel that shows the accounts you selected (Figure 5).
- Deleting accounts: If you selected the Delete field (Figure 3) to delete one or more accounts,
- Review the accounts to be deleted (Figure 5), and if they are correct, click Yes.
- Otherwise, click Cancel, and make any corrections on the Select Accounts panel.
The accounts are deleted and the system returns to the list of Mass Maintenance jobs.
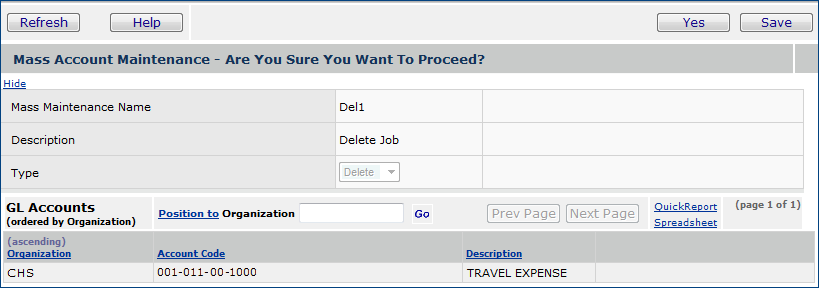
Figure 5 - Account Mass Maintenance: Confirming Account Deletions
- Updating account information: If you are changing account information, the Mass Account Maintenance panel appears. (Figure 6).
- Account record information that you can modify for the selected accounts appears on the Field Changes tab.
- The accounts that you have selected appear on the GL Accounts list at the bottom of the panel.
- Click Help on the panel for details about the fields.
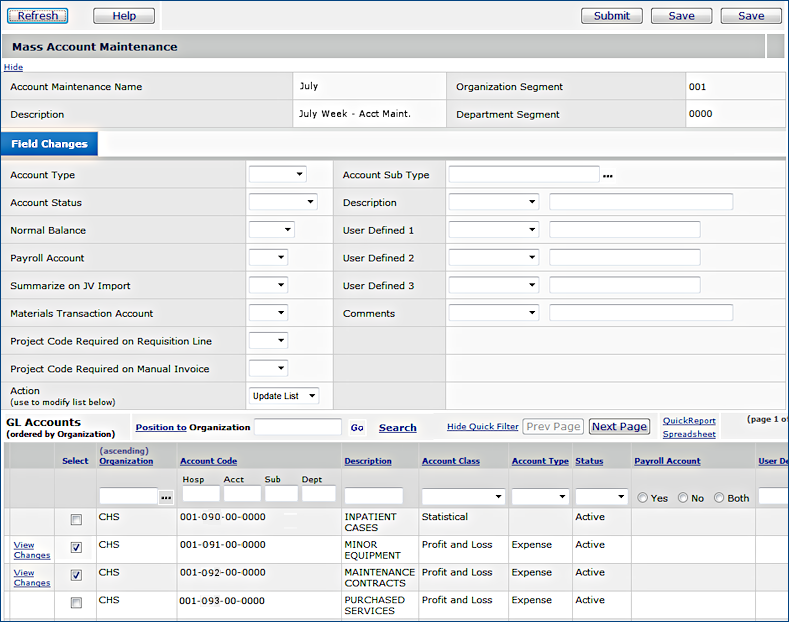
Figure 6 - Account Mass Maintenance: Changing Account Records
Figure 7 displays the Field Changes tab with updates specified for Summarize on JV Import, Materials Transaction Account, and Account Sub Type. The changes will be made to all the selected accounts; in this case, to accounts 001-00A-00-0000 and 001-00B-00-0000, listed on the bottom of the panel.
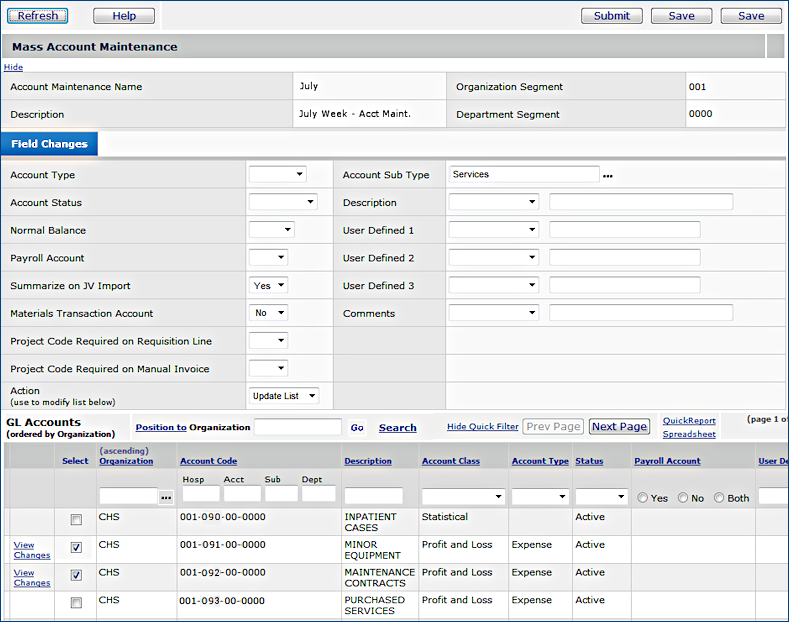
Figure 7 - Account Mass Maintenance: Overrides Tab for Changing Account Records
- Save the changes.
- Click View Changes next to a selected account to view the proposed changes.
- Click Submit to proceed with the changes or Cancel if you do not wish to make the changes.
-
Clicking Submit displays a panel with the changed information for your review.
- Click Yes to proceed with the changes (or Cancel if you do not wish to proceed).
Errors
If accounts in your mass maintenance job cannot be updated or deleted, the mass maintenance job does not complete, but stays in Entered Status. In this case, you will need to track and fix the errors, and Submit the job again.
Rolling Back Account Information Updates
You can roll back changes to account records that you have made in a maintenance Job. The Menu next to the job in the job list contains options for reverting to the previous account information.
- From the General Ledger menu, select Account Management > Mass Account Maintenance.
- The list of account mass maintenance jobs appears.
- Locate the job in the list that deleted accounts that you wish to restore.
- Next to the job, click Menu (Figure 8).
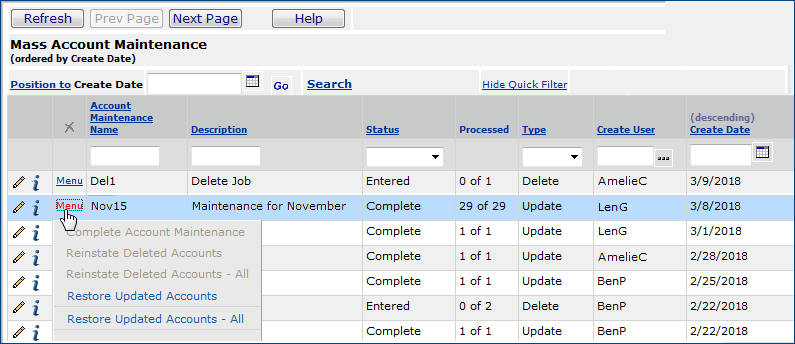
Figure 8 - Restoring Updated Accounts
-
To restore all the accounts that were updated by the job:
- Select Restore Updated Accounts - All.
The system displays a panel asking you to confirm the reinstatement of the account(s) (Figure 9).
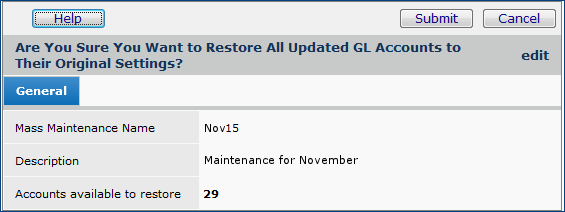
Figure 9 - Confirm Restoring All Updated Accounts
- Click Submit.
The account(s) are reinstated, and the system returns to the Maintenance jobs list.
-
To restore selected accounts:
- Select Restore Updated Accounts.
The system displays a panel with accounts updated by the job (Figure 10).
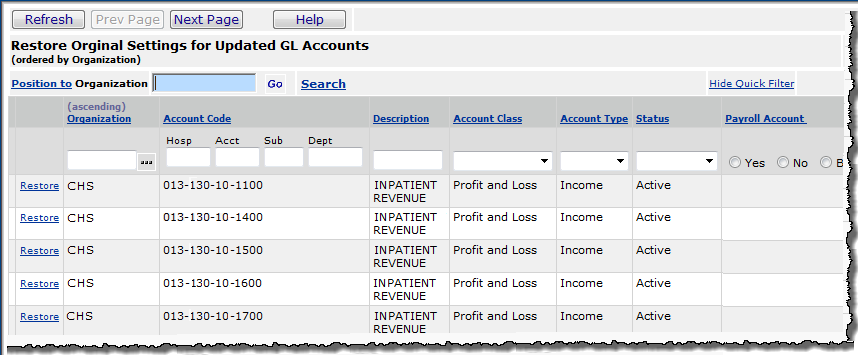
Figure 10 - Accounts Previously Updated, To Be Restored
- Click Restore next to any account that you wish to restore.
- The system restores the account information and returns you to the maintenance jobs list.
- If you wish to restore another account, select Menu > Restore next to the same job and select a different account.
Reinstating Deleted Accounts
You can reinstate accounts that you have deleted in a Maintenance job from the menu next to the job in the Mass Account Maintenance job list.
- From the General Ledger menu, select Account Management > Mass Account Maintenance.
- The list of account mass maintenance jobs appears.
- Locate the job in the list that deleted accounts that you wish to restore.
- Next to the job, click Menu (Figure 11).
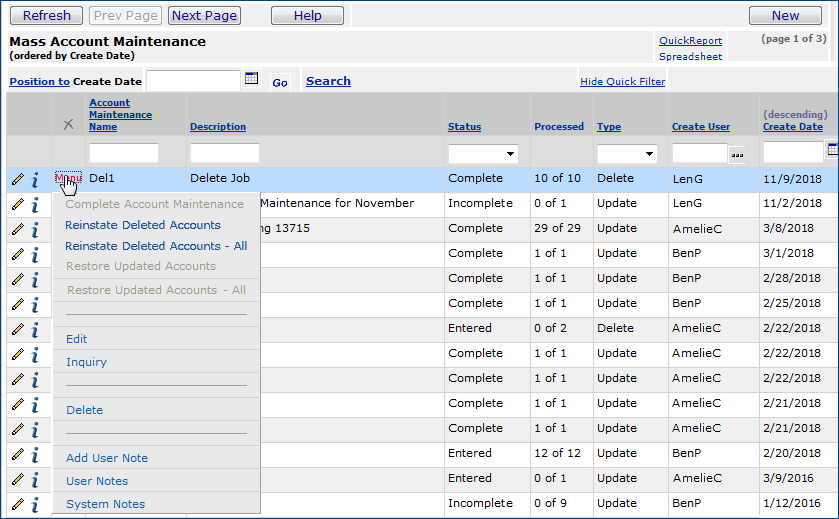
Figure 11 - Reinstating Deleted Accounts
-
To reinstate all the accounts that were deleted by the job:
- Select Reinstate Deleted Accounts - All.
- The system displays a panel asking you to confirm the reinstatement of the account(s),
- Click Submit.
- The account(s) are reinstated, and the system returns to the Maintenance jobs list.
-
To reinstate selected accounts:
- Select Reinstate Deleted Accounts.
- The system displays a panel with accounts deleted by the job.
- Click Reinstate next to any account that you wish to reinstate.
- The system reinstates the account and returns you to the Maintenance jobs list.
- If you wish to reinstate another account, select Menu > Reinstate next to the same job and select a different account.
Deleting Mass Maintenance Jobs
You can delete an account mass maintenance job from the list of jobs if its Status is either Incomplete or Entered. Complete jobs cannot be deleted. You can edit and inquire on jobs with any Status.
Copyright © 2023 by Premier Inc. All rights reserved.


