Working with Budgets Version
Contents
Overview
General Ledger Budget Management lets you create
and maintain an unlimited number of budgets per year for each general ledger
account. You can automatically generate budgets based on existing budgets, or
based on actual financial data. You can create a budget manually by entering
amounts for each period. You can also import budgets
into GL using the Excel Budget Template.
Budget Management supports budgets
for both financial and statistical accounts. Financial accounts
are balance sheet and profit and loss accounts. Statistical accounts
are used for non-financial data. For example, statistical accounts might
track overtime hours, employee head count, the number of employees enrolled in
various benefits programs, and so on.
Once a budget is complete, you can revise the budget.
The system maintains the various budget versions. You can activate budgets
and budget revisions, or make budgets inactive. Budgets can also be deleted
(if the status is Inactive).
Authorizations for users to create budgets are set in
the Users' Profiles. The system administrator at your site can establish
access to Budget Management for the appropriate users.
Setting User Permissions
for Budgeting
Users who work with budgets must have the appropriate
General Ledger authorizations set on the Users GL Limits panel. Also, the Budgets
role object must be included in the users' assigned role(s) with the appropriate
security level.
To set GL authorizations:
- From the Work in Administration main Contents, select Administration
> Users. The list of users appears.
- Locate the user whose user profile you wish to edit.
- Click the edit icon
 or
select Menu > Edit.
or
select Menu > Edit.
The user profile tabbed panels appear.
- Click the GL Limits tab.
The GL Limits panel appears (Figure 1).
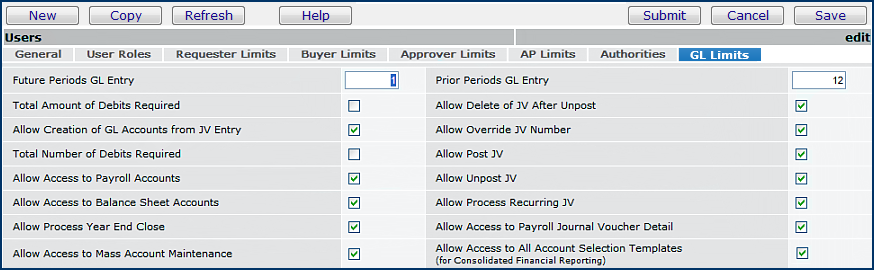
Figure 1 - User Profile GL Limits Panel
- Select the boxes that authorize the user's General Ledger access
and limits. For example, if the user will be creating budgets, click the box
next to Allow Access to Balance Sheet Accounts. Enter values in Future
Periods GL Entry and Prior Periods GL Entry, as needed.
- Click the User Roles tab and note the Role assigned to the user.
(You will need this information to set the security level on the "Budgets"
role object, as discussed below.)
- When you are finished with user profile settings, click Save.
- Click Submit.
The Users list is displayed.
To view and change settings on role objects:
- From the Work in Administration main Contents, select Administration > Roles.
The list of Roles appears.
- Locate the Role specified for the user (from the User Roles panel
for the user, as described above).
- Next to the Role, click Role Objects.
The Role Objects list appears (Figure 2).
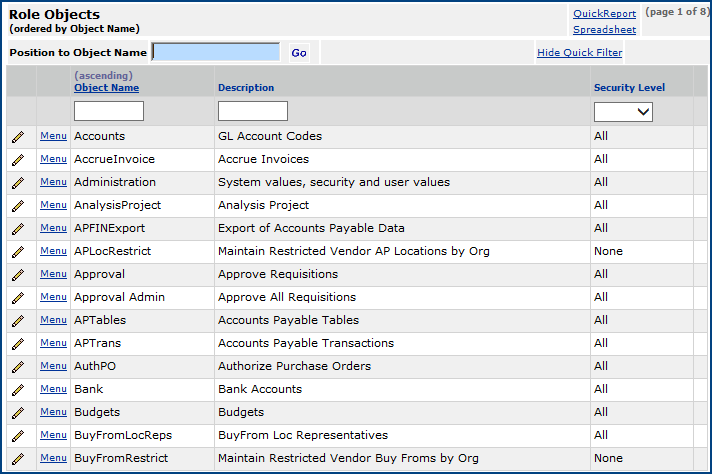
Figure 2 - Role Objects List
- Locate the "Budgets" object.
- Click Edit.
The Role Objects Edit panel appears (Figure 3).
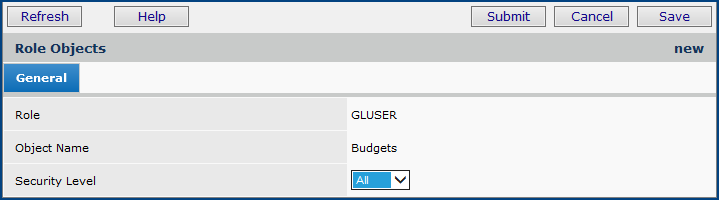
Figure 3 - Role Objects Panel: Edit Security
Levels
- Select the appropriate Security Level. (Levels None,
View, and Modify cannot create budgets.)
- Click Save.
- Click Submit.
The system returns you to the Role Objects list.
Important: If
you add the Budgets role object to a user's role, any other users with
the same role will also have access to budgets. Similarly, the security level
that you set for Budgets will be valid for the other users. To
avoid this situation, you can create a new role for users who need access to
budgets as follows: make a copy of their current role, include the Budgets
role object in the copy, and assign them the new role .
Viewing Budget Information
For each organization at your site, different types of budgets can be created. You can choose from five Budget Type indicators to characterize budgets, such as operating or flex budgets. A budget may contain projections for one or many accounts. (The examples below show only one account.)
For a given organization, year, and budget type, you can get budget data using the Financial Report Writer or ProSheet. Budget data is accessible in the same way as actuals data. You can also view budgets from the Budget Management feature in General Ledger.
To view the Budgets list from General Ledger:
- From the General Ledger main Contents, select Budget Management > Budgets.
The list of budgets appears (Figure 4), or No Data if none exist.
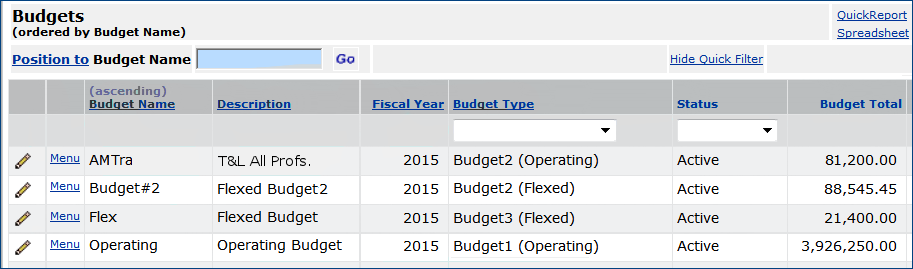
Figure 4 - The Budgets List
About the Budget Type Field
The Budget Type lets you categorize budgets in a way that is meaningful for your organization. The Budget Type can be used to create reports on budgets of the same type (year, and organization) for multiple departments, for example. Using the Budget Type field explains this field in more detail.
Options are:
Budget 1 (Operating)
Budget 2 (Flexed)
Budget 3
Budget 4
Budget 5.
Editing Incomplete Budgets
From the Budgets list, clicking the edit
icon
lets you edit any budget whose Status is Incomplete. Incomplete
budgets lack required information. Once a budget is complete, its status is
either Active (currently in use) or Inactive. When you edit a
complete budget, you can only change the budget description. To change other
parts of the budget, such as the values assigned to each account for each period,
you must revise the budget. (See the discussion
of revisions below.) Only Active budgets can be revised. Only Inactive
and Incomplete budgets can be deleted.
Creating New Budgets
You can create budgets by manually
entering an amount for each period in accounts. You can create budgets automatically
based on existing budgets; for example, a new Travel Expenses Budget for 2016
based on the Travel Expenses Budget for 2015. You can also generate budgets
automatically based on actual data in an account (actuals), rather than
on another budget. The system provides panels for entering budget information,
and also provides an Excel template that you can download (and upload) with
new budget data. The following sections describe how to create budgets with
the panels provided. Using the Excel template is
discussed below.
Creating a Budget Manually
Creating a budget manually has several basic steps:
- Enter general information and name the budget.
- Identify the accounts for the budget.
- Enter the Beginning Balance for each account, if a balance exists.
- Allocate an amount (or zero dollars) to each period of the financial year
for each account.
- Enter a Control Total.
- Balance the Control Total and the Budget Total.
The system automatically activates newly created budgets that are complete.
However, you can deactivate a budget if you wish.
To allocate amounts to each period in an account, you can spread
a total amount equally among all the periods. Or, you can enter the amount for
each period. The sections below outline each approach.
- From the General Ledger main Contents, select Budget Management > Budgets.
The list of budgets appears, or No Data if none exist.
- Click New.
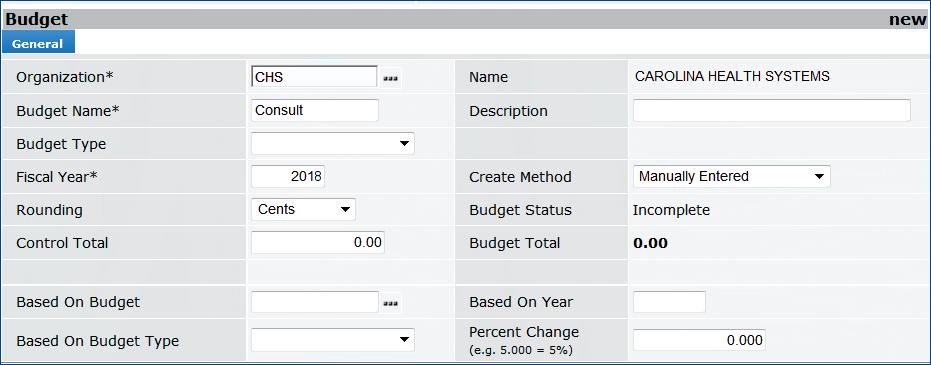
The Budget General panel appears (Figure 5).
Figure 5 - Budget General Panel
- Enter information in fields on the panel:
- Review the Organization. If it is not correct, select a new organization.
- Enter the Budget Name and budget Description.
- Select the Budget Type (see About the Budget Type field).
- Review the Fiscal Year for the budget and change it if needed.
- Enter the Rounding method (Cents is the default.)
Other fields are discussed in the steps below.
- From Create Method, select Manually Entered.
- Enter the Control Total (if you know it).
The Control Total, for an initial budget, is the total value of
the budget. For a revision, the Control Total is the total value
of the revision to the budget. You can let the system calculate the totals,
and then enter the Control Total later by editing the budget. When
a budget is created, the Control Total and Budget Total must
match in order for the budget to be Active.
- Click Save.
- Click Submit. The Budget Edit panel with three tabbed partitions
appears (Figure 6).
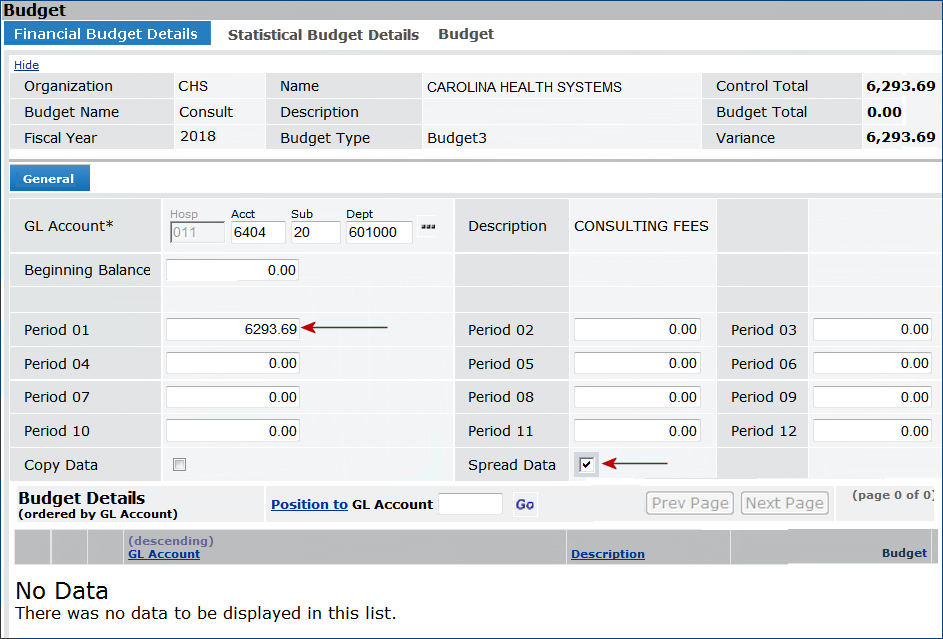
Figure 6 - Budget Details Edit Panel
Spreading an Amount Equally Among Periods
An easy way to allocate dollars to periods
in a budget is to spread the amount equally among the periods.
To spread an amount equally among periods:
- On the Financial Budget Details panel, go to the GL Account
field (Figure 6) and select the first account that you are including in the budget.
You can construct a budget that contains several accounts. (See Step 7.)
Important: An account for a department can be included only once for budgets of the same type for the same year.
- If the account is a balance sheet account, you can enter a Beginning
Balance amount, if any.
The beginning balance is included in the Budget Total.
The Budget Total must be the same as the Control Total
for your budget to be complete and active.
- In Period 01 (or in any other period), enter the amount that you
wish to spread equally among that period and the remaining periods.
Figure 6 shows $6293.69 in Period 01 to be spread among Period 01
through Period 12.
- Select Spread Data.
- Click Save.
The system displays the dollars allocated to each period for the account. Figure
7 is an example of spreading the amount (in Figure 6, Period 01) among
twelve periods.
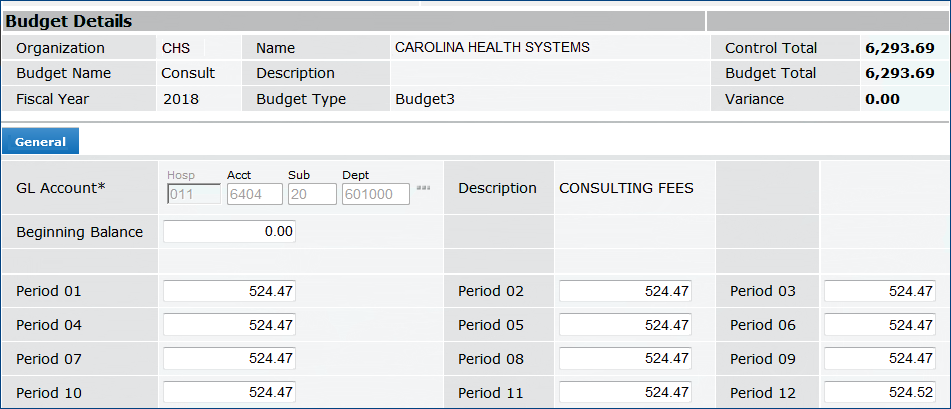
Figure 7 - Budget Details Panel: Dollars Allocated Evenly Among Periods
- Click Submit.
The Budget Details panel is displayed. The account that you just included
appears at the bottom (Figure 8). You can enter data for another account in
the budget, if you wish.
- If you wish to include another account in the budget, enter the account's information on the Financial
Budget Details tab.
- Select the GL Account.
- Enter an amount for each period.
- Click Save.
The account appears in the list under Budget Details.
- The Budget Total is adjusted when when you add or delete
accounts, or change values in an account's periods.
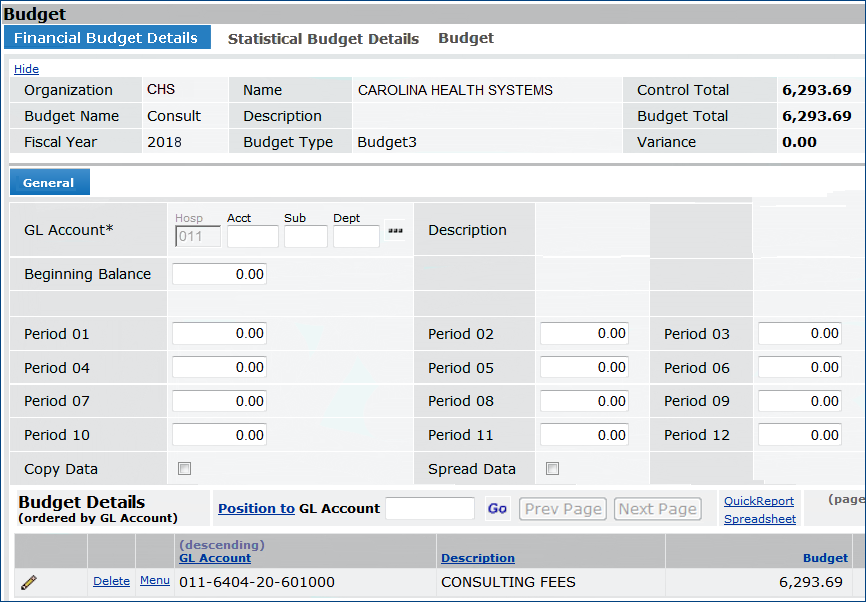
Figure 8 - Budget
Details Panel for Entering Another Account in the Budget
- Click Finish Now.
The system displays the Budgets list.
- If you click Finish Later, the budget is inactive, and you need
to activate it at some point.
- Click Refresh to view the new budget on the list.
- If the budget is complete; that is, the Control Total and the
Budget Total balance, the system activates the budget.
- If the Control Total and Budget Total do not balance,
the budget is Incomplete and inactive.
From the Budgets list, click the edit icon
to edit the budget. Enter a Control Total that balances it.
Entering different amounts for each period
You can enter a budgeted amount for each account in each period manually, if you wish. (An account for a department can be included only once for budgets of the same Budget Type for the same year.) If you are manually entering amounts for all periods, do not check the Spread Data field. Otherwise, the process is the same as creating a budget by spreading amounts equally. (See the steps described previously.) You can also enter a few amounts manually, and spread the balance among the remaining periods.
Creating a Budget Automatically
You can create new budgets automatically
based on existing budgets, or based on actuals. The methods are described below.
Basing a new budget on an existing budget with a percent change
Often, it is efficient to create new budgets
that are based on old budgets, allocating an added percent of dollars for inflation,
or other factors. If you are creating a budget that is based on another budget,
or on actuals, you can specify a percent increase or decrease to use in calculating
new values for each period.
To create a new budget based on an existing budget:
- From the General Ledger main Contents, select Budget Management > Budgets.
The list of budgets appears, or No Data if none exist.
- Click New.
The Budget General panel appears (Figure 9).
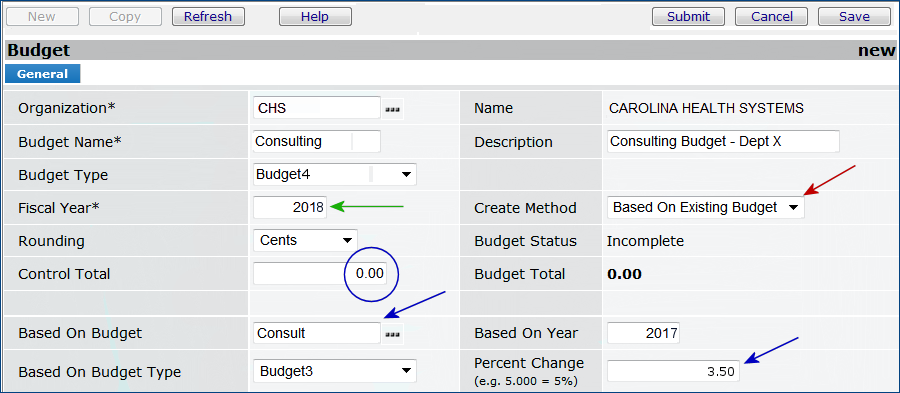
Figure 9 - Budget General Panel: New Budget Based on Existing Budget
- On the Budget General panel, complete the fields as follows:
- Review the Organization. If it is not correct, select a new organization.
- Enter the Budget Name and budget Description.
- Select the Budget Type (see About the Budget Type field).
- Review the Fiscal Year (green arrow), and enter a new year if
the new budget is for a different year than the existing budget.
- Enter the Rounding method (Cents is the default.)
- For the Create Method (red arrow), select Based On Existing
Budget.
- Leave the Control Total at zero, for the moment.
You are going to let the system calculate the total, and then you will enter
it manually.
- In Based on Budget (blue arrow, left), enter the name of the budget
that the new budget is based on.
- Enter the Percent Change between the old and new budgets (blue arrow, right).
- To allocate amounts in the new budget greater than the old budget, enter
the percent that you want to add.
- If you wish the new budget to allocate lower amounts than the old budget,
enter the percent to subtract, using a minus (–) sign.
- Review the Based On Year for the old budget, and change it if
it is incorrect.
- Click Save.
- Click Submit.
The system creates the budget and returns to the Budgets list.
- Refresh the Budgets list and locate the budget.
Notice that the Status of the budget is Incomplete.
- Click the edit icon
or Menu > Edit to edit the budget.
The Budget Details panel appears. Figure 10 is an example.
The system calculates amounts for each period in the account using the Percent Change. Then, the Budget Total and is calculated and displayed (upper right corner of the panel). The Control Total is still
zero. Since you have not yet entered a Control Total, the budget is
created as Incomplete. You need to enter a Control Total,
and balance the Control Total with the Budget Total
so that the Variance is zero.
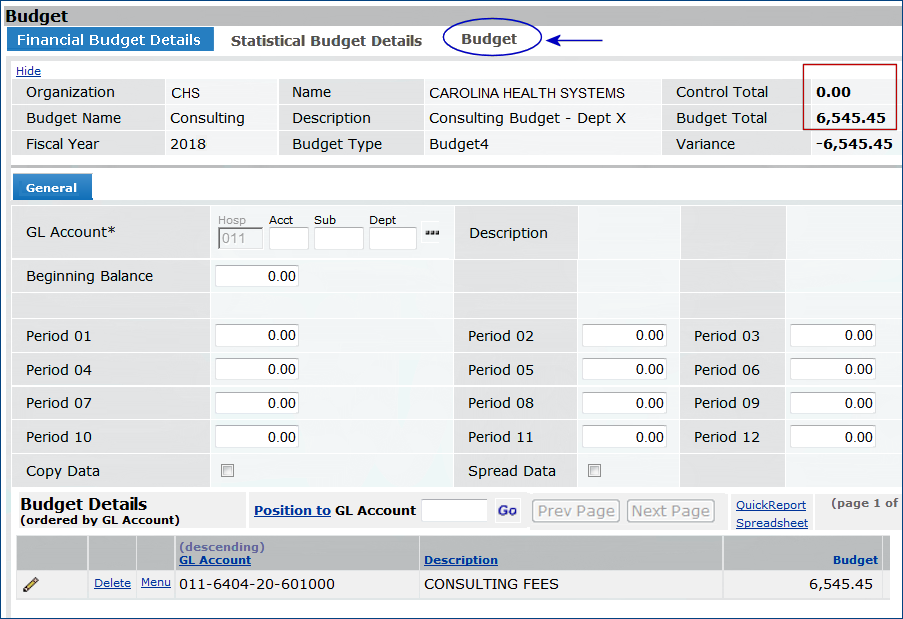
Figure 10 - Budget Details Panel: New Budget Based on an Existing
Budget
Notice that accounts included in the budget are listed at the bottom of the
panel under Budget Details. You can view/edit budgeted amounts for each account
by selecting the edit icon
or Menu > Edit next to the account number. You can also delete accounts
by clicking Delete.
- If you wish to include another account in the budget, enter the account's information on the Financial
Budget Details tab. (Important: An account for a department can be included only once for budgets of the same type for the same year.)
- Click Save when you are finished.
The account appears in the list under Budget Details.
- The Budget Total is adjusted when when you add or delete accounts
or change values in an account's periods.
- To balance the Budget Total and the Control Total,
click the Budget tab.
The Budget panel appears (Figure 11).
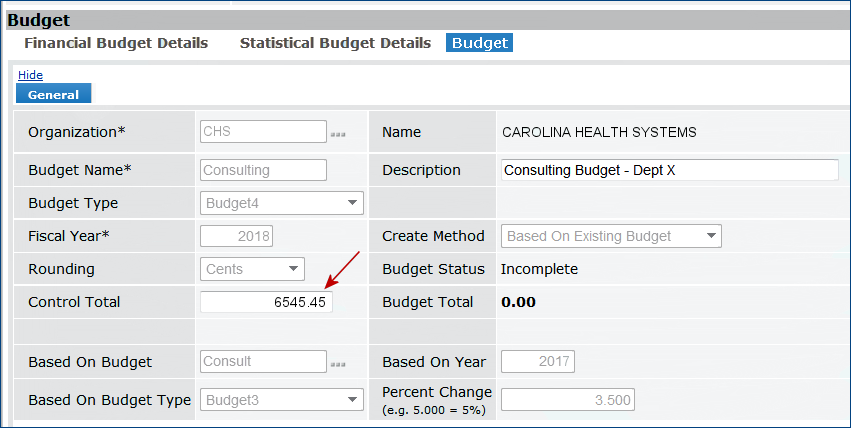
Figure 11 - Budget Panel: Edit Control Total for New Budget Based on an Existing Budget
- Enter the Control Total.
- Click Save.
- Click Finish Now.
The system activates the budget (if no other errors exist), and returns to the
Budgets list.
Budgets Based on Actuals
Budget Management can generate budgets
based on actual financial data. Typically, you may wish to use data in one year's
accounts to create a budget for the succeeding year; for example, to generate
a budget for 2016 based on data for 2015. When you base a new budget on actuals,
the system uses all the accounts available in the budget. This approach may be
practical if you are creating a budget for an entire organization.
If you wish to create a budget based on
actuals from only a few — and not all — accounts, you can create a budget based on actuals for all accounts, and then delete some accounts from the budget.
The paragraphs below outline the general steps in creating a budget based on
actuals, and how to delete accounts that you do not wish to include.
To create a budget based on actuals:
- From the General Ledger main Contents, select Budget Management
> Budgets.
The list of budgets appears, or No Data if none exist.
- Click New.
The Budget General panel appears (Figure 12).
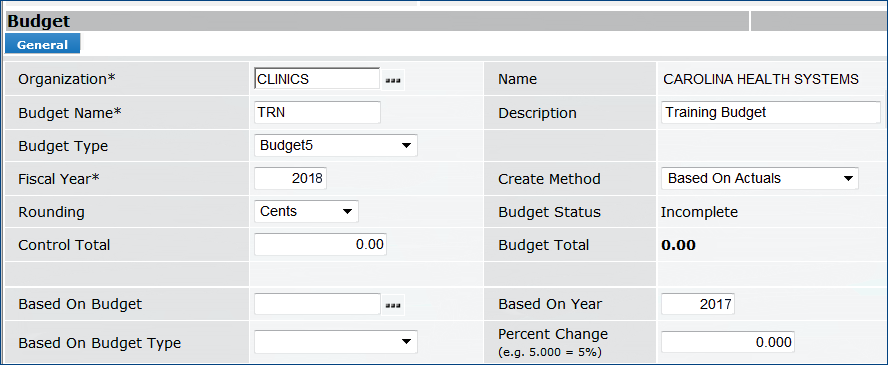
Figure 12 - Budget General Panel: New Budget Based on Actuals
- Enter information in fields on the Budget General panel for the Organization, Budget Name, and Description.
- Review the Organization. If it is not correct, select a new organization.
- Enter the Budget Name and budget Description.
- Select the Budget Type (see About the Budget Type field).
- Enter the correct Fiscal Year.
- For the Create Method, select Based On Actuals.
- Leave the Control Total at zero. You will not know the Control
Total until you have a Budget Total, which the system will calculate.
- If relevant, enter a Percent Change between the actuals and the new
budget.
- To allocate amounts in the new budget greater than the actuals, enter the
percent that you want to add.
- If you wish the new budget to allocate lower amounts than the actuals, enter
the amount to subtract, using a minus (–) sign.
- Enter a Based On Year. This field is required for budgets based on actuals.
- Click Save.
- Click Submit.
The system creates the budget and returns to the Budgets list.
- Refresh the Budgets list and locate the budget.
Notice that the Status of the budget is Incomplete.
- Click the edit icon or Menu > Edit to edit the budget.
The Budget Details panel appears. Figure 13 is an example.
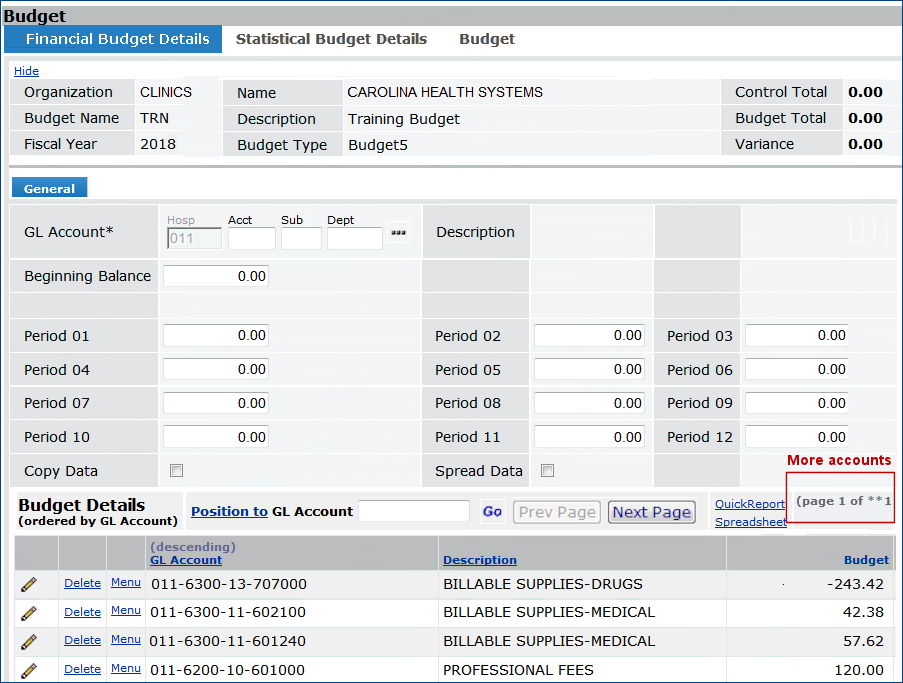
Figure 13 - Budget Details Based on Actuals
Notice that the Budget Details list at
the bottom contains all of the organization's accounts.
- Next to each account in the Budget Details list that you wish
to remove, click Delete.
The account is removed , and the Budget Total and the
Variance are adjusted.
- To change the amount budgeted in an account, click the edit icon or Menu
> Edit.
- When you are finished deleting and editing accounts, balance the budget:
- Click the Budget tab. The Budget panel appears (similar to Figure 11).
- Enter the Control Total.
- Click Save.
- Click Submit.
The system activates the budget (if no other errors exist), and returns to the
Budgets list.
Revising Budgets
You can revise budgets manually, or let
the system make automatic revisions.
Manual Revisions
In a manual budget revision, you adjust
an account's budget by entering a change amount (+ or –) or a new
total amount for one or more periods. The Control Total represents
the total amount added to or removed from the budget since the last revision.
The revision is Complete when the Control Total and the Revision
Total are balanced.
Automatic Revisions
Automatic revisions are based on existing
budgets or on actuals from specified accounts. During a budget revision, you can
remove accounts from a budget, except for accounts containing $0.00. This method
can be used to trim the list of accounts in a budget created from actuals.
To revise a budget manually:
- From the General Ledger main Contents, select Budget Management
> Budgets.
The list of budgets appears.
- Locate the budget to be revised, and select Menu > Revisions (Figure
14).
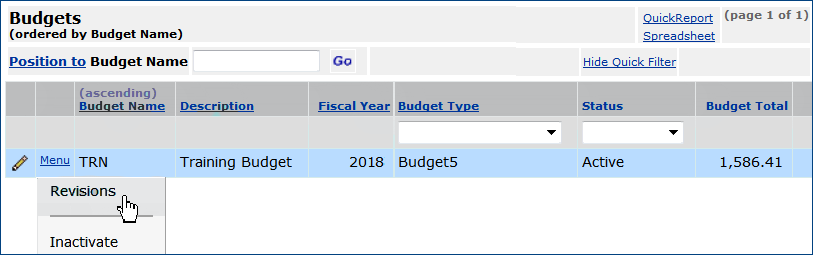
Figure 14 - Accessing Revisions for a
Budget
The list of revisions to the budget appears. If no revisions exist (Figure
15), the list shows only one entry for the budget's creation (Revision
No 0).

Figure 15 - List of Budget Revisions:
Initial Budget is Revision No 0
- Click New.
The Budget Revision panel appears (Figure 16).
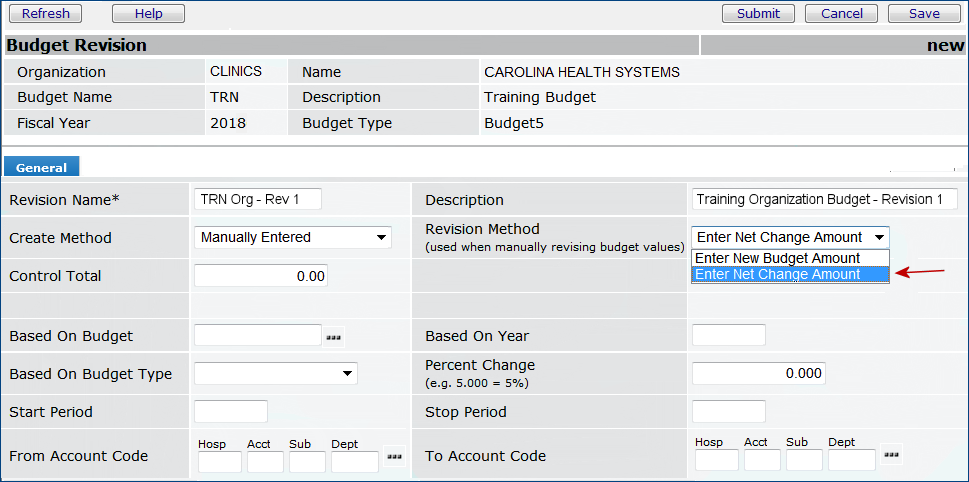
Figure 16 - Budget Revision Panel
- Enter information on the panel.
- Click Save.
- Click Submit.
The Budget Details panel appears with the list of accounts at the bottom (similar
to Figure 13).
- Click the edit icon or
Menu > Edit next to an account whose budgeted value you wish to
change.
The Budget Details panel appears (Figure 17).
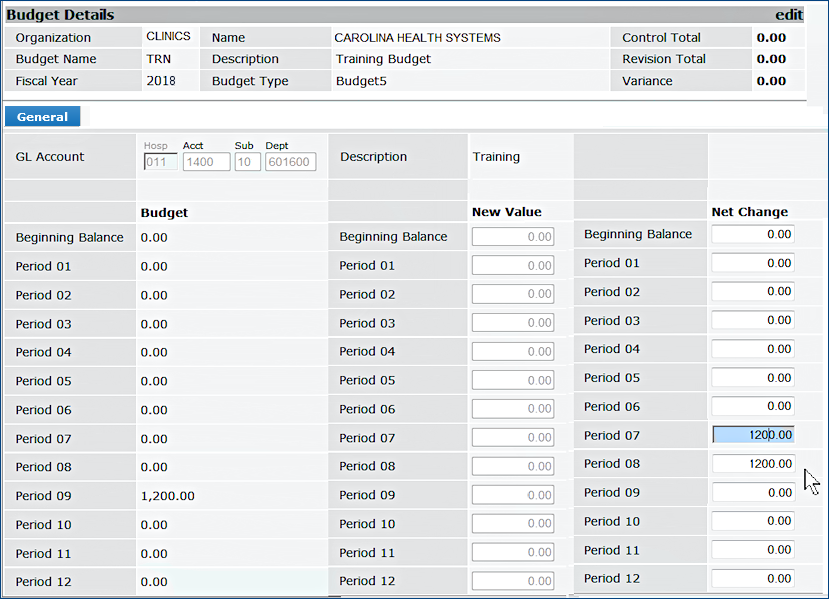
Figure 17 - Budget Details Panel
- Notice that the Net Change column is available for editing, since
you selected the Revision Method Enter Net Change Amount. If
you had selected Enter New Budget Amount, the New Value column
would be available, and the Net Change column would be grayed out.
- Enter the dollar amount to add or subtract from the budget for
any period. Use a minus (– ) for amounts to subtract.
Figure 17 shows $1200.00 added to the account in Period 07 and Period 8.
- When you finish entering the amount(s), click Save.
If you entered a Control Total, it appears in the top right of the
panel. (Otherwise, the Control Total is zero.) The system also calculates
the Revision Total and the Variance. You will need to edit
your revised budget to balance it after you Submit it.
- Click Submit.
The Financial Budget Accounts panel appears.
- Click the Revision tab.
The Budget Revision panel appears. Enter the Control Total that balances
the Revision Total.
- Click Save.
If you want to check whether your totals balance, click the Financial Budget
Accounts tab again (Figure 18).
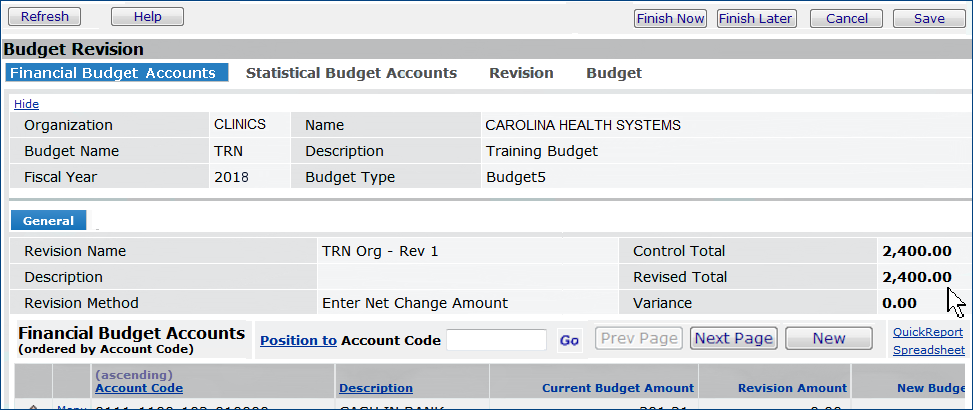
Figure 18 - Financial Budget Accounts Panel with Balanced Totals
- Click Finish Now to complete the revision.
You are returned to the Revisions list.
- Click Refresh.
If no errors exist, your budget revision appears on the list with a Status
of Complete. If you have errors, the Status is Open,
and you will need to edit the revision to make changes.
Creating
Budgets from Excel Spreadsheets
An Excel template
is provided for managing budgets with Excel. You can use the Excel budget template to create
new budgets and import them into the system. You can also download budgets created
in the system to an Excel spreadsheet. To use the template, you first must download it from General Ledger to a network location where you can access it from Excel.
Important: You can only use the budget template to create new budgets. You can replace an existing budget with a new version using the budget template, but you must first delete the existing budget.
The latest version of the template uses Excel 2010. If you need to install the template, follow the instructions below. If you are currently using a previous version of the template, you will need to disable it (by unselecting it) before proceeding with the install.
- Templates with embedded macros now have the file extension .xlsm.
To download and install
the Excel budget template on your local system:
Caution: The download process overwrites any existing spreadsheet
with the same name. If you have an existing spreadsheet with the same
name, you may wish to rename the existing spreadsheet so that its data are
preserved.
These instructions download and install the Budget Template for Excel 2010. This template supports the
sign-in process.
Important: members accessing the ERP General Ledger application through must use the new template.
Users (working with an Excel version earlier than 2010) can continue to work with old templates that they have downloaded in the past, as long as they do not need to sign on through .
- From the General Ledger main Contents, select Budget Management
> Excel Budget Template.
The Download panel appears (Figure 19).
- Click "Click here to download this file".
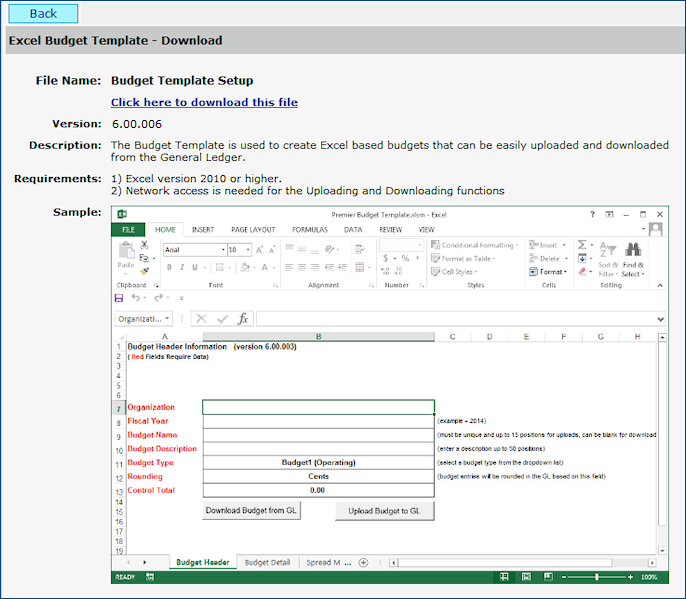
Figure 19 - Excel Budget Template Download Panel
The File Download panel appears.
- Click Run.
Depending on your Internet Explorer Security Settings, a verification panel may appear.
- If the verification panel appears, click Run.
The installation wizard panel appears (Figure 20).
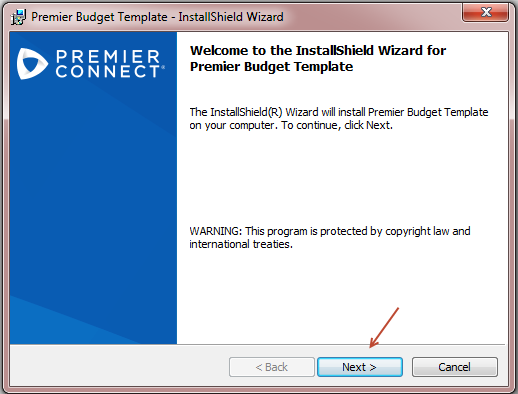
Figure 20 - The First Panel of the Budget Template Install Wizard
- Click Next.
Follow instructions on the install Wizard, clicking Next as you move
through the panels.
- The Destination Location panel appears (Figure 21).
On the Destination Location panel the Destination Folder specifies
where the template will be installed.
If you wish to install it
in another location, click Change and specify the location.
When you use the budget template with Excel, you will open the template from the Destination Folder.

Figure 21 - Destination Location for
Budget Template
- Click Next.
The Start Installation panel appears (Figure 22).
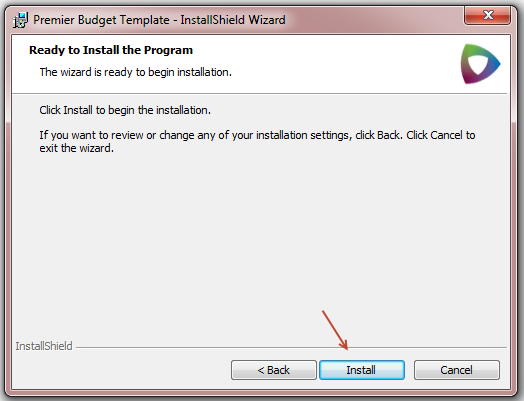
Figure 22 - The Start Installation Panel
- Click Install.
The template is installed in the location specified, and a
message is displayed when installation is complete (Figure 23).
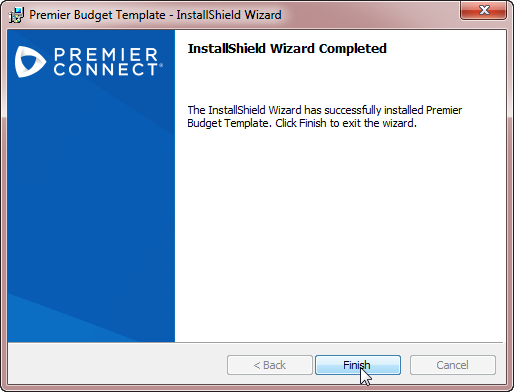
Figure 23 - Finish Template Installation
Panel
- Click Finish. The template is installed and available on
your local system in the location you specified. You are returned to the system.
Using the
Excel Budget Template
- Open the template file from the Destination Folder where you installed it (Figure 24).
Normally, this location is: C:\Program Files(x86)\\BudgetTemplate\.
The
template file is named Budget Template.xlsm.
You receive a message about enabling macros.
- Click Enable Macros.
If you get an error message after enabling macros, your Excel security settings
may be wrong.
- To change your security settings, from the Excel
menu, select Tools > Macro > Security Level.
- Select a Security Level of Medium.
- Click OK to close the Security panel.
The template appears with the Budget Header worksheet on top (Figure 24). Other
worksheets contain Budget Details (red arrow) and Spread Methods
(green arrow).
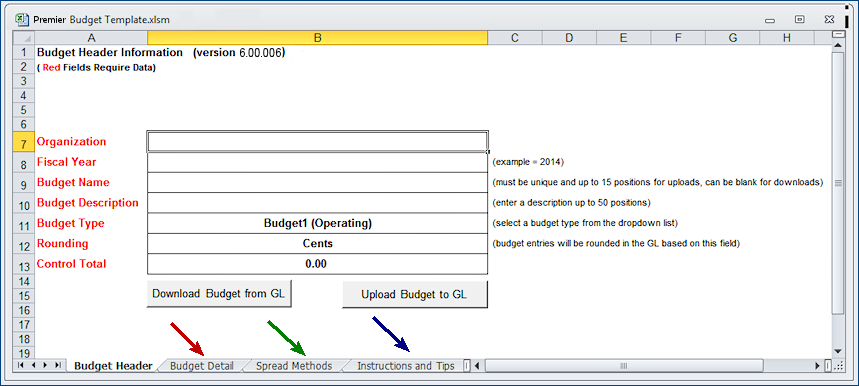
Figure 24 - Excel Budget Template Showing Budget Header Worksheet
- You can use the template just like any other Excel spreadsheet.
- Click the Instructions and Tips tab (blue arrow) for more information
about the template.
Spreading an Amount Among Periods - Excel Budget Template
The Spread Methods worksheet lets you define one or more methods of spreading a budgeted amount among several periods in a fiscal year. The steps are:
- Click the Spread Methods worksheet.
- Enter the percent of the spread amount that you wish to allocate to each period in the period cell.
- Name the spread method by overwriting Method1 or Method2, etc. in Column A with the chosen name.
For example, Figure 25 displays the Spread Methods worksheet with a method 100% Over 12 set up. This method spreads an amount equally over 12 periods.
Each Period contains 8.30 percent, which is 100 percent ÷ 12 (rounded down to the nearest hundredth).
(Note: The Budget Template also provides an "equal spread" method pre-defined on the Spread Budget Entry selection panel, Figure 26).
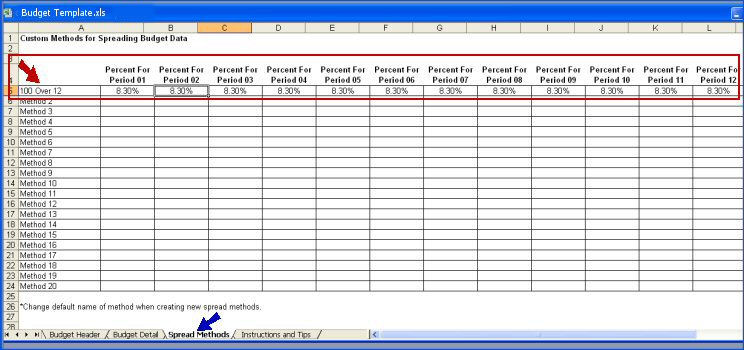
Figure 25 - Setting Up a Spread Method on the Excel Budget Template
- On the Budget Detail worksheet, enter the amount to be spread in the appropriate cell. Figure 26 shows an amount ($240.00, red arrow) entered in the Period 1 cell.
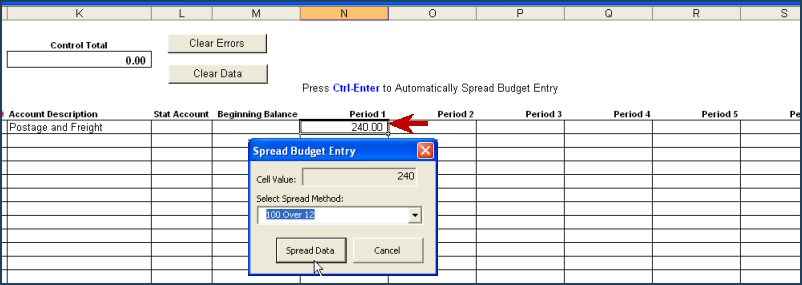
Figure 26 - Using a Spread Method to Allocate a Budget Amount among Periods on Excel
- Click Ctrl Enter. The Spread Budget Entry selection panel appears (Figure 26).
- Click the down arrow to select the spread method. In Figure 26, 100 Over 12 is selected. Several pre-defined methods are also available, if you do not wish to create your own spread methods.
- Click Spread Data. The amount is spread over the 12 periods in the fiscal year (Figure 27).

Figure 27 - Applying a Spread Method to a Dollar Amount on the Excel Budget Template
To upload a budget from Excel:
The Upload and Download links are located on the , Inc. tab of the worksheet.
- Create a new budget by entering data on each tabbed worksheet of the Excel
budget template.
The Instructions and Tips worksheet provides information about rows
and columns.
- When you are finished entering data, save the spreadsheet.
- On the , Inc. tab of the worksheet, click Upload Budget to GL to send your spreadsheet to the system (Figure 24)
Windows asks if you are sure.
- Click OK.
If you are not logged in to the system, a sign-on panel appears. Sign on instructions are below.
To download
a budget from the system to Excel:
The Upload and Download links are located on the , Inc. tab of the worksheet.
- Open the Excel budget template file on your local system.
Caution: Make sure you are using a
blank copy of the budget template since the download procedure will overwrite
existing spreadsheet data.
- Click Download Budget from GL.
Windows asks if you are sure.
- Click OK.
If you are not logged in to the system, a sign-on panel appears. Sign on instructions are below.
Sign On to General Ledger for Uploading/Downloading Budgets: Excel 2010 and Users
If you are not a user, and are using the (very) old (pre-Release 6.0.3) budget template with Excel 2007, you can continue with the sign on process that you have been following.
The process has changed only for users of the new Excel 2010 template.
 For Excel 2010 users signing on to General Ledger on the "Aperek" server:
If this is your first time signing on through the Budget Template, the Host Setup panel appears (Figure 28). "" is selected by default.
- Select "Aperek."
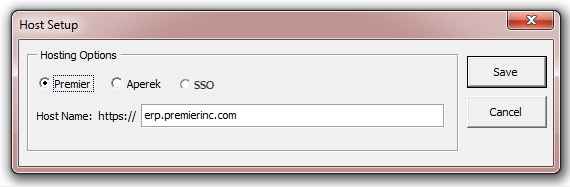
Figure 28 - The Initial Host Setup Panel for Upload/Download Log In: "Aperek" User
The panel refreshes (Figure 29).
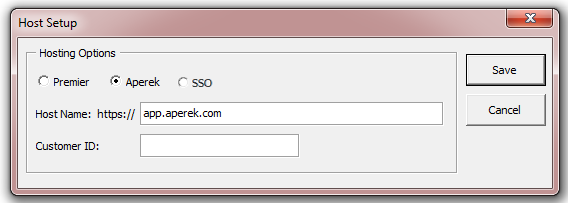
Figure 29 - The Hosting Options Panel for "Aperek"
The Host Name on the panel is pre-populated with the correct server URL. (You would only need to change the Host Name value, if, for example, you are in a training class, and using a different server. Your instructor would tell you what to enter, in that case.)
- Enter your Customer ID.
- Click Save. The Sign on panel appears (Figure 30).
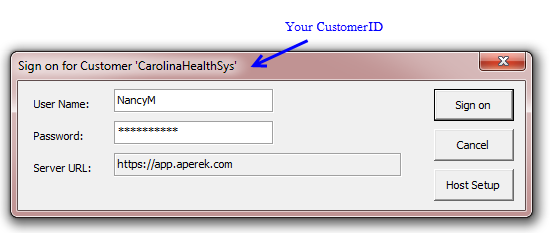
Figure 30 - The Sign on Panel for Aperek User
- Enter your normal User Name, and Password on the sign-on panel.
- Click Sign On.
For an upload, a message tells you that your worksheet is being uploaded to the system.
If there are no errors, Excel sends you a final message that the spreadsheet
was successfully uploaded.
For a download, the budget data appears in the worksheet.
- Click OK.
For users signing on to General Ledger through :
If this is your first time signing on through the Budget Template, the Host Setup panel appears (Figure 31).
Figure 31 - The Host Setup Panel for Upload/Download Sign On: User
The Host Name on the panel is pre-populated with the correct server URL. (You would only need to change the Host Name in a special circumstance if you were using a different server; for example, when you are in a training class. Your instructor would tell you what to enter, in that case.)
- Click Save. The Sign on panel appears (Figure 32).
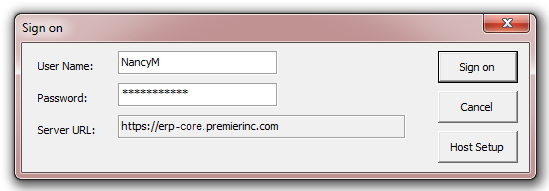
Figure 32 - The Sign on Panel for a User
- Enter your normal User Name, and Password on the sign-on panel.
- Click Sign On.
For an upload, a message tells you that your worksheet is being uploaded to the system.
If there are no errors, Excel sends you a final message that the spreadsheet
was successfully uploaded.
For a download, the budget data appears in the worksheet.
- Click OK.
For SSO users signing on to General Ledger
- Click Upload JV.
If this is your first time signing on through the JV Template, the Host Setup panel appears (Figure 33).
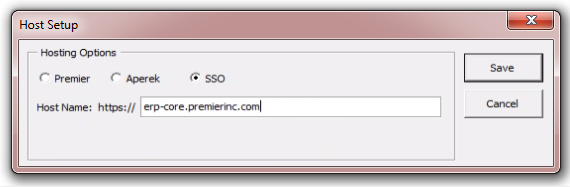
Figure 33 - The Initial Host Setup Panel for SSO Users
The Host Name on the panel is pre-populated with the correct server URL.
- Select "SSO."
- Click Save. The Sign on panel appears (Figure 34).
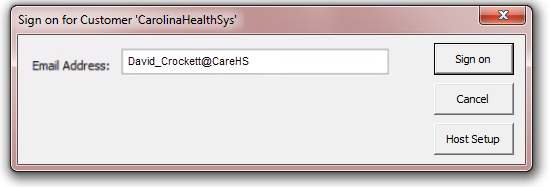
Figure 34 - The Sign on Panel for an SSO User
- Enter your hospital email address on the sign-on panel.
- Click Sign On.
Your site's network/application login panel appears. Enter your normal login credentials. Figure 35 is an example.
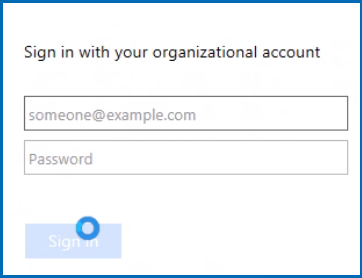
Figure 35 - Generic Sample: Network User Signon Panel
- Click Signon.
Activating and Deactivating
a budget
The system normally activates a budget when
it is complete. Activating a budget puts it into use. You can deactivate any
active budget. You can also re-activate any inactive budget.
Activation/deactivation is available for
a budget on the budgets list.
- From the General Ledger main Contents, select Budget Management
> Budgets.
The list of budgets appears (Figure 4), or No Data if none exist.
- Click Menu next to the budget of interest.
- If the budget is Active, select the Inactivate menu option.
- If the budget is Inactive, select the Activate menu option.
Using the Budget Type Field
The Budget Type field simplifies building reports on budgets. In Financial Reports and ProSheet, the Budget Type field lets you access budget data in the same way that you access actuals data. For example, in running a Financial Report for a particular Budget Type, you can specify the "year" as "base year + offset."
You can create a budget of each Budget Type that you use at your site for all organizations and all years. You can run Financial reports for any year without having to maintain the budget column. Inquiry and Analysis can inquire against different years without changing the budget type. Set the Default Budget Type for Inquiry on the Organization's GL Information tab.
Two of the budget types -- Budget 1 (Operating) and Budget 2 (Flexed) -- are labels for common types of budgets. You may have other named budgets that make more sense to categorize separately -- a statistical budget of some sort, or a special budget for a project, for example. You can use the labels 'Budget 3", "Budget 4," and "Budget 5" for these other budgets.
Budgets for multiple departments do not have to be "combined" to get a composite organization budget. You can upload multiple budget templates for the same budget year and organization. Using ProSheet, the process of creating an organization budget is simple: the organization's budget is ready when the departments finish uploading their individual budgets of the same Budget Type for the year. You can use the Budget Name field to designate each department's budget, and you can create individual financial reports on departmental budgets for the organization, year, and Budget Type.
Statistical Budgets
Setting up a statistical budget follows
the same processes as financial budgets, with these differences:
- You can only select statistical accounts to include in the budget.
- The Budget Total for statistical budgets is zero.
- Manually created statistical budgets have no Control Total.
- For a statistical budget based on another statistical budget, you
need to enter a Control Total of zero to complete the budget.
Copyright © 2023 by Premier Inc. All rights reserved.