Creating Invoice Match Detail Lines Version
Contents
Overview
The Invoice Match feature
creates invoice match detail lines for purchase orders. For each invoice, the Invoice Match panels contain two tabs for invoice detail lines:
- The Add Lines tab lists PO/receipt lines that are available to be added to the invoice.
- The Invoice Lines tab lists the lines that have been added to the invoice.
Both lists are designed with filters and search capabilities for efficiency in locating individual lines.
From the Add Lines list, you can view and select purchase order lines,
along with their associated quantities and costs. You can also change quantities on an invoice detail line (as long as the changes balance with the original purchase order line). Using function keys, you can add PO lines to an invoice and display them on the Invoice Lines list.
For regular purchase orders (except for fill/kill POs), you can add detail
lines to an invoice before the lines have been received.
If you are new to the process of matching invoices and handling
exceptions in the system, you should read Matching
Purchase Order Receipts with Invoices and Handling Exceptions.
Those topics contain significant detail about the entire
process. The discussion below covers use of the invoice match detail lines interface —
a tool that makes matching invoices easier and more efficient.
When a purchase order is received, the system looks for invoices containing
unreceived lines and tries to match the lines with receipts. If a line is partly
received, the received portion is added to the invoice and a new
line is created for the unreceived remainder.
Invoices that contain unreceived lines are considered
"in exception"; each unreceived line has an exception status of R.
A purchase order cannot be "unauthorized" if it has unreceived invoice
lines. A purchase order also cannot be completed when an invoice exists with
unreceived lines.
Purchase order types not available for matching unreceived
lines
Invoices for the following purchase order types can only be created containing received
lines :consignment, credit, blanket, and standing. Regular fill/kill invoices cannot be matched with unreceived lines. (Unreceived lines do not appear on the invoice matching lists for these purchase orders.)
Reports - "Invoice Match Header" Report Object
Ten new fields have been added to the report to enable you to create an "Invoiced not Received" report.
Note: Permission to add unreceived lines to an invoice must be specified in the AP Limits tab of the User Profile.
Security
The "Invoicing" role object controls access to invoice lines.
- For access to Create Invoice from Purchase Order, the minimum setting is View.
Using the Invoice Match Detail Lines Panels
To use the invoice match detail lines panels, you need to first create the invoice header:
- From the Materials Management main Contents, select Invoicing > Create Invoice from Purchase Orders.
The Quick Click menu appears. (You can also select Invoicing > Create Invoice from Purchase Orders from Accounts Payable.)
- Under I would like to..., select View the Purchase Orders for Matching List.
- Click Show All.
The Purchase Orders for Matching list appears.
- Scroll through the Purchase Orders for Matching list to find the PO that you need,
or click Search to locate the PO.
- Next to the purchase order number, select Create Invoice from Purchase Order.
The Create Invoice from Purchase Order panel appears
(Figure 1). The panel contains fields for entering invoice header information.
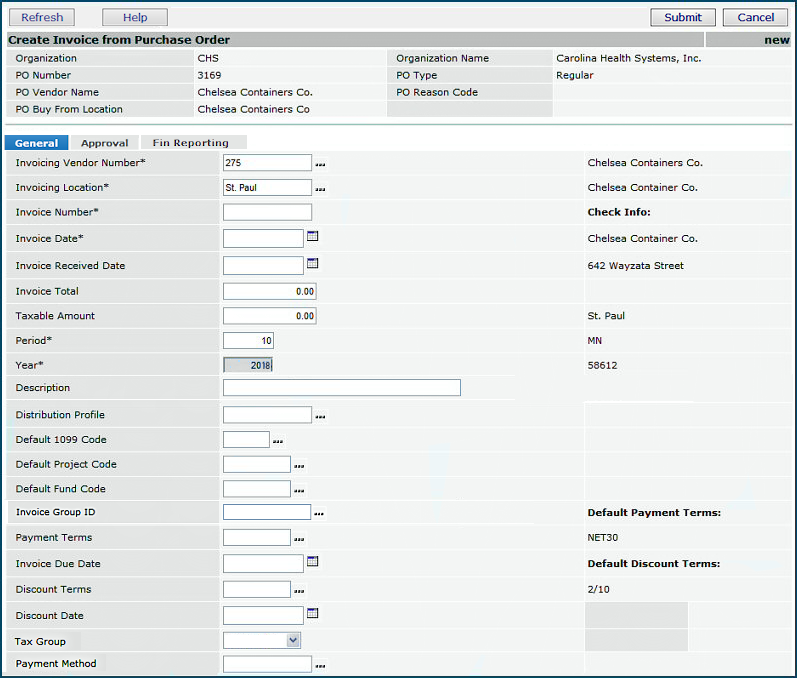
Figure 1 - Invoice
Header Panel
- Complete fields on the panel as needed.
A detailed discussion on how to create header information and enter fields
is located in Matching Purchase Order Invoices with
Receipts.
- Click Submit.
If you have not used Invoicing
Detail Lines lists before, the Microsoft Security Warning panel appears.
Note: The Security Warning panel is required to get your permission to install updated controls
needed by the invoicing interface. Controls are program
elements created by Microsoft and other vendors. Controls are commonly used
by many applications, such as Excel. You often need to install
controls the first time you use an application that requires them.
- Click Yes on the Security Warning panel to give permission to install the controls.
You are asked if you would like to run "Service Pack X for Visual Basic..." (where X is a version number).
- Click Yes.
The system installs the service pack and controls.
The header information tabs are displayed on the top part
of the panel. On the bottom are tabs containing the Add Lines and Invoice
Lines lists (Figure 2).
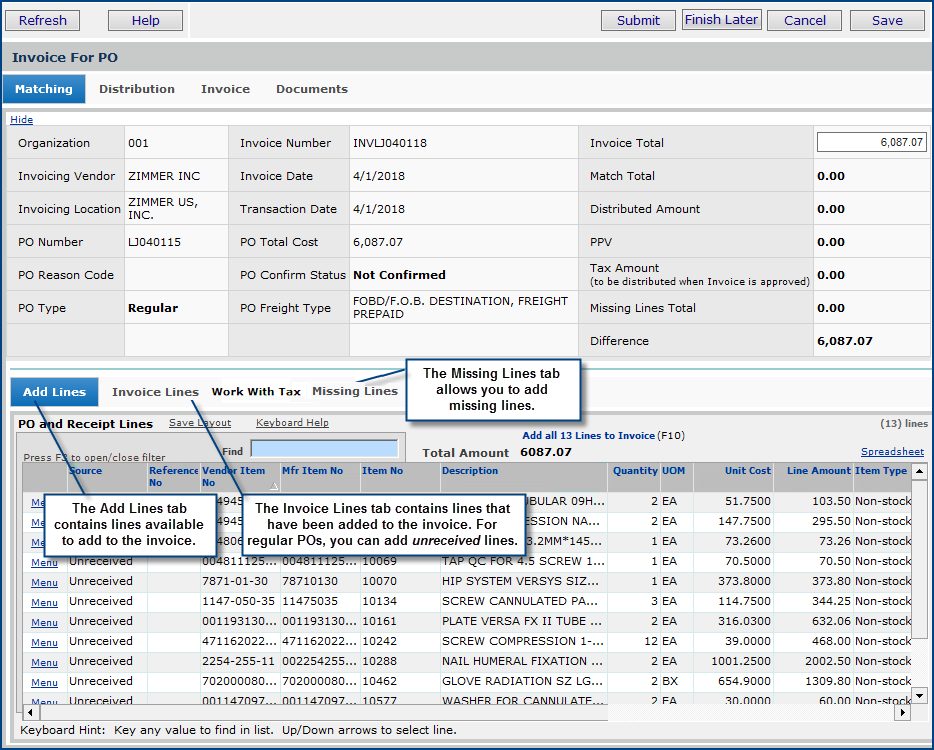
Figure 2 - Invoice Detail Lines Panels
Use the Add Lines
and Invoice Lines panels to create invoice detail lines and match them.
Navigating and using the lists simplifies working with invoices that contain
many lines. Instructions for navigating and using
the lists are below.
- When you are finished adding lines to your invoice, add or change
other information as needed. You may have discount information to edit and
distribution charges to enter. (See Matching
Purchase Orders With Invoices for details.)
- When the invoice is balanced, click Finish Now to end the invoice
matching process.
Using
the Add Lines and Invoice Lines Lists
The following table summarizes the
navigation tools for the Add Lines and Invoice Lines lists. Following the list are illustrations of how the navigation tools can be used. This information
is also available from the upper left of the list by clicking Shortcut
Keys.
Table 1 - Shortcut
Keys and Tools for Invoice Matching Lists
To get this result:
|
Do this:
|
See examples:
|
View
PO lines (including unreceived lines) available
to match with an invoice |
Click
the Add Lines tab |
Figure 2, Figure 3
|
| View lines that have been added to an invoice |
Click the Invoice Lines tab |
Figure 13
|
|
Move to the next line — up or down — in the list and
show editable regions in each line
|
Use the up  and down
  arrow
keys. arrow
keys.
|
|
|
Move to the next field — right or left — in the list
and show editable regions in each line
|
Use the left  and right and right  arrow keys. arrow keys.
|
|
| Move to the next field |
Tab |
|
|
Display (or re-display) all lines
|
Click F6 or
Put the cursor in the empty Find box and click Enter.
|
|
| Go to the Find box. |
Click Home.
|
|
|
Open the list filter
|
Click F3
|
Figure 15
Figure 16 |
|
Add one or more lines to an invoice
|
Select the line or lines and click Enter.
|
Figure 8
|
| Select sequential lines to add to an invoice |
• Select the first line.
• Hold down Shift and click the left mouse button
to select the last line. All the lines in between are highlighted.
• To add the lines, click the link:
"Add all X lines to the invoice"
(X is the number of lines you selected.)
|
|
| Select non-sequential lines to add to an invoice |
• Hold down Ctrl and click the left mouse button
to select each line.
• To add the lines, click the link:
"Add all X lines to the invoice"
(X is the number of lines you selected.) |
|
|
Add all lines to the invoice
|
Click F10.
|
|
|
Find one or more lines, or a line containing any value
(including numeric values)
|
Enter characters in the Find box.
The system starts searching as soon as you start typing.
|
Figure 3
Figure 4
|
|
Sort a list column
|
Click the column header.
|
Figure 5
|
| Resize columns on a list |
Place the cursor on the left or right bar in a margin heading.
Drag the bar to make the column narrower or wider. |
Figure 7
|
Move a column to the far right
(effectively removing it from the list) |
Place the cursor on the column header, hold down
the left mouse button, and drag the column
to the edge of the window. |
|
| Add PO lines with no receipt required to an invoice |
Enter a quantity for each line, save the line,
and move the line to the Invoice Lines list. |
Figure 23 -
Figure 26 |
Finding Lines and Sorting Columns
The Find box finds lines in the lists.
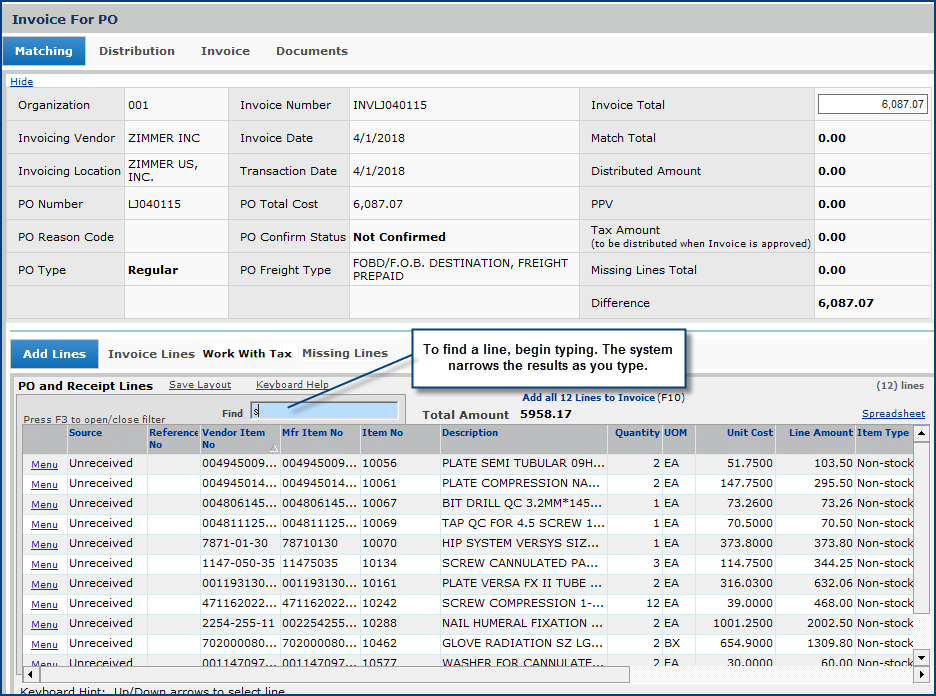
|
Figure 3 - Find One or More Invoice Lines
|
| |
|
|

|
Figure 4 - Results of Using Find
|
| |
|
|
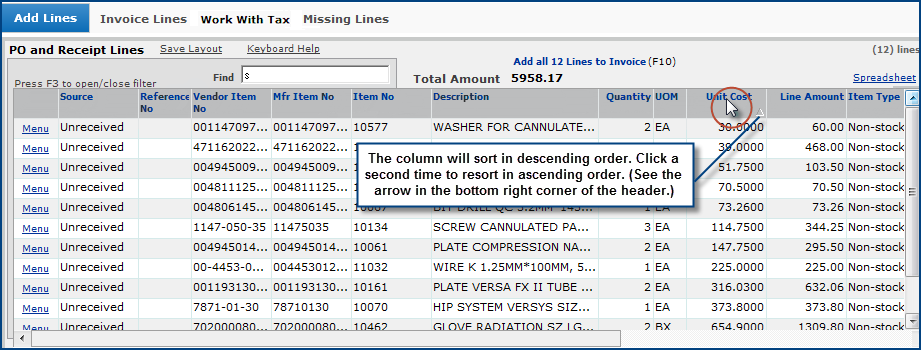
All of the columns on the Add Lines and Invoice Lines lists are sortable.
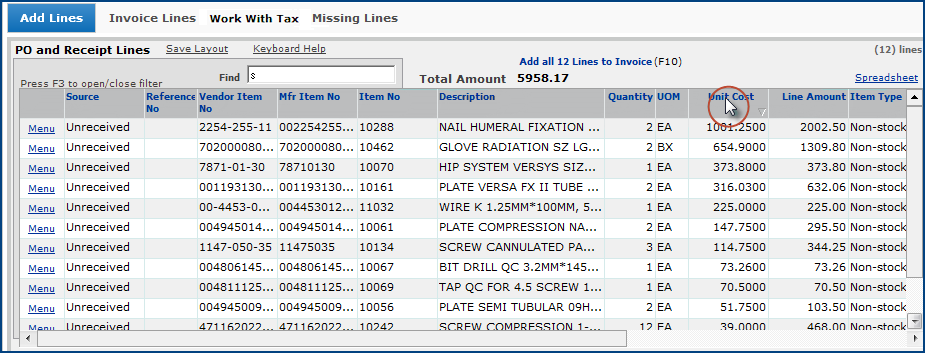
Any column can be sorted. |
Figure 5 - Sorting a List Column
|
| |
|
|
|
Figure 6 - Sorted Desc Column |
| |
|
Changing the List Layout
You can change the arrangement of columns in the Add Lines and Invoice Lines lists
and save the layout permanently. You can resize column widths,
rearrange the order of the columns, and move columns to the far right.
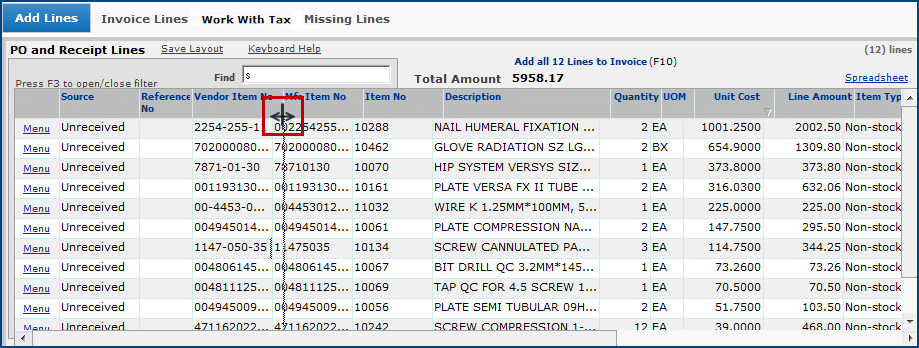
• Place the cursor on the header bar. The cursor changes to double arrows.
• Drag to the right or left to enlarge or decrease column width.
|
Figure 7 - Resize Column Width
|
| |
|
|

|
Figure 8 - Dragging a Column Header Off the List
|
| |
|
|

The "removed" column is actually positioned to the far right.
You can retrieve it if you need to, and move it back. |
Figure 9 - What Happens to the "Removed" Column
|
| |
|
|

You can rearrange the order of columns in the tables. |
Figure 10 - Reordering Columns
|
| |
|
|

Clicking Save Layout saves the table configuration on your local PC by user;
your layout is associated with your user ID. |
Figure 11 - Saving the Layout
|
| |
|
Adding Lines to the Invoice
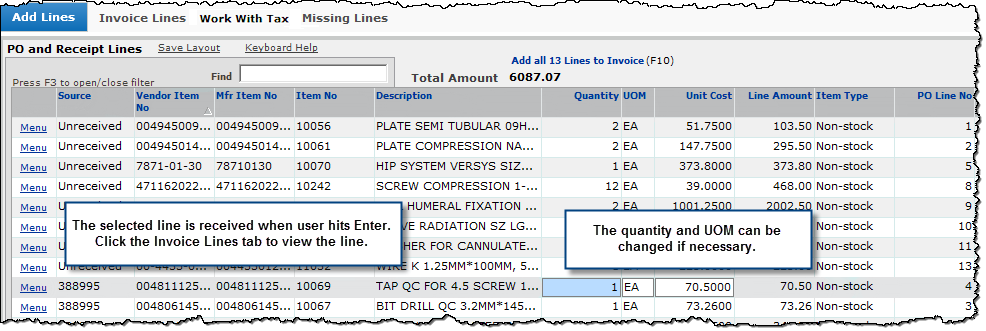
• Click a line on the Add Lines panel to select the line.
• Click Enter.
The line is added to the invoice.
To add all the lines to the invoice, click F10. |
Figure 12 - Selecting and Adding Lines to the Invoice
from the Add Lines Panel
|
| |
|
| |
|
|
• Click the Invoice List tab to see the added lines.

|
Figure 13 - Invoice Lines Panel With Two Lines
Added to the Invoice
|
| |
|
|

Here is the Invoice Lines list from Figure 12 with three lines added. |
Figure 14 - Invoice Lines Panel With Three Lines Added to the Invoice
|
| |
|
| |
|
|

Lines with exceptions have been added.
Unreceived lines have an Exception Status of R.
Received lines, with no price or quantity exceptions, have an exception status of N.
Price (P) or quantity (Q) exceptions may also exist for a line.
The fifth line in Figure 16 has a quantity exception.
Open the filter to view lines with each different exception status.
Scroll right to view the exception status (EX) of each line.
An easier way to view lines with a given exception status is to use
the filter.
To open the filter:
• Click F3.
Or
• Click in
the gray area in the upper left of the Add Lines or Invoice
Lines panel.
|
Figure 15 - Scrolling Right (in Figure 14) to View Each
Line's Exception Status
|
| |
|
| |
|
|

No lines with price exceptions exist in for this
invoice. However, if they did exist, the filter
would show a "P".
Clicking the P would display the lines.
In the filter:
• Click N to see invoice lines that have been received.
• Click R to view invoice lines that have not been received.
•Click Q to view lines with quantity exceptions. |
Figure 16 - Filter Is Open in the Invoice Lines List
|
| |
|
| |
|
|

To close the filter, click in the filter. |
Figure 17 - Using the Filter to View Unreceived Lines
- Invoice Lines List
|
| |
|
| |
|
|

|
Figure 18 - Using the Filter to View Unreceived
Lines on the Add Lines List |
| |
|
| |
|
|
A receipt has been created for item 10242.
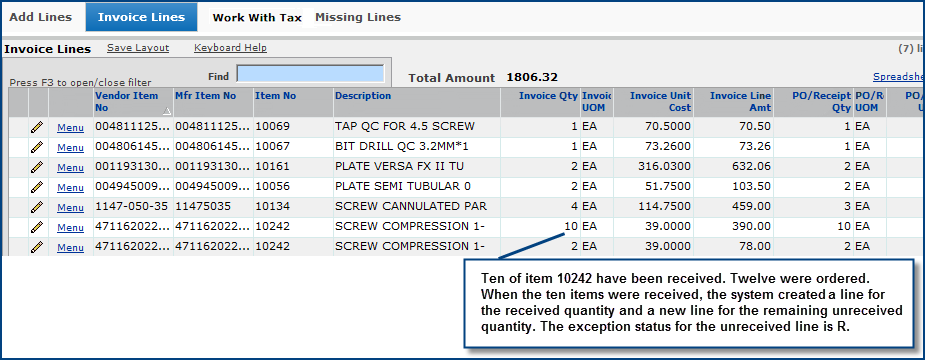
When the received quantity for a purchase order line is
less than the invoiced quantity,
the invoice quantity on the existing
invoice line is changed to be equal to the received quantity.
A new invoice match detail line is created for the difference
in invoiced quantity.
The new line is ready for the next receipt. |
Figure 19 - Invoice Lines List Shows a New Line Created
for Received Quantity |
| |
|
| |
|
|
Suppose you delete the last, unreceived line for item 10242
in Figure 19.
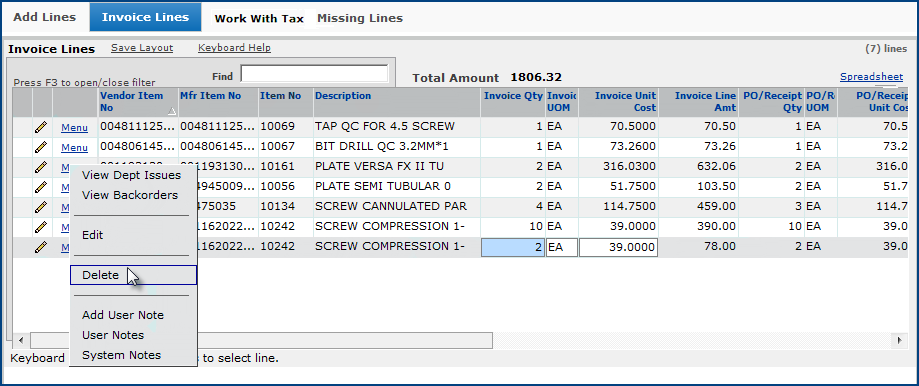
When the last line (Figure 20) is deleted,
the system returns the unreceived line
to the Add Lines list,
where it could be selected again. |
Figure 20 - Deleting an Unreceived Line where a Received
Line for the Same Item Exists |
| |
|
| |
|
|
Suppose more of
item 10242 is received. The quantity received is 2 EA.

The system creates a line on the Add Lines list.
The line can be
selected and moved to the Invoice Lines list. |
Figure 21 - Line for Additional Receipt of Item 1879-30
on the Add Lines List |
| |
|
| |
|
|
The newly received quantity (2) appears in the line at the
bottom of the list. Exception status is now N.

|
Figure 22 - Remaining Quantity Received and Added to an Invoice Detail
Line
|
| |
|
Receiptless Lines
You can create invoice detail lines for receiptless items
on a purchase order (Figure 23).
Notice the the filter contains a category
"Receiptless" for receiptless lines.
Clicking Receiptless
displays all the receiptless lines.

|
Figure
23 - An Invoice for a Purchase
Order With a Receiptless Line |
| |
|
| |
|
|
Receiptless lines on an invoice need to have a quantity
set. The system sends an error message
and enters instructions at the bottom
of the panel (Figure 24).

|
Figure 24 - Invoice Line for Receiptless Item Requires Quantity |
| |
|
| |
|
|
Click the line to open the Quantity, UOM,
and Unit Cost for editing.
Enter the correct quantity and change
other information as needed.

|
Figure 25 - Entering
a Quantity for a Receiptless Item
|
| |
|
| |
|
|
Once information for the line is complete, you can move
the receiptless line
(and other lines) to the invoice (Figure 26).

|
Figure 26 -
Moving Receiptless
Line from the Add Lines List to the Invoice Lines List |
Exception Receipts
An exception receipt occurs when an overage — a larger quantity of
an item than you ordered — is received, and the invoice does not show
the increased quantity. In this case, the system matches the invoiced
quantity with the received quantity (minus the overage), and keeps the
purchase order available should an invoice for the overage arrive.
To use the exception receipt feature, your organization must have
the appropriate permission set on its organization record. (Your System
Administrator can set the permission.) If your organization does not
use the exception receipt feature, the system creates a Receipt Overage
Report and sends email about the overage to the PO buyer. (The buyer's
email address must be entered in the system by your system administrator.)
Common Situations
In using the invoice match detail lines panels, you may find it helpful to
know how different receiving/invoicing scenarios are handled. Below is
a summary of a few common situations.
Situation |
Result |
An invoice contains one or more unreceived lines. This can happen if
you add unreceived lines from a regular purchase order to the invoice
by moving the lines from the Add Lines list to the Invoice Lines list. |
As long as you only click Finish Later, when receipts are created,
the system will automatically match the invoice lines. In the meantime, the
unreceived lines on the invoice have an exception status of R.
If you click Finish Now on an invoice with unreceived lines, the
invoice is in exception, and you will need to clear the the R exception
manually before you can finish matching the invoice.
- To clear the exception, from the AP Contents, select Invoicing
> Exception Invoices.
When the exception is cleared, the person
who originated the purchase order gets email (as with P and Q exception types). |
| |
| An invoice has a price, quantity, and invoice receiving exception, but all that appears on the line is a Q. |
Exceptions appear in this order: Q, P, R. When the quantity exception is cleared, a P for the price exception appears. Clearing the price exception reveals an R. When the R exception is cleared, totals can be adjusted, and the invoice match completed. |
|
An invoice line quantity for an item is greater than the receipt quantity.
(Inv Qty > PO/Receipt Qty) |
The system matches the receipt quantity, and creates a new "unreceived"
line on the Add Lines list for the difference.
Suppose you delete the unreceived line and enter the full invoiced
quantity on the line that has been received.
• If the quantity is out of tolerance, the line
is marked as a quantity exception (Q).
|
| |
A receipt line quantity is greater than the invoice line quantity for
an item. (PO/Receipt Qty > Inv Qty) |
The system matches the invoiced and received quantity. The purchase order
remains open for another invoice to be created that matches the receipt
overage. |
| |
On an unreceived invoice detail line, the Invoice Unit Cost does not match the PO/Receipt Unit Cost. |
The system shows a price exception (P) for the invoice detail line.
The unreceived line also has an receiving exception. The invoice cannot
be completed until the line is received.
When the line is received, the receipt number is entered in the Receipt
No column. |
Copyright © 2022 by Premier Inc. All rights reserved.


