Work with 1099-MISC and 1099-NEC Form Records Version
Contents
Overview
Payments to vendors for certain types of goods or services
must be reported to the IRS on a 1099-MISC or 1099-NEC form. If you are generating printed 1099 forms for the IRS, you must order the forms by calling a toll free IRS number, or by using an online order. The IRS encourages electronic submission of forms, but in some cases, electronic submission is required. Check the IRS website for information relevant to your particular organization.
Note: 1099 processing in ERP runs based on payment dates, not based on invoice dates.
For 2020, the N "Non-employee compensation" reporting has been removed from the standard 1099-MISC form, and given its own form 1099-NEC. Use the 1099-NEC form if you have non-employee compensation to report. The process for building and sending 1099-NEC information is the same in ERP as for the 1099-MISC form. Except, there is a separate menu element for the 1099-NEC form, as explained below.
User Security
The role object "Ten99Processing" controls users' abilities to work with 1099 data and tools. The "Ten99Processing" role object must be minimally set to View to access to the 1099 MISC Processing menu and the 1099 NEC Processing menu.
To locate IRS 1099 information,
-
Point your browser to the IRS website http://www.irs.gov
- Enter 1099 in the Search box. Click Search.
Accounts Payable features provide
tools to complete IRS 1099-MISC and 1099-NEC forms for reportable payments. The AP Tables contain a list of 1099 Codes
that are associated with the IRS-defined 1099 form fields for reportable payments. The 1099 codes are:
C: Royalties
E: Rents
F: Fishing boat proceeds
G: Total Federal Income Tax Withheld
H: Other income
J: Crop Insurance Proceeds
M: Medical and Health Care Payments
N: Non-Employee Compensation
Q: Excess Golden Parachute Payments
T: Gross Proceeds Paid to Attorney for Legal Services
X: Section 409A Deferral
Y: Section 409A Income
Z: Substitute Payments in Lieu of Dividends
A 1099 code can be assigned to particular vendors on
each vendor record. The system creates 1099-MISC and 1099-NEC form data records from vendor
invoices and payments, prints 1099 forms, and generates 1099 files
for downloading to send to the IRS.
Invoice distribution lines
Only goods lines, lines from matches, and adjustment lines are included in 1099 processing.
Viewing a Vendor's 1099 Information
When a vendor is set up in the system, a 1099 code and related information are
entered on the vendor record, if relevant. You can view 1099 information for
a vendor from the Vendors list.
To view 1099 information for a vendor:
-
From the Accounts Payable main Contents, select
Vendors > Vendors.
-
On the Quick Click menu, select
"I would like to ... View the Vendors List." Click
Show All. The list of vendors appears.
- On the Quick Click menu, enter the Vendor Name under Starting
With and click Go.
The vendor list appears with the vendor you specified at the top.
- Click the Help button to get information about columns in the
list.
- Next to the vendor name, click i (for Inquiry).
The Vendor Inquiry panel appears.
- On the lower part of the panel, click the Form 1099 Information
tab.
The 1099 information for the vendor appears (Figure 1).
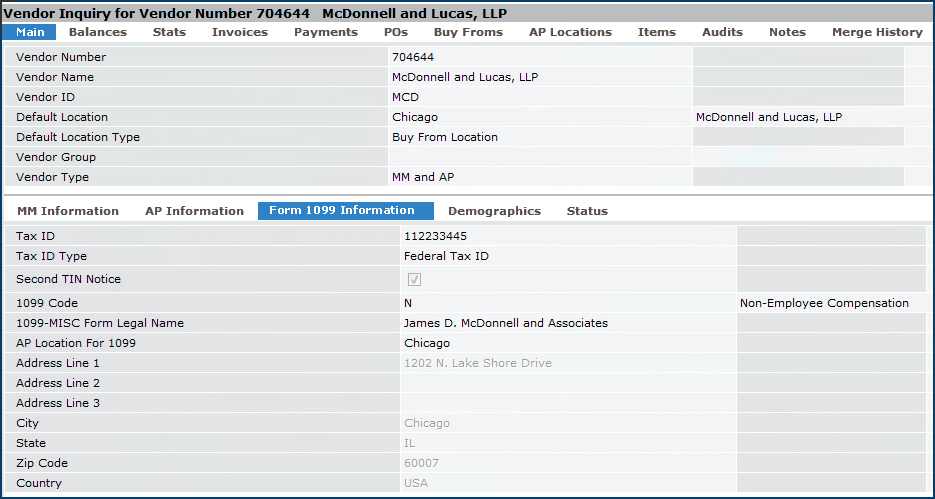
Figure 1 - Vendor Form 1099 Information Panel
Payments to the vendor in Figure 1 are reportable to the IRS for
1099 code N "Non-Employee Compensation." Notice that
the record contains a federal Tax ID and an address. The address on this panel is used
for the 1099 form record.
To view 1099 information for an organization:
- From the Materials Management or Accounts Payable main Contents, select Tables > Organizations.
The list of organizations appears.
- Locate the organization of interest.
- Next to the organization, click the edit icon
 .
.
The Organization panel appears.
- Click the Form 1099 Information tab.
1099 information for the organization appears (Figure 2).
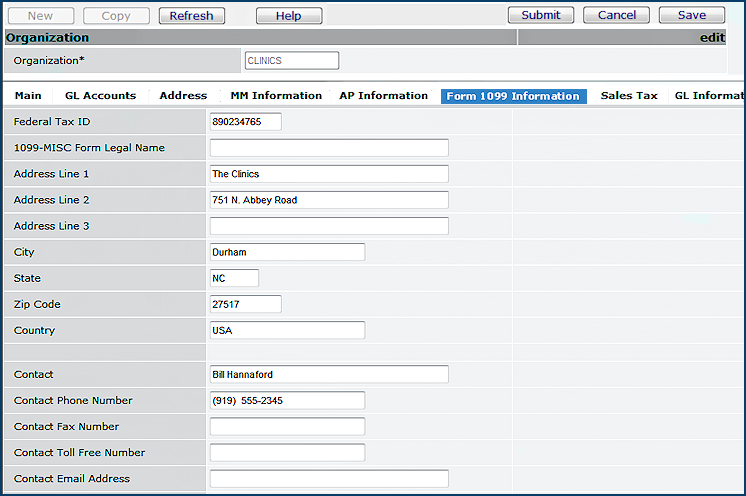
Figure 2 - The Organization Form 1099 Information Panel
You can get details on the panel fields by clicking Help.
Setup for Vendors and Organizations
 Before you can create 1099 Year records, all the 1099 vendor payees
must have complete information for 1099 processing. This information, on the
Vendor Edit Form 1099 Information tab, includes a Tax
ID (which may be a social security number or a Federal Tax ID) and
an address for 1099 purposes.
Before you can create 1099 Year records, all the 1099 vendor payees
must have complete information for 1099 processing. This information, on the
Vendor Edit Form 1099 Information tab, includes a Tax
ID (which may be a social security number or a Federal Tax ID) and
an address for 1099 purposes.
Note: The Vendor's 1099 address field can be updated automatically when the Buy-From Location and Pay-To Location addresses are the same.
(This feature applies only to "MM and AP" vendors that have a 1099 code and do not use the 1099-AP Location feature to define the 1099 address.)
When you change the Buy-From Location or the Pay-To Location for a 1099 vendor, Accounts Payable checks whether the two addresses are the same. If they are the same, but the vendor's 1099 address is different, you are asked to confirm a change to the 1099 address.
- Click OK to accept the change or Cancel to reject the change. OK changes the vendor's 1099 address to the Buy-From/Pay-To Location address.
Once the 1099 address is set to the same value as the buy-from and pay-to addresses, if you change either the buy-from address or the pay-to address again, a message appears. The message tells you that the address being changed was previously the same address as the vendor's 1099 address and that the vendor's 1099 address will remain unchanged.
-
If you need to merge vendors, or move vendor AP/buy-from locations, perform
that task before you create 1099 year records. (See Using
the Vendor Merge Feature.)
- To create 1099 records for payer organizations, each
organization must have complete 1099 address information, and a Tax ID.
To enter 1099 information for an organization, from the Organization Edit panel,
select the Form 1099 Information tab.
- The dual federal/state reporting program for 1099s lets organizations enter a State Tax ID number on the 1099 form. The program streamlines reporting to vendors: organizations can issue one copy of the 1099 for both state and federal purposes. This program is available in several states, but not all. See IRS Publication 1220 for details.
- For organizations in states that use the dual state-federal reporting program, the field State Tax ID on the organization record must contain the state ID for their organization.
Using 1099 Forms Processing
The IRS 1099-MISC form is used for reporting payments of 1099-coded invoice
lines, except for "N" payments, which use the 1099-NEC form.
Payable 1099-MISC and 1099-NEC form processing lets you create records for 1099-MISC
and 1099-NEC forms. From the 1099 form data, you can create an Adobe Acrobat PDF-formatted
file for printing 1099 forms. Optionally, you can create a file to download
to your network and send to the IRS. You can view existing 1099 forms records
as well.
In some cases, electronic submission of forms is required. You should review the requirements for any given year. (The IRS website is: http://www.irs.gov).
To send 1099 data to the IRS electronically, you must
obtain and submit a Form 4419 "Application for File Information Returns Electronically/Magnetically."
Form 4419 must be sent to the IRS no later than 30 days before the due date
of the 1099 form(s). The IRS provides a Transmitter Control Code which
you will need to create the file for sending to the IRS, whether electronically,
or on magnetic media. See the IRS website for details.
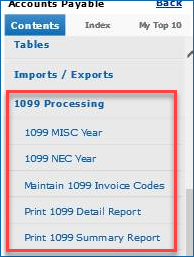
The panels for processing 1099-MISC and 1099-NEC forms are on the AP main Contents under 1099 Processing (Figure 3).
Figure 3 - 1099 Processing Menu
Work with 1099-MISC Forms
Begin by looking at a list few 1099 MISC years records.
To view a list of 1099-MISC years records:
- From the Accounts Payable main Contents, select 1099 Processing
> 1099 MISC Year.
A list appears that shows the years for which 1099-MISC form records have been
generated, by 1099 Year. (Figure 4).
(No Data appears if forms records have not been created for any year.)
Note: The 1099 Years list is restricted by the user's data profile. You can only see 1099 year data for organizations permitted in your data profile.
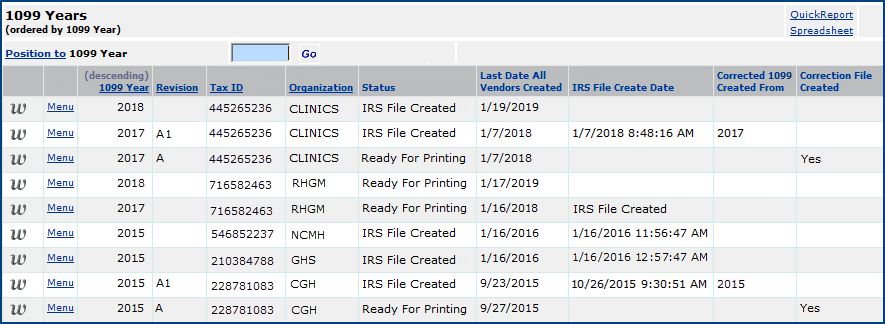
Figure 4 - 1099-MISC Records for Financial Years
- Click Help for detailed information on the list's columns.
A few notes are below:
- The 1099 Year column shows the years for which 1099-MISC form records
exist, by payer Tax ID. (Usually, the Tax ID is associated with a
paying organization at your site.)
- The Revision column may contain a capital letter. If so, data for
that payer Tax ID and year have been regenerated. Once you create a file
for transmission to the IRS for a given payer Tax ID and year, the form
data is locked down. Any re-generations of the form data create a new version
of the 1099-MISC year (e.g., 2009 A), and new 1099-MISC form records for the year.
See 1099 Records Lock Down and To
regenerate records after lock down.
- The Status column is the status of the 1099-MISC form records for the
given year and payer Tax ID. Values are:
- Missing 1099 Info: The 1099 form records are not complete.
Organization or vendor 1099 address and/or contact information is missing.
Each organization and vendor that has 1099 payments must also have a Tax
ID.
- Ready for Printing: The 1099 form records are complete.
All required 1099 address and contact information exists. 1099-MISC forms
can be printed and the file for the IRS can be created.
- IRS File Created: A file has been created for the IRS. You can
download this file.
- The Corrected 1099 Created From and Correction File Created
columns will contain data if a correction file has been created. (Creating a correction file is discussed in a later section.)
Clicking the w at the beginning
of a 1099 year row opens the Work With panel so that you can access
the records that the system generated for the payer Tax ID and year. Depending
on the Status of the 1099 form records, you can perform various activities
from the Work With panel, for example:
- View the vendors for the year.
View vendor invoices with and without 1099 codes.
Edit 1099 information.
- Print 1099 forms.
- Re-create the 1099 data.
For example, if the Status of the year records is Missing 1099 Info,
you will need to re-create the 1099 data after you enter whatever is missing
for the vendor or organization. (Address information may be missing.)
- Create and download files for the IRS.
- To return to the 1099 Years list, click Back.
To build new 1099-MISC year records:
- From the Accounts Payable main Contents, select 1099 Processing
> 1099 MISC Year.
A list of 1099 form records appears (Figure 4), or No Data if none
have been created.
- Click New.
The system asks what year you wish to build 1099 MISC data for and gives you
the opportunity to enter a payer Tax ID (Figure 5).
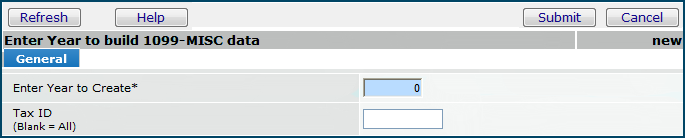
Figure 5 - Build New 1099 MISC Year Records
-
Enter information on the form.
- To build new data for all payer Tax IDs for a year, enter only the year
(in Enter Year to Create), and click Build.
- To build 1099-MISC data for a specific payer Tax ID, enter the year and
Tax ID.
- Click Submit.
(You can also click Cancel to terminate the create process.)
Clicking Submit generates a batch job in which the system creates the following:
The data accumulated comes from the vendor invoices that have 1099 codes
on them, and were paid by a check dated within the calendar year entered.
If the current threshold amount for a 1099 code is not met, the system sets
a flag on the 1099 Form record.
Invoices that are fully or partially paid (with distribution lines containing
1099 codes) are included. The payer Tax IDs come from organizations designated
as invoicing and invoicing/paying only. A Tax ID will appear
only once. If multiple organizations have the same Tax ID, they are rolled
into one record.
Invoices for vendor "OneTime." Your site may use
the Vendor Number OneTime as an "umbrella" for infrequent or
one-time vendors. The system generates data from invoices paid to the
OneTime vendor number, and gives you the opportunity to break out data for
each individual payee (as described below).
If you have two payments from the same vendor, you must manually
sum the tax amounts, and create a single 1099 form record. You cannot create
1099 form records for two vendors with the same Tax ID.
- When the build is complete, the 1099 Years list appears.
Note: 1099 form records for a year and payer Tax ID
cannot be deleted once created, but the data can be regenerated.
- Click the "Work With" icon (w)
next to the year and Tax ID on the list to access the form records.
Using the Work With Panel
Figure 6 is an example of the Work With panel.
Figure 6 - Work With 1099 Year Panel
To view the Work With panel for
a 1099-MISC year and Tax ID:
- From the Accounts Payable main Contents, select 1099 Processing
> 1099 MISC Year.
A list of 1099 year records appears
- Locate the row containing the year and Tax ID of interest.
- Click w or Menu > Work
with.
The Work With panel appears. (See Figure 6).
Viewing the List of Vendors
Included in the 1099 Forms Data
The Vendor Inquiry panel contains two tabs: Regular Vendors (Figure
7 and OneTime Vendors (Figure 11).
- On the Work With panel, click View 1099 Vendors.
Go appears.
- Click Go.
A list of regular vendors with associated 1099 codes and amounts appears on
the Regular Vendors panel (Figure
7). The 1099 data for each regular
vendor is generated by the system. For each Vendor Tax
ID on the list, you can click Menu to access information, such as
invoices with 1099 codes.
- If the vendor 1099 information is complete, Yes appears in the 1099 Info Complete column.
- Otherwise, the vendor column is blank and the entire 1099 run for the year has the Status Missing 1099 Info. You will need to complete missing information for vendors before the year can be printed.
- Click Menu > Edit 1099 Information to complete the data for the vendor. You may need to enter an ID, an address element, or other fields.
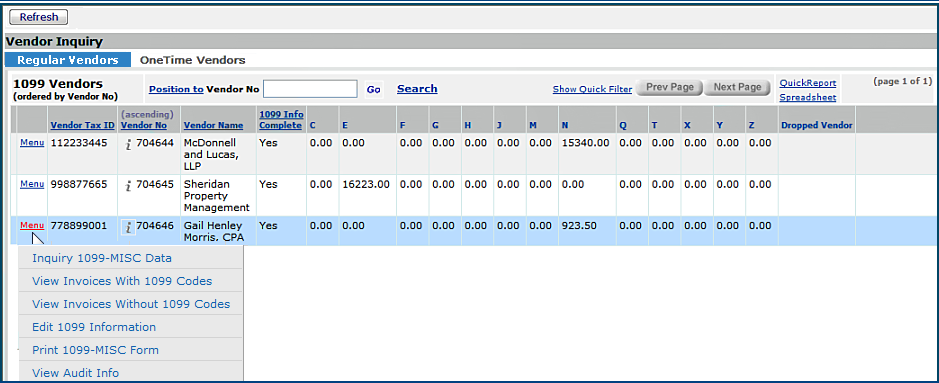
Figure 7 - 1099 Vendor Inquiry List for Payer Tax ID and Year
Work with 1099-NEC Forms
Processing 1099-NEC forms has the same steps as processing 1099-MISC forms. The discussion below is a summary of the steps, and refers to the discussion on 1099-MISC forms for details.
To display a list of 1099-NEC years records:
- From the Accounts Payable main Contents, select 1099 Processing
> 1099 NEC Year.
A list displays the years for which 1099-NEC form records have been
generated, by 1099 Year (Figure 8).
(No Data appears if forms records have not been created for any year.)
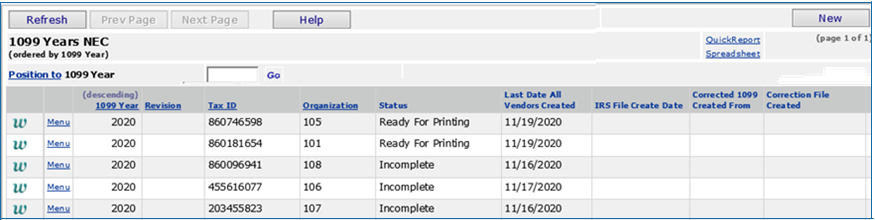
Figure 8 - 1099-NEC Records for Financial Years
Note: As with the 1099-MISC form, the 1099-NEC Years list is restricted by the user's data profile. You can only see 1099 year data for organizations permitted in your data profile.
- The Revision column may contain a capital letter. If so, data for
that payer Tax ID and year have been regenerated. (See details above on the Revision column.)
- The Status column is the status of the 1099-NEC form records for the
given year and payer Tax ID. (See previous discussion of the Status column.)
- The Corrected 1099 Created From and Correction File Created columns will contain data if a correction file has been created. (See Creating a correction file.)
Clicking the w at the beginning
of a 1099 NEC year row opens the Work With panel so that you can access
the records that the system generated for the payer Tax ID and year. Click Help on the Work With panel for information on its fields and actions.
To build new 1099-NEC year records:
The process is the same as building 1099-MISC year records. Below is a summary. See details in the previous discussion for 1099-MISC forms.
- From the Accounts Payable main Contents, select 1099 Processing
> 1099 NEC Year.
A list of 1099 form records appears, or No Data if none
have been created.
- Click New.
The system asks what year you wish to build 1099 MISC data for and gives you
the opportunity to enter a payer Tax ID (Figure 9).
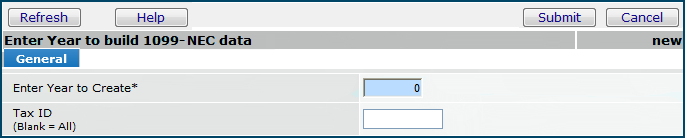
Figure 9 - Build New 1099 NEC Year Records
-
Enter information on the form.
- To build new data for all payer Tax IDs for a year, enter only the year
(in Enter Year to Create), and click Build.
- To build 1099-NEC data for a specific payer Tax ID, enter the year and Tax ID.
- Click Submit.
(You can also click Cancel to terminate the create process.)
Clicking Submit generates a batch job in which the system creates the following:
- When the build is complete, the 1099 Years list appears.
Note: 1099 form records for a year and payer Tax ID
cannot be deleted once created, but the data can be regenerated.
- Click the "Work With" icon (w)
next to the year and Tax ID on the list to access the form records.
The Work With Panel for a 1099-NEC Year
Figure 6 is an example of the Work With panel for a user creating a 1099-MISC form. Below (Figure 10) is the same panel for a user creating a 1099-NEC form. The panels work in the same way.
To view the Work With panel for a 1099-NEC year and Tax ID:
- From the Accounts Payable main Contents, select 1099 Processing > 1099 NEC Year.
A list of 1099 year records appears
- Locate the row containing the year and Tax ID of interest.
- Click w or Menu > Work with.
The Work With panel appears. (See Figure 10).
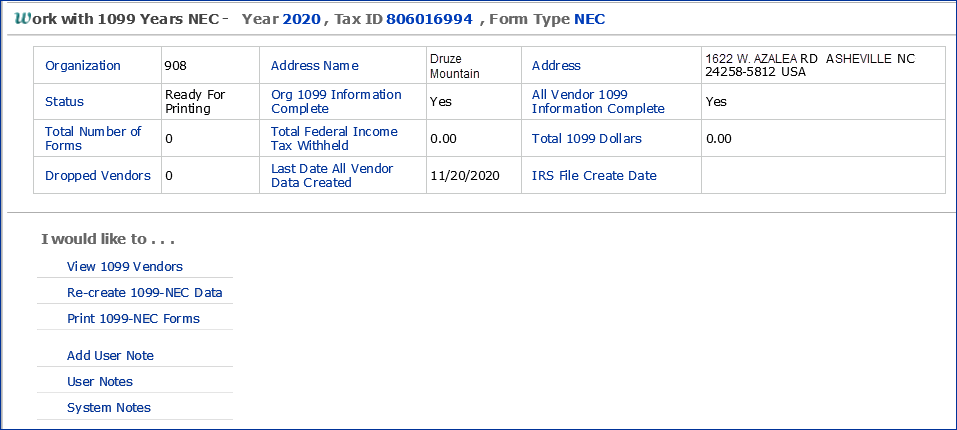
Figure 10 - Work With 1099-NEC Panel
Viewing the List of Vendors Included in the 1099-NEC Forms Data
The Vendor Inquiry panel contains two tabs: Regular Vendors and OneTime Vendors (Figure 11).
- On the Work With panel, click View 1099 Vendors.
Go appears.
- Click Go.
A list of regular vendors with associated 1099 "N" codes and amounts appears on the Regular Vendors panel (Figure 11). The 1099 data for each regular vendor is generated by the system. For each Vendor Tax ID on the list, you can click Menu to access information, such as invoices with 1099 codes.
- If the vendor 1099 information is complete, Yes appears in the 1099 Info Complete column.
- Otherwise, the vendor column is blank and the entire 1099 run for the year has the Status Missing 1099 Info. You will need to complete missing information for vendors before the year can be printed.
- Click Menu > Edit 1099 Information to complete the data for the vendor. You may need to enter an ID, an address element, or other fields.

Figure 11 - 1099 - NEC Vendor Inquiry List for Payer Tax ID and Year
Creating 1099 Records for
Individual OneTime Vendors
This process applies to both 1099-MISC and 1099-NEC forms.
The system generates collective 1099 data for all
vendors with the umbrella Vendor No "OneTime." From the OneTime
Vendors tab on the Vendor Inquiry panel, you can create an individual 1099
form record for each payee, if you need to. Creating the individual 1099 form
record for each OneTime payee is a manual process.
Keep in mind that if you have multiple payments
to the same OneTime vendor, you must sum the tax amounts, and create a single
1099 form record. You cannot create 1099 form records for two OneTime vendors
with the same Tax ID.
To create 1099 form records for each OneTime payee:
- On the Work With panel for either your 1099 MISC or 1099 NEC year, click View 1099 Vendors.
Go appears.
- Click Go.
The Vendor Inquiry panel appears.
- Click the OneTime Vendors tab.
A panel appears containing a row for Vendor Number OneTime (Figure
12).
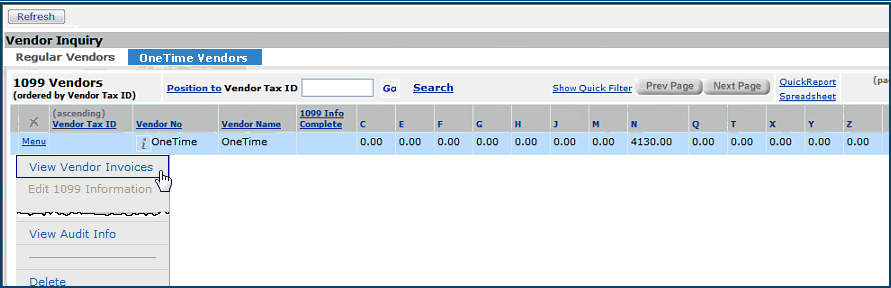
Figure 12 - OneTime Vendors List Before Payees Are Split Out
- Select Menu > View Vendor Invoices.
The list of invoices for Vendor No OneTime appears, along with each
payee name and other information. Figure 13 is the list for 1099-MISC vendors. The list for 1099 NEC vendors is similar (except that the column Code 1099 displays "N").
(When you create an invoice for a vendor whose Vendor No is OneTime,
you enter the payee information -- check name and address -- on the invoice.
Note: Using an apostrophe in the payee Vendor No or Vendor Name is not recommended.)
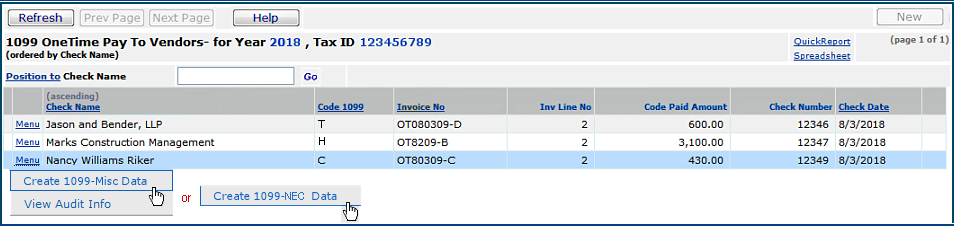
Figure 13 - List of Payees for Vendor Number OneTime
If you have multiple invoices for any payee, multiple entries will exist
in the invoice list.
- Next to a payee in the Check Name column, select Menu
> Create 1099-Misc Data or Create 1099-NEC data, depending on which form you are working with.
A form appears for you to enter additional information such as
other 1099 code amounts and Vendor Tax ID. Figure 14 is an example for the 1099-MISC form. The panel for the 1099-NEC form is similar.
- The system populates the reportable
amount next to the 1099 code for the invoice row selected.
Amounts below 1099 thresholds are dropped.
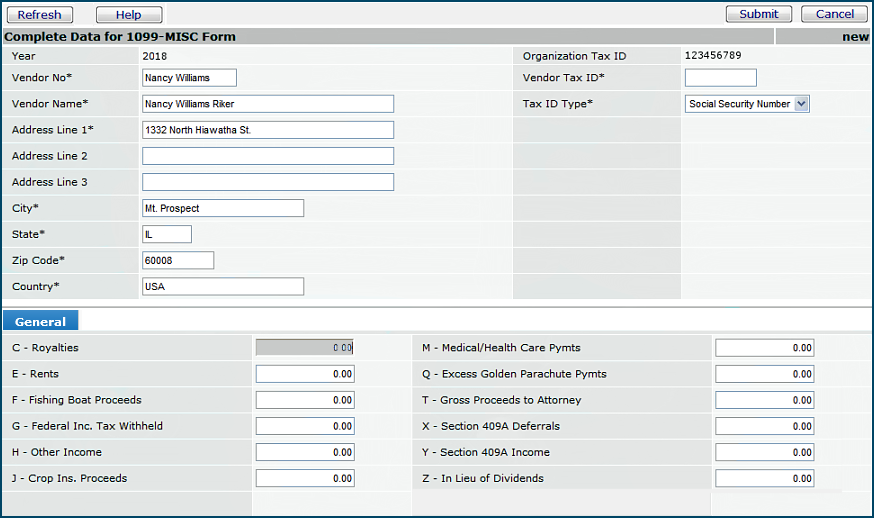
Figure 14 - Form for Entering 1099-MISC Data for OneTime Payee
- Enter the Vendor Tax ID and other information on the form
as needed. If multiple invoices for the payee exist, sum the reportable amounts.
- Click Submit when you are finished.
The list of payees for vendor OneTime is displayed.
- Click the X in the upper right to exit the invoice list.
The OneTime Vendors panel is displayed.
- Click Refresh.
A row appears on the panel showing the record that you created (Figure 15).

Figure 15 - OneTime Vendors List After a Payee Is Split Out
The amount for each individual OneTime payee is
included in the Total 1096 Dollars on the Work With panel (Figure 6). The "umbrella" OneTime total is not included, however, since this value
breaks down into separate amounts for each payee.
Note that you cannot edit the OneTime record, nor
can you print a 1099 form based on this record. You can edit (or delete) each
individual OneTime payee's 1099 information, however.
Recreating Year Data for 1099 Forms
If 1099 information for an organization or vendor is not complete, the 1099
data that you build will have the status of Missing 1099 Info, and you
must complete the needed information in the vendor and/or organization records.
Then, recreate the forms data.
If new invoices for 1099 vendors have been paid since the forms data was originally
built, or if existing invoices have changed to remove/include a 1099 code, you
should recreate the data to capture any new payments.
When you recreate the data, the system recreates OneTime data. If you think there
are changes for any individual OneTime payee, you need to manually update the
payee's 1099 form record, as discussed in Creating
1099 Records for Individual OneTime Vendors.
Once you create an IRS Export file, the forms data is locked down. In this
situation, you need to generate a new version of the forms data. See
1099 Records Lock Down.
To regenerate 1099 data for a payer Tax ID and year:
- On the Work With panel, click Re-Create 1099-MISC Data or Re-Create 1099-NEC Data.
Go appears.
- Click Go.
Printing
1099 Forms
Printing 1099 forms in the system is similar to printing reports. The information for the printed copy is
sent to the reports list: Reports >
My Archived Reports. You can view the data, or print it on a form. Stock
the printer with blank IRS 1099-MISC forms or 1099-NEC forms, as appropriate, and the 1099 data will print in
the correct fields on the paper form.
Important Printing
Notes:
Before you print 1099 forms from My Archived Reports,
adjust the printer settings for the options below. You can find these options
on the File > Page Setup menu or the File > Print
menu. Keep in mind that printers differ. You may have to experiment with various
printer options to find those that work best.
Margins = "none". If values
can be entered, set the margins to 0.
Orientation = "Portrait"
The Header and Footer fields should be blank.
Page Scaling = "None"
If you can set the dpi and
Fit to Page options on your printer, set them to:
dpi = "600"
To print 1099 forms for a payer Tax ID and year:
- On the Work With panel, click Print 1099-MISC Forms or Print 1099-NEC forms.
- Click Go.
Your printed forms are available from Reports > My Archived Reports.
If you have printing problems...
Verify that you are running Adobe Reader, Version 6.0.
This version of Adobe Reader is required for 1099 Misc Forms.
If your Adobe Reader is the correct version, and you still cannot print 1099
forms correctly, contact your network system administrator to make sure that
Adobe print settings are correct. Your administrator may need to update the
printer's PostScript Printer Description (PPD) file. This file handles PostScript
printer capabilities such as margin settings. See the Adobe web site for more information.
Creating 1099 Export Files for the IRS
After you generate the 1099-MISC or 1099-NEC forms records, you may wish to create an electronic
file to download to your network and send to the IRS.
To create an IRS electronic file for a payer Tax ID and year:
- On the Work With panel for either the 1099-MISC year or the 1099-NEC year, click Files for IRS.
The list of files that have been created appears (Figure 16) or No Data if none exist.

Figure 16 - List of IRS 1099 Export Files Generated for a Year
and Payer Tax ID
- Click New.
A panel appears asking you to enter the Transmitter Code for the file. You
obtain a Transmitter Code from the IRS.
- Enter the Transmitter Code.
- Click Build.
The IRS file is built , and you are returned to the IRS 1099 Export Files list.
- Click Refresh to see the new file on the list.
- To download the file
to your network for sending to the IRS, click Menu > Download.
The system displays the Microsoft Windows Download panels. Use the panels to
download the file to a network location.
1099
Records Lock Down
Once you create the 1099 export file for the IRS, the form records for the
file are locked down. Even if you do not send the IRS the online file,
you should still build the file to be sure that the form records you generate
are locked, and are not changed inadvertently at a later date. You can always
regenerate a new version if needed.
To regenerate the 1099 form data after the IRS file has been created, you
must create new form records. The system treats the new form records as a new
version for the same year and payer Tax ID. An additional entry appears
for the Year and the Tax ID with a corresponding letter entry
(A, B, C, etc.) in the Revision column on the 1099 Years list. The alphabetical
suffix identifies the order in which the form data was regenerated.
To regenerate 1099
form records after lock down:
Regenerating a 1099 forms record uses the same process as creating a new record.
- From the Accounts Payable main Contents, select 1099 Processing
> 1099 MISC Year or 1099 NEC Year
A list of 1099 year records appears.
- Click New.
A panel appears with two fields to complete.
- Enter the year. The year is the same year as the records that you are regenerating.
- Enter the payer Tax ID. Again, this value is the same as the payer
Tax ID for the records being regenerated.
- Click Build.
- Refresh the 1099 Years list.
The regenerated records appear with the year you specified, followed by a
letter. The letter indicates the regenerated version.
Creating a Correction File for a Submitted 1099 Form
If you have already submitted your 1099-MISC or 1099-NEC for the year and later need to make corrections to it, you can create a correction file. You must first regenerate the 1099 file by following the procedure outlined above.
After you have regenerated the 1099 file, find the new file on the 1099 Year panel. In Figure 17 below, the regenerated file for 2013 is listed as 2013A. In the menu, select Create Correction File.
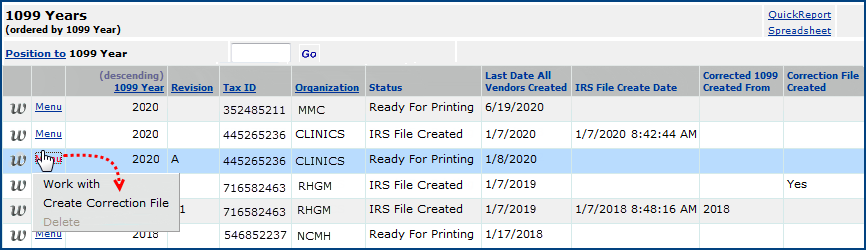
Figure 17 - Create Correction File
You will need to supply the Transmitter Control Code and the 1099 Year Compare To File. (See Figure 18.)
- Transmitter Control Code: The code provided by the IRS to allow your organization to submit files electronically.
- 1099 Year Compare To File: The tax year for which the corrections are being made. In the above example, the 2013A file would be
compared to the already-submitted 2013 file.
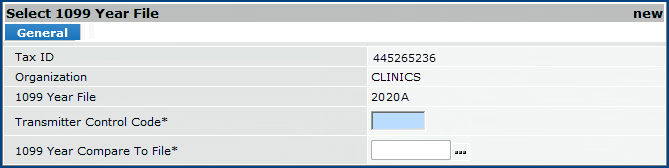
Figure 18 - Select 1099 Year File
When the correction file is listed on the 1099 Years panel, the Revision column will display A1.
Note: A 1099-MISC or 1099-NEC year can only have one 1099 Correction file each.
If data has been recreated for a 1099 that has a correction file, the corrected data is deleted.
Corrected 1099 Years cannot be used to create correction files.
Getting 1099 Reports
Summary and detail reports are available for your use from the 1099 Processing
menu.
- Select either Print 1099 Detail Report or Print 1099 Summary Report, as appropriate. The Selection Menu appears.
A new select field for record type is available. For 1099-NEC records only, select Yes. You can also select No for 1099-MISC records only. The default is Both, and includes both types of records.
- Click Submit to run the report.
The information for the printed copy is sent to the reports list: Reports > My Archived Reports.
From the Print 1099 Summary Report, you can also get information
about the total dollars for a vendor that were above or below the 1099 threshold.
On the Report Selection Values panel,
- Set Dropped to Yes to see dollars below each 1099 code threshold.
- Set Dropped to No to see dollars above each 1099 code threshold.
- Set Dropped to Both to see dollars below and above each 1099
code threshold.
The New Vendor Audit report is available from Reports > Standard Report
Definitions. This report has a prompt for Create Date, allowing the
easy identification of new vendors. Associated 1099 code and address information
is also provided.
You can also create your own reports using the report objects "1099 Summary, ""1099 Detail," "1099 Summary," "1099 Detail Worksheet," "1099 Form," and 1099 Form Including Dropped Box Values."
- From the Accounts Payable main Contents, select Reports > My Report Definitions.
Maintaining 1099 Codes
You can change the value of 1099 codes on multiple vendor invoices by creating
and running a batch maintenance job.
To create 1099 batch maintenance jobs:
- From the Accounts Payable main Contents, select 1099 Processing
> Maintain 1099 Invoice Codes.
A panel appears with a list of maintenance files that have run batch updates
of vendor 1099 codes on invoices.
- Click New.
A panel appears asking for the name of the maintenance job that you are creating,
and a description.
- Complete the Invoice Maintenance Name and Invoice Maintenance
Description fields.
- Click Next.
The Maintain 1099 Invoice Selection panel appears (Figure 19).
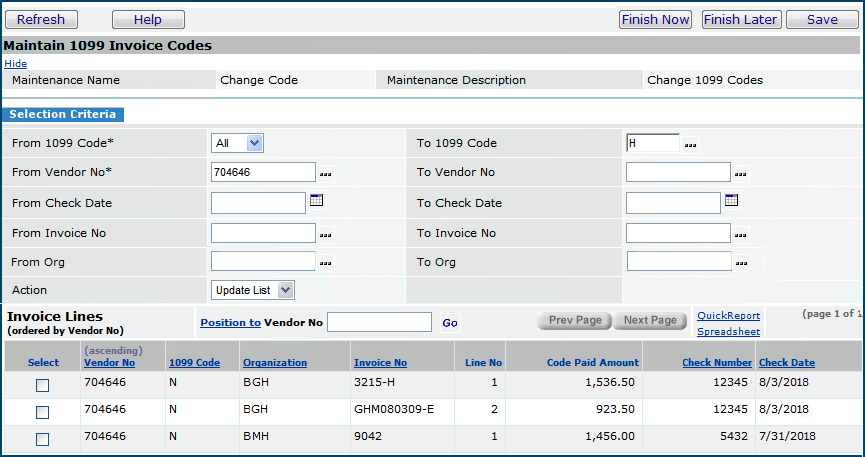
Figure 19 - Maintain 1099 Invoice Codes Selection Panel
- Use this panel to select and filter invoice distribution lines
on which you wish to change 1099 codes. You can filter the set of possible
lines by vendor number, 1099 code, invoice number, and check date.
- Enter selection criteria for the filter in the middle part of this panel.
You can specify an organization or range of organizations when selecting the invoice distribution lines for updating.
The organization prompt in the selection criteria is limited to the organizations that are valid for the user's data profile.
The list of invoice distribution lines is limited to the organizations that are valid for the user's data profile.
- Set Action to Update List.
- Click Save or Enter.
The filtered results are displayed in a list in the lower part of the
panel.
- Select individual invoice lines from the list by checking the Select
box on each line; or,
- Select all invoice lines by changing the Action to Select All
and clicking Enter or Save.
You can also "unselect" all selected lines by changing the Action to
Unselect All and and clicking Enter or Save.
- When you have finished specifying the list of invoice lines that
you want to change, click Finish Now to run the batch job immediately,
or Finish Later.
The list of batch jobs appears. (The job you created may have a message that
it is running.)
- Check the Status column to determine if your job is Complete.
- If not, your job could not run. Go back to the Selection panel and review
the information you entered. Make changes as needed.
- Click Menu > System Notes to view messages about how many records
were eligible for update, how many actually were updated, how many had errors,
and how many no longer exist.
Copyright © 2023 by Premier Inc. All rights reserved.