The system can import vendor catalog files in EDI 832 format. An authorized buyer can then update the item catalog -- either automatically for new items and price changes, or manually -- using the imported data. In order to import vendor catalogs, you must perform some setup steps. These steps are not difficult, and are described below. Additionally, the correct permissions must be set for you to import vendor data. The administrator at your site is able to set the appropriate permissions, as outlined below.
Note: EDI 832 documents older that 30 days (from the Start Receive date) are purged.
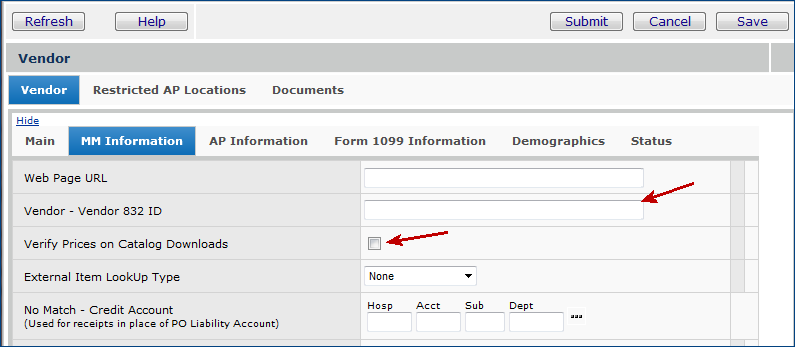
You will need a Vendor 832 ID number for each vendor (or each vendor's buy-from location) whose catalog information you plan to import. The system can accept catalog data across all of a vendor's buy-from locations, or from only specific locations. Contact the vendor to obtain this ID number.
The Vendor 832 ID number must be entered in the vendor records. After you have obtained the Vendor 832 ID, follow these steps:
You can view imported raw data files containing vendor catalog items and errors associated with the import process. You can also make corrections for some simple types of errors.

Fields on the list are:
Import Date - The date when the file was imported.
Status
- Complete: The file has been imported
and processed (brought into the system).
- Ready for Processing: The file
has not been brought into the system ("processed"), but is ready. You
will see this value on files that you may have corrected.
- Processing: The file is being
brought into the system.
Processed - The number of records in the file that were processed.
Message - Any message from the processing system, such as "Incomplete" (the file did not finish processing).
Source File - The name of the X12 source file.
Import User - The id of the user processing the files.
If errors prevent the raw data in any file from being processed further, you can view the import errors. Errors that prevent the raw data from being further processed are...
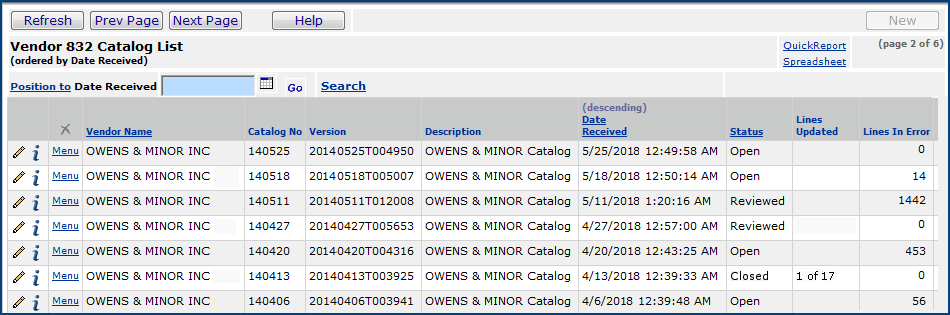
Note the column labeled Status. An imported file can have the status of Reviewed, which means that the catalog has been viewed; Closed, which indicates that the catalog is no longer available for editing (although you can click Inquiry to view catalog information) or Open, which means that you can edit or process the catalog further. Click Help for information on the other fields.
Once you have successfully brought an 832 vendor file into the system, you can use the file to update your records. Typically, vendor 832 import files contain two kinds of information for updates:
Keep in mind that new item data from a vendor may not contain all of the information the system needs to make the item active. You may need to add additional information yourself. Similarly, items with changed prices can show conversion or UOM data that is different from the system's record for the item. In order to accommodate either of these possibilities, the system allows you control over the update process.
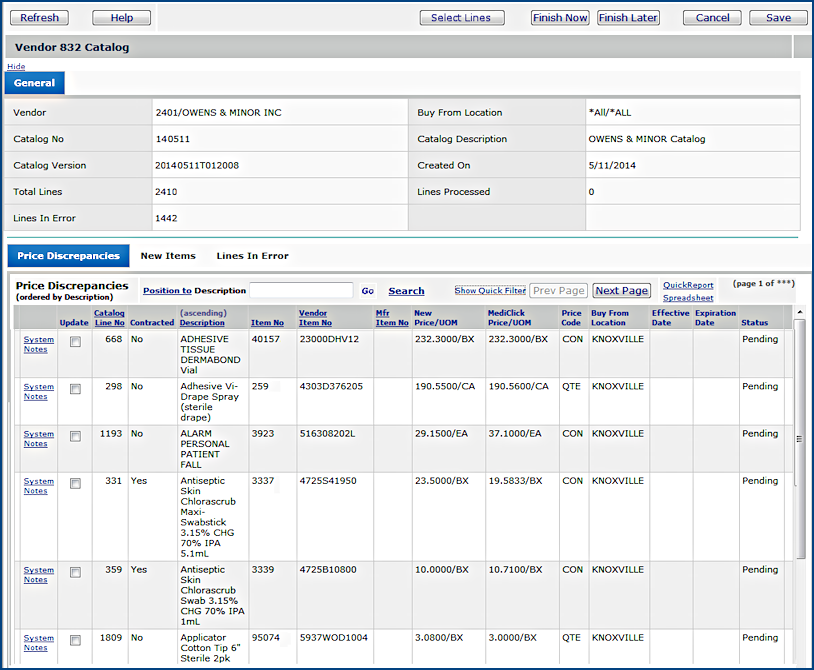
Click Help for information on the list's columns.
To accept prices for items, you have two choices:
Important: If the item price is determined by contract, when you attempt to update the vendor price, the application displays a warning before changing the price.
- Click the box labeled Select/Unselect All New Items.
-
Click Submit.
The records are processed when you click Finish Now, creating a
new catalog item record and vendor item record.
The system writes a user note to the item vendor record for each UOM selected
for an item. Later, you can delete UOMs that you do not want to use.
The Status field on the Lines in Error tab describes problems or ambiguities in the imported data. The application is unable to use the data to update the associated item catalog record(s).
Here is the list of errors:
Integrity - Indicates a data integrity problem. An item number on the import does not exist in the item catalog.
Effective Date > Today - An item record was imported that shows an Effective Date for a new price at some time in the future. The application would not normally use this record to update the price on the current day.
Today > Expiration Date - The imported item record has an expired price.
No Price Change - The imported item record contains the same price as the current item record. The system can do nothing with this item, so the item is logged as an error.
Under Contract - The item is under contract.
Invalid Unit of Measure - The imported record has a UOM that is unknown by the system, or is not a purchasing UOM in the application for the item.
No Vendor Item No - The imported record has no Vendor Item Number (VIN).
No UOM - The imported item record has no unit of measure.
Many Items - When the system searched for the matching item catalog item using the vendor number, VIN, buy-from location, and the item number from the item catalog, multiple matching items were found.
You can review the Status of records on the Lines in Error tab, and determine whether you want to make manual updates in the system's item catalog.
Using Select Lines, you can choose all price discrepancies -- or none; and you can choose all New items -- or none -- by checking or unchecking the appropriate box.
Select Lines is useful if you have many price changes, for example, but you do not want to use all of them. In that situation, you would check the Select/Unselect All Price Discrepancies box, click Submit, and then click Refresh. All price discrepancies are selected. You can then unselect the records that you do not wish to update.
After you specify the items that the system should add and/or the items whose prices change, click Finish Now to implement the changes in the application. Or, click Save, then click Finish Later to come back to the data and update the application later.
When you select Finish Now, the system updates its item catalog records, and writes a user note for any items updated. If the update involves UOMs that are different from those used in the application, the vendor item record also has a user note written to it. The system updates any unauthorized POs with item price changes.
Note: If you add items to the item catalog, be sure to also add them to your asset location item inventories as needed.
Copyright © 2023 by Premier Inc. All rights reserved.