| This topic discusses: |
Links to related topics: |
| Search Online Doc | |
| Current Release Notes | |
The ADT (Admission, Discharge, and Transfer) Import feature allows you to bring files into the system from your admissions system as new patient data, as updated patient data, or as an instruction on what patient data to delete. You can run the import function from the system as often as you need to. The ADT import feature can be run, for example, whenever a particular hospital unit decides to enter its patient charges.
Features are built into the system to ensure the privacy of electronic protected health information (ePHI), in compliance with HIPAA requirements. One applicable area is ADT patient record import.
On a User Profile, the Hide ePHI Data field determines whether a user can access patient data. When Hide ePHI Data is checked, a detailed series of restrictions apply to the user's access to ePHI records. Patient information in the ADT import feature is subject to restrictions governed by this User Profile field.
In sum, if Hide ePHI Data is checked, the user cannot access patient-identifying information.
The list of restrictions and examples is outlined in the ePHI documentation.
Note: All patient identifier fields in this document's figures contain fictional values, and are not associated with any actual individual.
This feature is controlled by the "PatChg" role object.
-
The minimal setting to display or work with ADT patient data is Modify.
-
To download or delete ADT patient data, a setting of All is required.
When you upload patient data files from your admissions system, the system performs these steps:
Checks the file - The system verifies that the file is a patient data file, and determines if the file format is correct.
Reads the file - The system reads the file to determine the action(s) needed; for example, adding or changing a patient record. You set the actions in the import file's ADTACTION field for each patient record. See "How ADTACTIONs work."
Processes the file to add, delete, or change patient data in the system.
If the system cannot complete any step because of errors, it logs the errors. You can view the errors and correct them.
Since patient data can accumulate quickly, the system purges records for discharged patients.
Patient data is deleted five days after the patient's
discharge date has been imported into the system.
However, for discharged patients, records with charges pending will not be deleted by purges.
Purges do not delete records for active patients, regardless of how long the records have existed.
If you need to post charges for a patient whose data have not yet been imported from your admissions system, you can add the data to the system using the Patient Charge Entry feature. The patient information is flagged as "not validated" and the system validates the patient (checks that the patient does exist) during the next patient charge export. When a patient is discharged, the hospital admissions system can update the system during the next import of patient data.
The following steps cover the process of importing ADT patient records.
Important: Click BACK on your browser when you finish viewing the example files described in the next paragraph. Or, if you are using Internet Explorer tabs, close the tab. If you click File > Exit or File > Close, the system may also close.
Click update, add, or delete to see an Example File with each ADTACTION. Study the field descriptions, and structure your patient data accordingly.
<EOF>
Important: Your file must contain <EOF>, by itself, on the last line.
The ADD and DELETE ADTactions add and delete patient data. Use ADD when a patient is newly admitted. The UPDATE ADTACTION updates patient data; for example, updating a Patient ID. DELETE manually deletes patient data; for example, in case of a data entry error.
The column name in bold following each column letter must be entered exactly as it appears in the list. The column letter is for reference only - do not enter it on the spreadsheet.
| Field | Entry | ||||||||
| Row 1 - Header | |||||||||
| Column A: PatADT | The word "PatADT" is required. | ||||||||
| Column B: Customer ID | Your customer ID. (defined by the system). Contact customer support if you do not know your ID. | ||||||||
| Column C: Time Stamp | The date of the import in MM/DD/YYYY format; e.g., 10/17/2001 for October 17, 2001. | ||||||||
| Row 2 - Column Names (Enter the column names exactly as they appear below, e.g., DEPT in Column C.) | |||||||||
| Column A: ORG | The Organization ID. | ||||||||
| Column B: DEPT |
The Department ID. |
||||||||
| *Column C: ADTACTION |
A required code that describes the action the system should take with the patient information: ADD the patient; DELETE the patient; or UPDATE - change information for the patient. The ADT action may also be one of the following HL7 Trigger Event Codes:
|
||||||||
| *Column D: PATIENTID |
The ID of the patient who is being added, deleted, or whose records are being updated. This field can have a maximum of 15 characters. Either Patient ID, Patient Account No, or both is required. |
||||||||
| Column E: DOB |
The patient's date of birth. |
||||||||
| Column F: ADMISSIONDATE |
The date when the patient was admitted. Required with ADD ADTACTION. |
||||||||
| Column G: DISCHARGEDATE |
The date when the patient was discharged, if discharge has happened. Always optional. |
||||||||
| Column H: NEWPATIENTID | A new ID associated
with the patient, if needed. (e.g., a newborn). 50
characters, max. |
||||||||
|
*Column I: PatientAccountNo |
The hospital patient's account number. Either Patient ID, Patient Account No, or both is required. | ||||||||
|
*Column J: PatientClass |
One of the following values is required: E - Emergency |
||||||||
| Rows 3 and on: data records | |||||||||
| Last Row: <EOF> | |||||||||
* indicates required field, or choice of required field.
![]()
- Select the box labeled Load and Verify, No Import.
- Click Submit. The system attempts to upload your file and validate it. If successful, the system sends you a message. If the system cannot upload your file and validate it, error messages appear. Read and close the error messages. Make changes as needed in your .csv file and try the upload again. Click here to read debugging information.
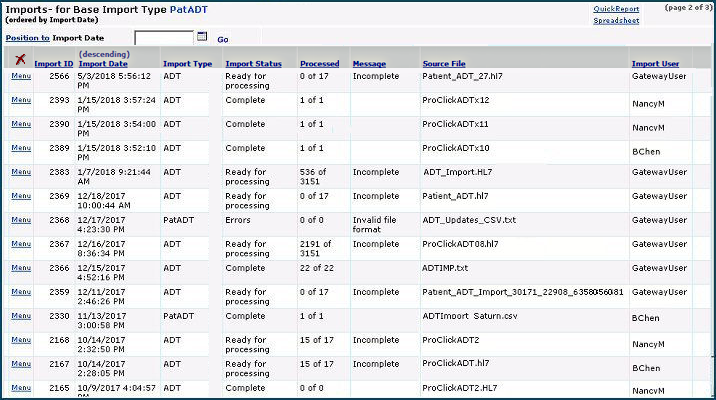
The Imports for Base Import Type PatChg appears.
- Click Refresh to see your file listed.
- Click Submit. The system attempts to upload your file and validate it. The list Imports for Base Import Type PatChg appears.
- Click Refresh to see your file listed.
Import Status Desc - The successful or unsuccessful status of the upload.
Errors: The .csv file could not be read or validated.
Ready for Processing: If you have used a two-stage upload, the file is ready for the second (update) step.
Processed - The number of data records processed out of the total uploaded.
This number indicates how many of the import file records successfully performed
their respective ADTACTIONs on patient records.
n of X: X is the number of data records uploaded and n is the number of records processed.
For a one-stage upload, this field indicates whether the system could make changes to its patient data using the imported file's records, and, if so, how many records processed successfully. 0 of X means that the system was not able to process any of the imported file's records. Click Menu > View Import Details. The Patient Data Import Details list appears, and you can review your data for errors.
For a two-stage upload, 0 of X is normal.
If you are using the one-stage approach, the system has run the processing step for you. You can review any errors, and begin fixing any problems.
If you are using the two-stage approach, you need to process the patient data file that you uploaded so that the appropriate changes are made to patient records. Do the following:
You can encounter errors at any or all of the stages of patient data import. Error messages provide information about problems with the .csv file. In most cases, you will wish to alter your .csv file. Rarely, you may need to change values in the system tables.
When you select Menu > Reprocess, the system attempts to update (add, or delete) data in its patient records using the imported data. The number of records successfully processed appears on the Import list, and errors in processing each record are logged. To see the errors:
Since patient data can accumulate quickly, the system has two automatic purging cycles:
Patient data is deleted five days after the patient's discharge date has been imported into the system.
Patient records that do not have a discharge date and have not had patient update or charge activity for 90 days are automatically deleted.
The ADT feature also provides two Report Objects that you can use to create custom reports. For reports, from the Materials Management main Contents, select Reports > My Report Definitions.
Copyright © 2023 by Premier Inc. All rights reserved.