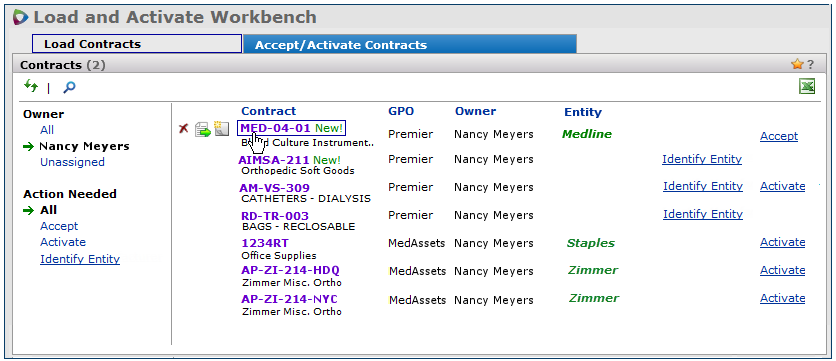
- On the Accept/Activate Contracts panel, click a contract number (Figure 1).
Once your contracts are loaded, accepted, and activated, you can mark them as "completed." Before you get to that point -- or even after -- you may need to work with your contracts in various ways. For example, if a contract is expiring, you may wish to designate a replacement. You may wish to set an alert when spend on a contract reaches a particular level, as it approaches the upper dollar limit of the activated tier. Or, you may just wish to look at contract lines. This topic summarizes tools for managing contracts.
If you are using the Integrated SCM/SCA Platform, you should also review the topic "Integrated SCM/SCA Contract Management."
Accepting and activating local (non-Premier) contracts is in the topic Activate Supply Contract Prices and Resolve Exceptions in SCM.
Your system administrator can adjust your user profile and data profile as needed. A discussion of role objects and data profiles is in the online Administration chapter. (See Administration and Security Settings.)
The Sourcing and Contract Management main Contents provides two workbenches for managing contracts, although contracts can be opened from many points in the application.
![]() Select Contracts > Load and Activate Workbench.
Select Contracts > Load and Activate Workbench.
- On the Accept/Activate Contracts panel, click a contract number (Figure 1).
![]() Select Supply Contracts > Contract Workbench.
Select Supply Contracts > Contract Workbench.
-
Click a contract number on any of these tabbed panels: Contracts, Contracts Expiring, and Contracts for Review. These panels contain several filters on the left side (Figure 2).
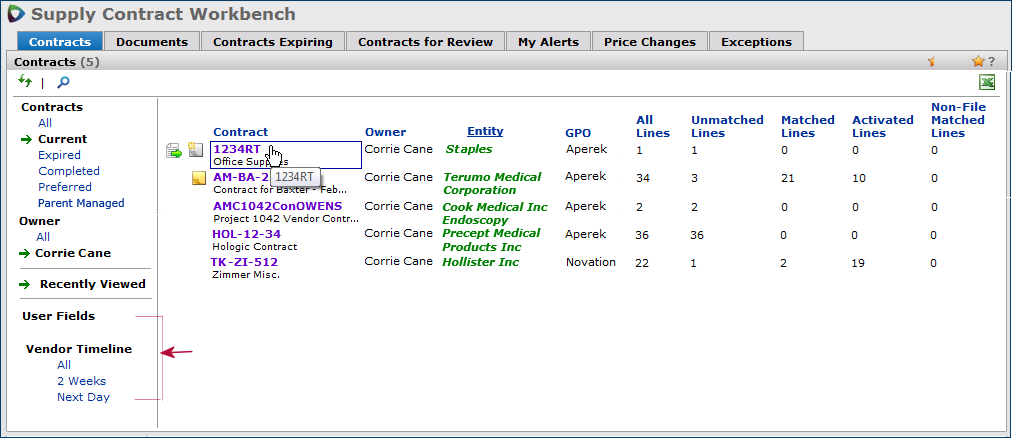
In Figure 2:
Expired contracts are designated with the flag Exp.
Instructions on setting up user fields are in "Designating a user-defined field as a filter for services and supply contracts."
On a contract in the list, mousing over the contract name displays icons.On most lists in the application, clicking a contract number opens the contract.
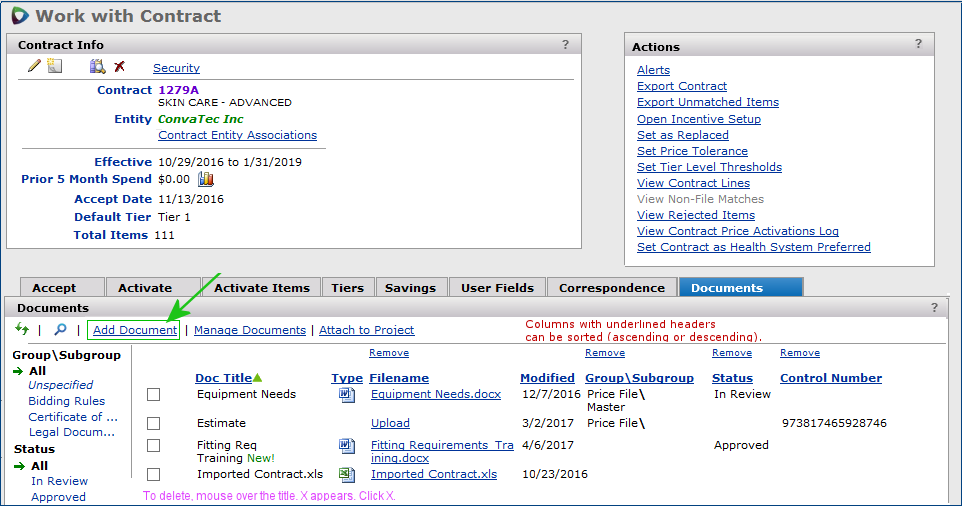
The "Work with Contract" page appears Figure 3.
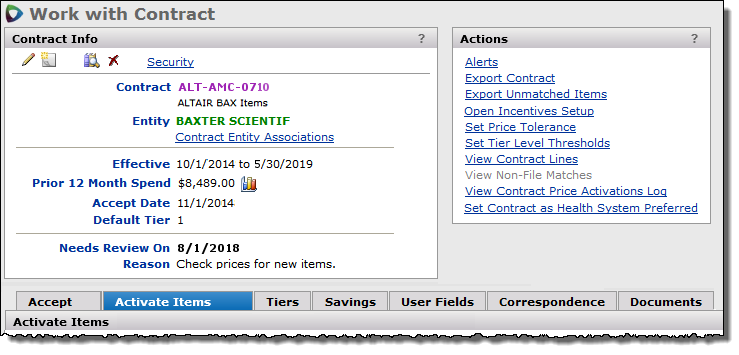
If you are authorized to work with the contract, you can edit the contract header and perform other activities with the contract.
The Actions panel on the "Work with Contract" page contains links to activities such as setting alerts and exporting the contract to Excel. Many other areas of the system use similar Actions panels. When a link is grayed out, the action is not available or not relevant. For example, View Non-File Matches in Figure 3 is grayed out because the contract has no non-file matches.
Note: If your User Profile Role only allows you View access to contracts, you can display contract header data, but you cannot exercise other links on the page.
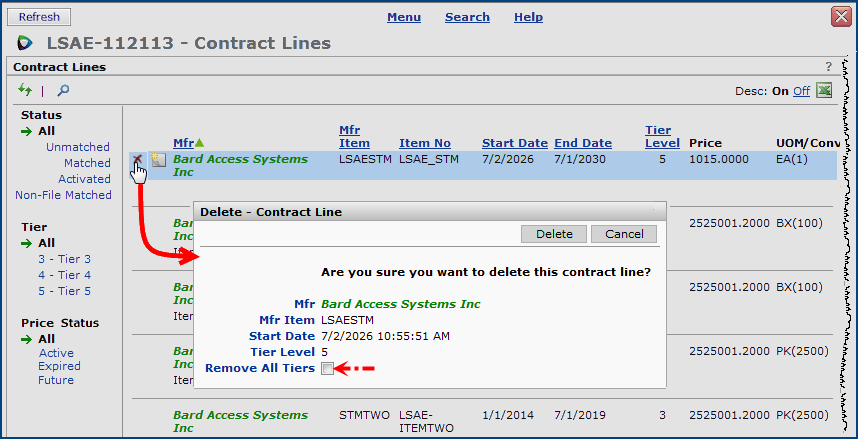
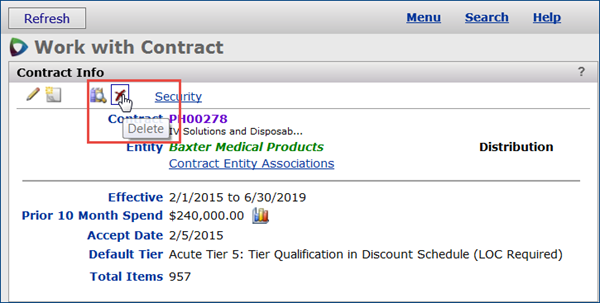
Occasionally, a contract detail is incorrect, and re-importing the contract will not solve the problem. To handle this situation, you can now delete imported contract detail lines.
Restriction: You cannot delete contract lines on a managed contract. These contracts contain the field Parent Managed - Yes on the Contract Info panel.
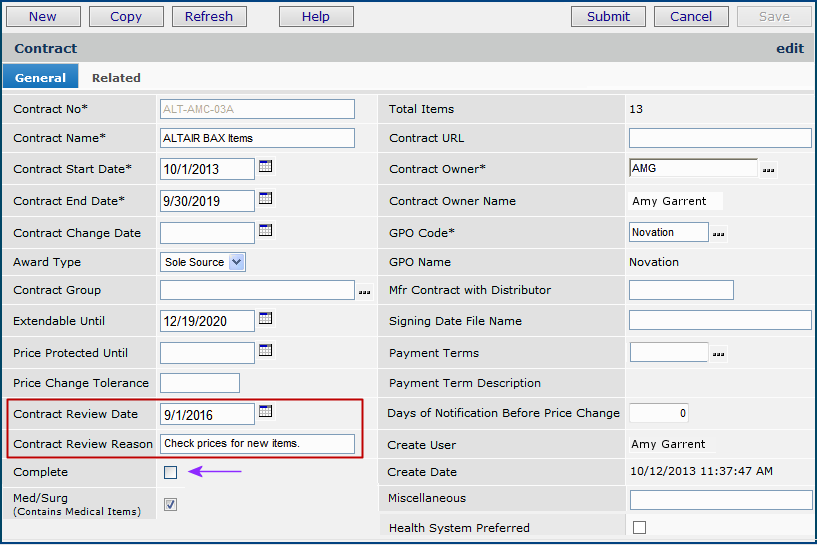
You may want to designate a contract as "complete" once you have finished fixing vendor exceptions such as UOM errors, and have activated all the prices that you wish. The Cmplt indicator is set by editing the contract record and checking Completed at the bottom of the header edit panel.
On the "Supply Contracts Workbench" page, the list of filters under Contracts includes "Completed." (See Figure 2, left side under Contracts.) Clicking the "Completed" filter takes you to a view that displays only
the completed contracts. Completed contracts in the list are designated with the Cmplt indicator, for example: 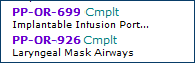 .
.
Designating a contract as "complete" will remove the contract from the Accept/Activate Contracts panel. Contracts designated as "complete" will not appear again on the Accept/Activate Contracts panel, even if a situation occurs requiring the contract to be re-activated (e.g. new products are matched to the contract, etc.).
Two user-defined fields are available on the single- and multi-tier contract templates for uploading contracts.
When a contract is uploaded, the system attaches the fields to contract detail lines. You can view the fields from panels that contain contract detail lines (e.g., Actions > View Contract Lines) and edit the field values.
The fields are included in exports of contract lines to Excel.
Also, the field names and descriptions can be edited. See the online documentation topic "Work with User Defined Fields."
You can export contracts using the Export Contract link on the "Work with Contract" page Actions panel (Figure 3, upper right). This link produces an Excel file that you can open and save.
Note: You can only export contracts whose manufacturer is associated with a PIL entity.
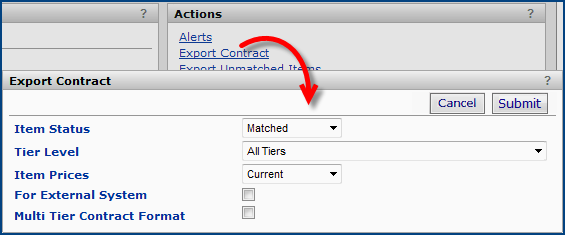
Note: If the contract only has one tier, then that single tier appears. In this case, you cannot select from any drop down list, and All Tiers does not appear.
On Premier-managed contracts, for an exported contract,
The contract header is the collection of general information for the contract. For example, the contract header includes the Contract Number, the Contract Name, the start date, the end date, and so on.

The Contract Header Edit panel appears (Figure 7).
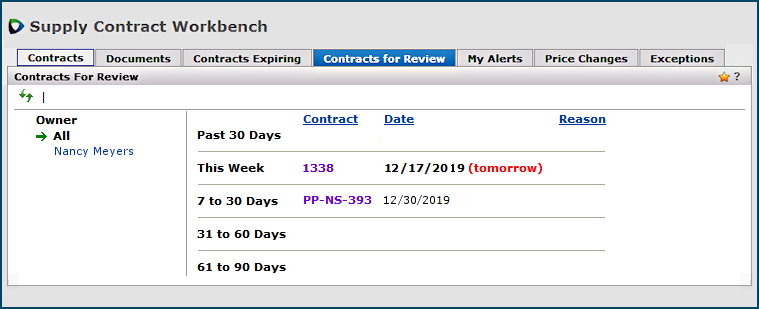
The following section is a brief discussion of the Contracts for Review (Figure 8) and Contracts Expiring (Figure 9) panels on the "Supply Contract Workbench."
![]() The Contracts for Review panel (Figure 8) lists contracts that need review in various time-frame categories: this week, in the next 7 to 30 days, in the next 31 to 60 days, 61 days to 90 days, or that needed review in the past 30 days.
The Contracts for Review panel (Figure 8) lists contracts that need review in various time-frame categories: this week, in the next 7 to 30 days, in the next 31 to 60 days, 61 days to 90 days, or that needed review in the past 30 days.
You can specify a review date for a contract and set up an alert for the review date. The Contract Info panel (Figure 6) displays review dates that you define.
The Contracts Expiring panel (Figure 9) lists contracts which are still active, but which are about to expire. Expiring contracts are listed in various time-frame categories:
- Contracts that will expire in 0 to 30 days,
- in 31 to 60 days,
- in 61 to 90 days,
- in 91 to 120 days,
- and in 121 to 180 days.
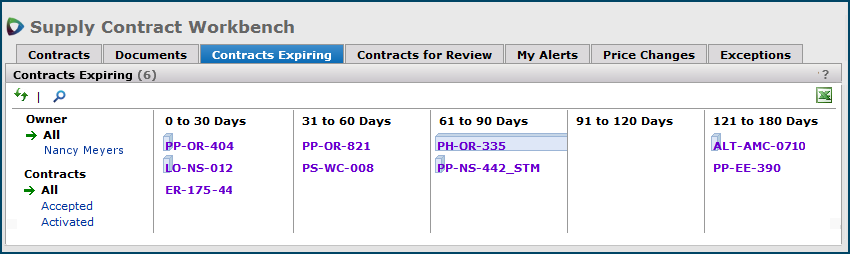
You can filter the list by Activated Contracts only, Accepted Contracts only, or display All expiring contracts (the default). You can also display your contracts only.
Clicking the Excel icon ![]() in the upper right copies the list to a spreadsheet. The spreadsheet displays each contract and and the associated time interval to expiration.
in the upper right copies the list to a spreadsheet. The spreadsheet displays each contract and and the associated time interval to expiration.
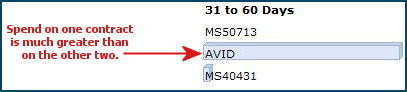
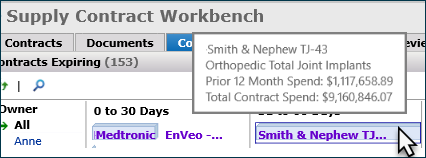
A shaded box around a contract (Figure 10) shows relative spend on the contract, compared to other expiring contracts. If you hold the mouse on the shaded area, you can see details of spend (Figure 10A).
You can get more spend information by using the Analysis tools.
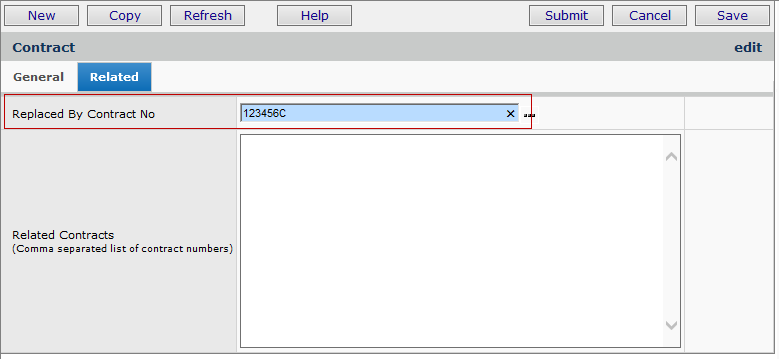
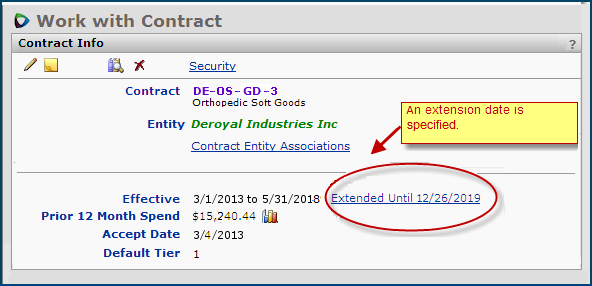
You can set an Extend Until date to extend a contract's expiration date, and you can designate a replacement contract.
Spend Note:
For any contract, when an item is activated, the spend for the item is included in the contract spend. If an item is not activated, but only accepted, and is available on multiple accepted contracts, the application uses the following tie breaking logic to determine which contract to assign the item's spend to.
- The application assigns the item spend to the contract with the most future Contract Accept Date. If a tie, then:
- The application assigns the item spend to the contract with the most future Contract Begin Date. If another tie, then:
- The most future Contract Create Date is used. If still no resolution, then:
- The application assigns the spend to the contract with the most future Price Start Date for the item.
Also, see the topic "Spend, Savings, and Contract Definitions."
The field Replaced by Contract No on the Contract Header Edit panel is used to select a replacement contract.
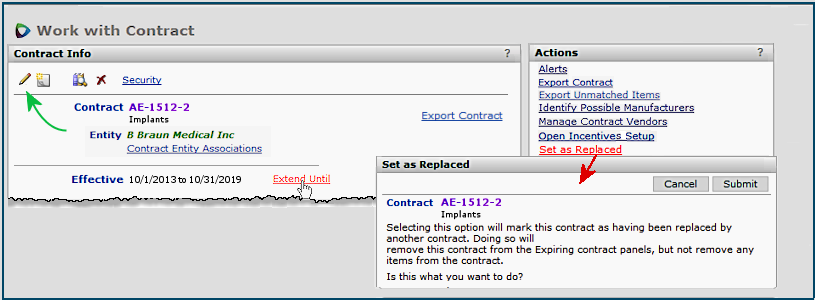
When a contract is marked as "replaced," the system removes the contract from the Contracts Expiring panel. No items on the replaced contract are deactivated, however.
From the Contract header edit panel, you can designate a replacement contract for any expiring contract.
Note: You can also set an Extendable Until date from the Contract Info panel.
- Next to the contract Effective dates (Figure 11), click Extend Until.
Figure 13 is an example of a contract with an extended date.
Note: For contracts whose effective End Date has been extended, and whose prices have been re-activated, on the Contract Lines panel, you will not see changes in end dates (or in the Exp flag) for item prices. The system does not re-stamp item price end-dates for extended contracts. Once re-activated, the prices are good, however, until the extended contract End Date arrives. Spend for the extended contract is "on-contract" spend.
You can display a list of expired contracts from the Contracts search results panel.
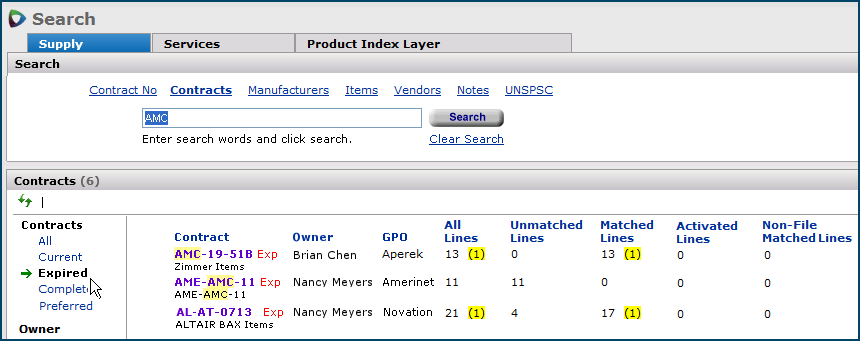
When a contract has expired, the designation Exp appears next to the contract number. Contracts which are still active, but which are about to expire are listed on the Contracts Expiring panel in various time-frame categories.
Sourcing and Contract Management provides two main types of alerts; contract alerts and system alerts. Different options are discussed within each category.
You must have a valid email address to set up alerts. You can set up alerts for yourself, or for other users.
Setting up alerts for other users is governed by the "CAAlerts" role object as follows:
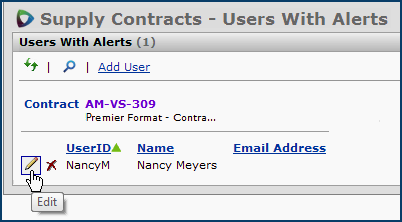
Users with Alerts panel
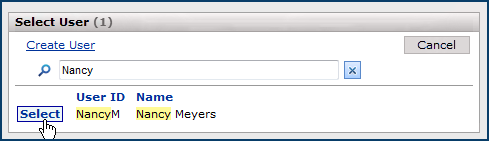
Select User panel
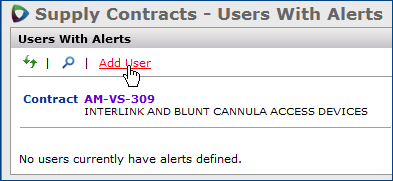
A panel appears for you to locate and select the user.
When you click Select, the standard alerts panel is displayed (Figure 17). Details on the contents of this panel are in the next section.
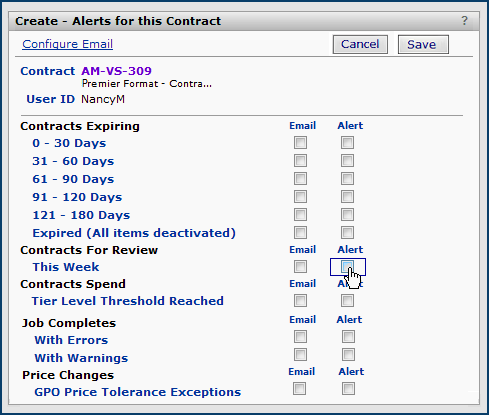
Contracts Expiring
0 - 30 Days (Contracts that will expire in 0 - 30 Days)
31 - 60 Days (Contracts that will expire in 31 - 60 Days)
61 - 90 Days (Contracts that will expire in 61 - 90 Days)
91 - 120 Days (Contracts that will expire in 91 - 120 Days)
121 - 180 Days (Contracts that will expire in 121 - 180 Days)
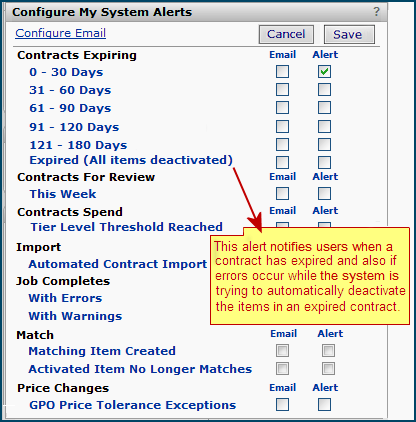
Expired (All items deactivated)
When a contract expires, an automated process deactivates all its items; except: any items with pending price changes do remain activated. This alert Expired (All items deactivated) notifies you that a contract expired. The message occurs in both an alert (from the My Alerts panel) or in an email notification. Here is an example:
Contract <contract number> (<contract name>) with Entity <manufacturer> has expired. An automated request has been submitted to deactivate all items for this contract.
For supply contracts, the alert also flags any problems in deactivating items. Here is an example of that message:
Errors occurred while trying to deactivate all items on expired Contract [CONTRACT, OWNER] with Entity [Entity Name]
Review the contract for any deactivation error messages.
This message occurs when the manufacturer (sometimes labeled "Business Partner") on the contract does not match to the SCM manufacturer entity displayed in [Entity Name]. You may also have the situation where a manufacturer entity is not matched at all, or where there are several entities that need association to manufacturer entities. The section "Deactivation Error Messages for Expired Contracts" has details on handling this problem.
Notes:
Contracts for Review
This Week (Contracts due for review this week)Note: These options are also available for setting alerts at the system level. They are located on the "Supply Contract Workbench" page and on the Services Contract Workbench for services contracts.
Contracts Spend
Approaching Tier BoundariesJob Completes
With ErrorsPrice Changes
GPO Price Tolerance ExceptionsSystem alerts are associated with events that affect any/all contracts. For example, a system alert can let you know when an item added to the item catalog/item file matches an existing contract item. You must have a valid email address to set up system alerts.
Setting up alerts for other users is governed by the CAAlerts role object as follows:
Users with Alerts panel
Select User panel
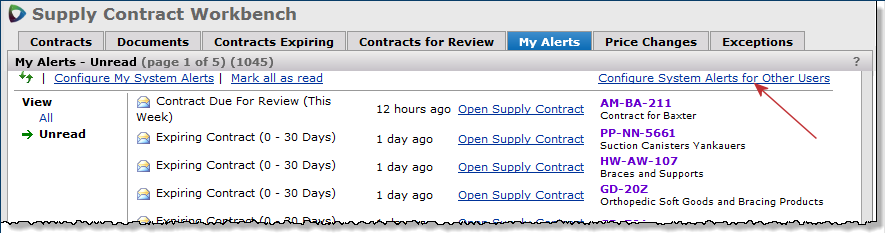
Follow the instructions above for setting up an alert for another user. System alert options are described in the next paragraph.
Contracts Expiring
The system checks contracts for upcoming expiration dates.
- 0 - 30 Days (Contracts that will expire in 0 - 30 Days)
- 31 - 60 Days (Contracts that will expire in 31 - 60 Days)
- 61 - 90 Days (Contracts that will expire in 61 - 90 Days)
- 91 - 120 Days (Contracts that will expire in 91 - 120 Days)
- 121 - 180 Days (Contracts that will expire in 121 - 180 Days)
- Expired (All items deactivated)
When a contract expires, an automated process deactivates all its items. The alert Expired (All items deactivated) notifies users that a contract expired (Figure 20).
For supply contracts, the alert also flags any problems in deactivating items.
Notes:
Contracts For Review
This Week (Contracts due for review this week)Contracts Spend
Approaching Tier BoundariesImport
Automated Contract Import FailsJob Completes
With Errors:
With Warnings:
Note: An alert is sent only to the user who submitted the job. This alert is available with supply contracts.
Activated Item No Longer Matches:
Matching Item Created:
This alert is available with supply contracts.
Note: An alert is not sent for Matching Item Created on the same day the contract is created. Similarly, a Matching Item Created alert is not sent for expired contracts.
Price Changes
GPO Tolerance Exceptions
Use the Documents panel to upload documents to a supply contract and to work with documents that you have attached to a contract. The following discussion explains the basic process of uploading and opening documents. The panels for uploading and displaying documents contain several options which are addressed in the Document Management topic. This section just describes the basics of getting a document associated with a contract.
You may wish to explore the other capabilities of the Documents feature. For example, you can use a full-text search to find information in a project's documents. You can create groups for documents and sort documents by the groups to which they are assigned. You can assign a Status value to documents. You can attach a document from the contract to an analysis project. See the discussion in the Documents topic.
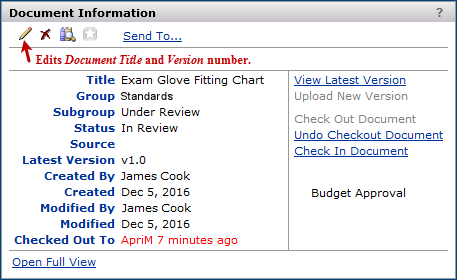
For the first document that you upload, the "Work with Contract" page (Figure 21) Documents panel is empty. Newly uploaded documents are flagged as New. You can display, edit, or delete uploaded documents. You can also upload revisions to documents.
The following document types are supported:
Microsoft Word (.doc)
Microsoft Excel (.xls)
Adobe Acrobat (.pdf)
image documents (.jpg, .png)
Power Point (.ppt)
email messages (.msg)
plain text documents (.txt)
HTML documents (.htm/ .html)
To be able to work with documents attached to a contract, the role object "ContractDocuments" in your user role must have the appropriate setting.
The "Work with Contract" Documents panel has a full text search of listed documents for the supply contract, described below.
Initially, the Documents panel is empty. Newly uploaded documents are flagged as New.
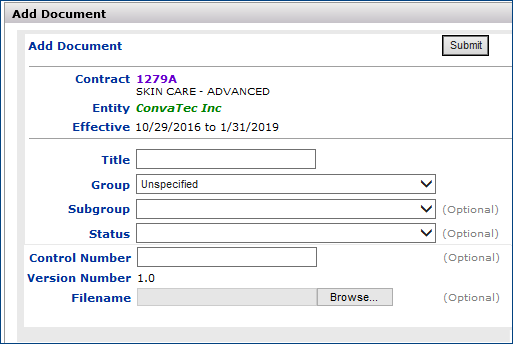
A panel appears for choosing a file. Figure 23 is an example using Microsoft Windows.

The document path and file name appear in the Filename field on the Add Document panel.
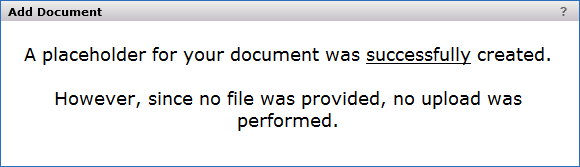
A message tells you that the document is uploaded.
You can upload another document by clicking Add Document, and by following the steps above. Alternately, you can create a placeholder name for a document, and upload the content later.
Once a document is added, you can view it and delete it if you wish. You can also edit the document header.
Full text search finds documents that contain search characters that you enter, and the documents' associated contracts.
Important: This feature must be enabled at your site for you to use it. Contact the Help Desk for further information.
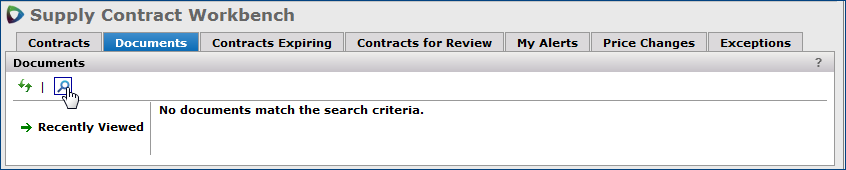
The full text search feature is available from the "Supply Contract Workbench" page Documents panel (Figure 26).
The panel displays the filter Recently Viewed. After you perform a search, clicking Recently Viewed returns to the list of documents that you looked at recently.
The full-text search applies to stored files in popular formats; e.g.,
Microsoft Word (.doc)
Excel (.xls)
Powerpoint (.ppt)
web pages (.htm/.html)
Adobe Acrobat (.pdf)
text files (.txt)
email messages (.msg)
and other types.
Note: Adobe Acrobat .pdf files must be optical character recognition (OCR) enabled for the full-text search to work with them. In other words, when a file is created, the OCR option must be set with Adobe Acrobat for the file.
Hint: You can tell if a .pdf file is OCR enabled because when you open it in Acrobat Reader, Acrobat Reader lets you search for text in the file, and you can highlight areas.
If the characters that you entered also exist in any Services Contracts' documents, the search results panel appears with a list of the documents, their owners, the associated contracts.
Figure 27 is an example of a full-text search and results for the characters "fixes."
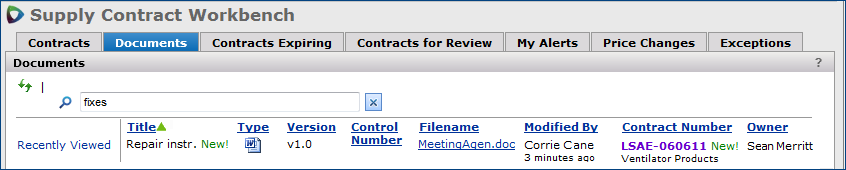
On the search results, you can do the following:
Note: If your site is not set up for this feature, the full-text search is not available. An error message appears when you enter a value in the search box and click Enter.
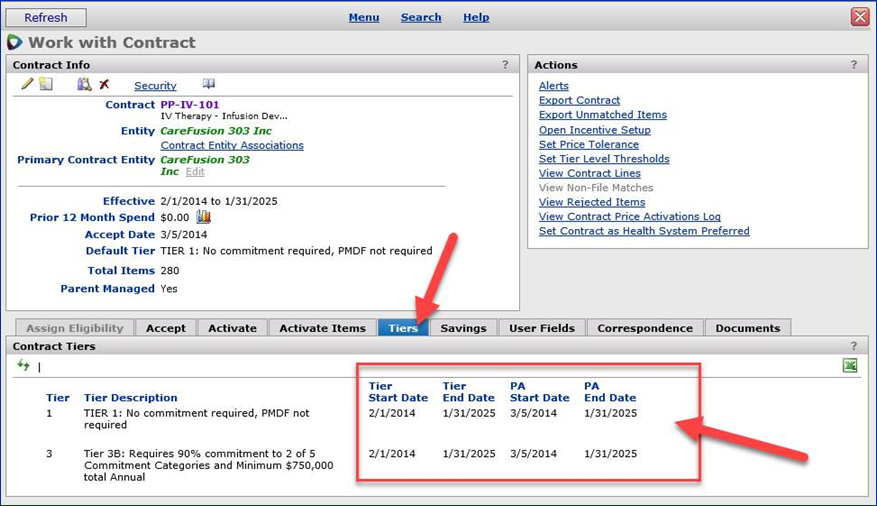
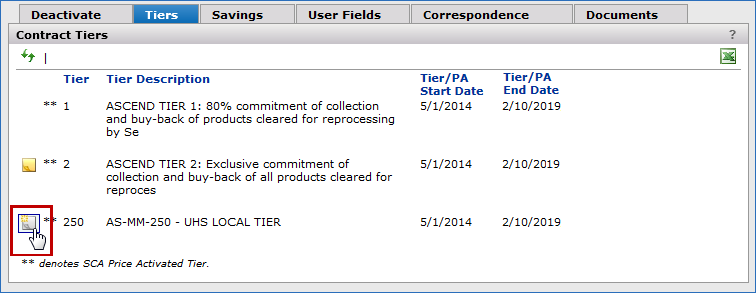
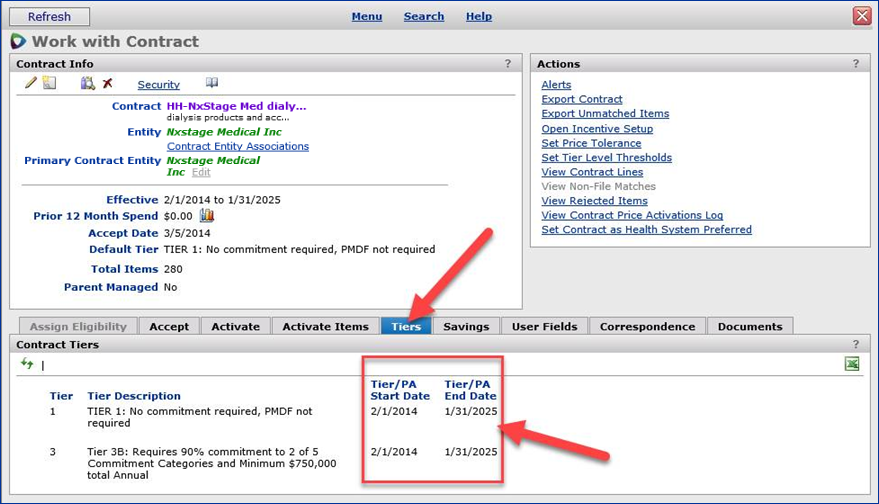
The Tiers tab on the "Work with Contract" page contains a consolidated look at the information for each tier within a contract. Each tier name, description, start date, end date, and any user notes are displayed on this tab.
If an SCA price activated tier (-managed contracts) exists in the contract, it is denoted by a double asterisk (Figure 29). Inactive tiers are indicated by the word Inactive to the right of the End Date column.
The display of contract tier dates and price activation (PA) effective dates is determined by tier type (local vs. Premier managed) and not by contract type.
A flag in each site's administrative profile can be set by the Solutions Center to indicate that the site is a Premier GPO member.
This flag determines how to display the PA/tier date.
- When the flag is set to "off," the Tier Start Date and PA Start Date are displayed together (See Figure 42).
- When the flag is "on," tier dates are displayed as in the table below. Figure 28 is an example.

Start and end dates for tiers always align with the contract start and end dates (even when edited). (See Figure 42.)
Tier Start Date
![]() For an original price activated tier, the Tier Start Date is the same as the Contract Accept Date. If the tier is extended, the Tier Start Date remains as the Contract Accept Date.
For an original price activated tier, the Tier Start Date is the same as the Contract Accept Date. If the tier is extended, the Tier Start Date remains as the Contract Accept Date.
![]() For a brand new price activated tier under an existing contract, the Tier Start Date is the new price activation start date.
For a brand new price activated tier under an existing contract, the Tier Start Date is the new price activation start date.
Tier End Date
![]() The Tier End Date for the default tier is the "Tier Participation End Date."
The Tier End Date for the default tier is the "Tier Participation End Date."
![]() The Tier End Date for all the other price activated tiers is the "Tier Price Activation End Date."
The Tier End Date for all the other price activated tiers is the "Tier Price Activation End Date."
Figure 28 is an example of the Tiers display when the "Managed" flag is on.
When you upload a contract into SCM using the GPO Template, all of the tiers in the contract are displayed on the Tiers panel without any SCA price activation date. These contracts will sync with SCA, and become Managed Contracts. For these contracts, the tier dates displayed in SCM are the tier dates for the same contract in SCA.
SCM processes SCA tier price activations in the order it receives them from SCA. In this case the tier received (processed) first defines the SCM Accept Date and the tier received (processed) last becomes the SCM Default Tier.
You can add notes to a tier by mousing over to the left of the Tier number and clicking the Add Note icon (red box, Figure 29). The Tiers tab also includes an Excel icon at the top right that exports the tier information to an Excel spreadsheet.
For -managed contracts, the start and end dates displayed on the tab are defined as the following:
Start Date (beginning date when prices on the tier are available)
End Date (last date when prices on the tier are available)
Expirations according to the Tier End Date are enabled as follows:
For managed contracts, the Default Tier and Tier Participation End Date fields are displayed on the Contract Info panel within the "Work with Contract" page (Figure 30).
Note: A managed contract is any contract created or synced via the Contract Sync process (SCA → SCM).
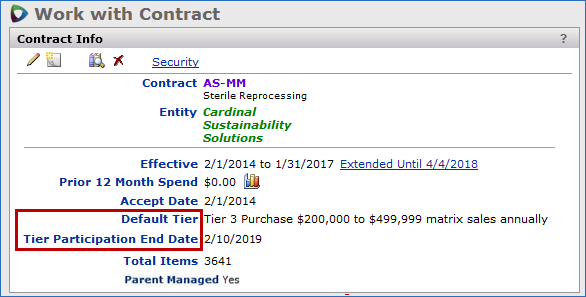
The Default Tier is the tier that was last activated in SCA. If the Default Tier is inactive, it is indicated by the word Inactive next to the tier description.
When SCM receives a message that a contract tier is activated in SCA, the Default Tier on the Contract Info panel is displayed as follows:
The Tier Participation End Date is the end date for the current SCA Price Activated Tier in use. This date is displayed on the Contract Info panel (Figure 30) even after the SCA Price Activated Tier has expired. To update the Tier Participation End Date, a new contract tier in SCA must be Price Activated (the new Tier Participation End Date would be the SCA Price Activation End Date for the new SCA Price Activated Tier).
The Contract Tier Thresholds feature makes it easy to identify contracts whose spend is about to reach—or has already reached—the upper dollar boundary of the default (currently activated) tier.
This feature lets you monitor spend as it approaches tier boundaries so that you can make purchases at the next tier as soon as possible. You can also set an alert when a tier level threshold that you define is reached. See Use tier threshold alerts to set the alert. Some of the information (setting up the threshold) in that section is repeated below.
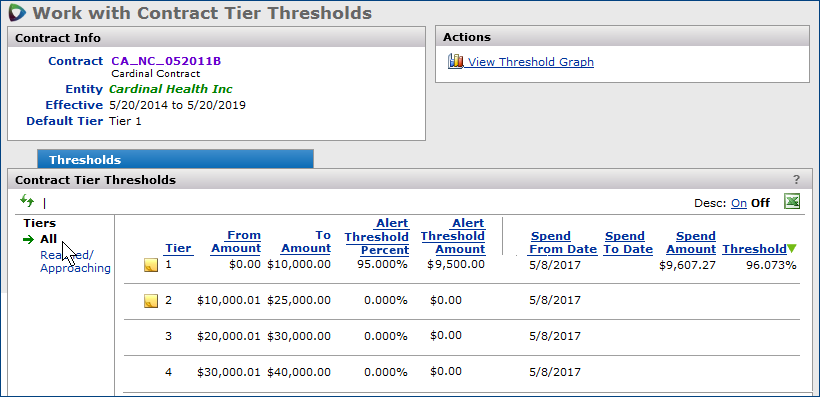
Threshold is the amount spent in the currently activated tier as a percent of the amount needed to reach the tier's upper dollar boundary.
Default tier: The currently activated tier.
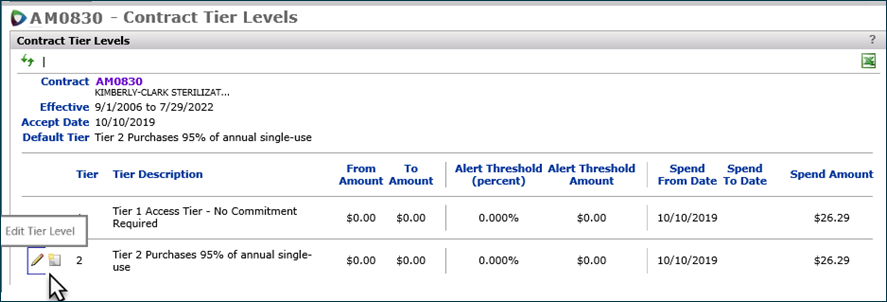
| From Amount | A dollar amount for the lower boundary of the tier. |
| To Amount | A dollar amount for the upper boundary of the tier. The value in this field must be greater than the value in the Spend Amount field in order to trigger an alert. |
| Alert Threshold (Percent) | An integer representing a percentage. When spend on the contract tier reaches the specified percentage of the upper tier boundary, an alert can be triggered.
To use the alert feature: - Edit the tier information and specify the threshold percent at which you want to receive an alert. For example, you may want to be notified when spend in the tier is 70% of the way to the upper tier boundary. The value to enter is "70.00." - Set the alert. On the Actions panel, click Alerts. You can specify the type of notification that you wish: email, or an alert message. |
| Spend From Date | The beginning date in defining a spend timeframe. |
| Spend To Date | The end date in defining a spend timeframe. |
The "Contract Tier Thresholds" main page appears, open to the Threshold Summary panel (Figure 32).
The tier threshold feature has spend summary and contract data. You can drill down to contract details.
The spend summary panels provide a single view of spend across all contracts.
Two tables are available:
From the contract perspective, you can display contracts whose spend has reached a selected threshold in the current tier, or has reached the current tier boundary.
Drilling down to threshold details for any contract displays data for all of the contract's tiers.
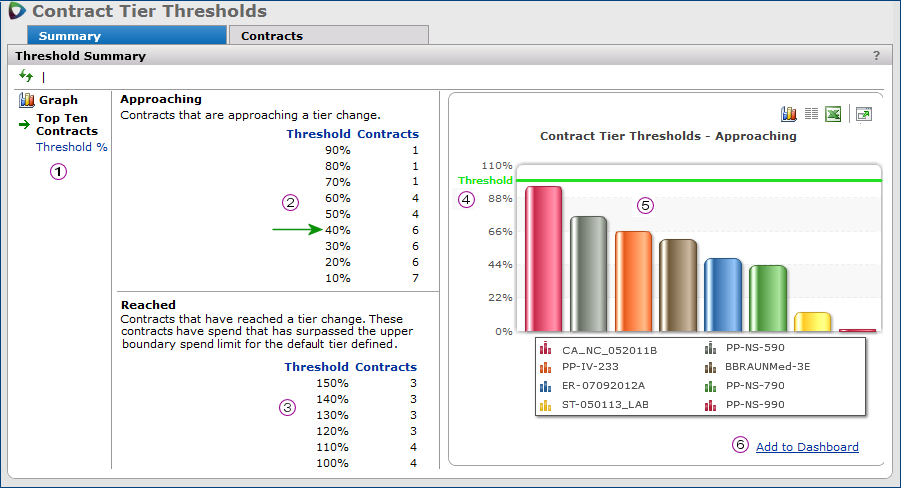
![]() The links on the left (Figure 32) change the graph.
The links on the left (Figure 32) change the graph.
Top Ten Contracts displays a bar graph for the top ten contracts (See Figure 32).
Threshold % displays a line graph for all contracts ( Figure 32).
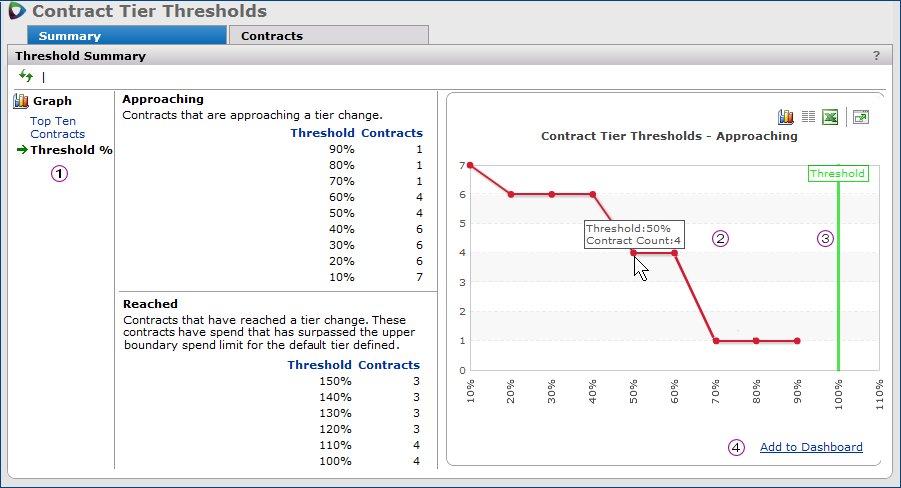
![]() Approaching table: When a contract appears in the approaching section, the contract is approaching a tier change. The Approaching table lists the number of all contracts at thresholds greater than 10% but less than 100% of the default tier boundary. For example in Figure 32 (green arrow), six contracts have spend that is at least 40% but less than 50% of the amount needed to reach the tier's upper boundary. Clicking any percentage value displays the contracts at or within 10% of that threshold.
Approaching table: When a contract appears in the approaching section, the contract is approaching a tier change. The Approaching table lists the number of all contracts at thresholds greater than 10% but less than 100% of the default tier boundary. For example in Figure 32 (green arrow), six contracts have spend that is at least 40% but less than 50% of the amount needed to reach the tier's upper boundary. Clicking any percentage value displays the contracts at or within 10% of that threshold.
![]() Reached table: Lists the number of all contracts that have reached or exceeded the amounts needed to attain the upper boundary of their default tiers. These contracts range between those at the 100% threshold to 150%, or greater. These are contracts that have spend at or over their default tier boundary. As with the Approaching table, the count of contracts is for each interval: e.g., between 100%, but less than 110%; more than 110% but less than 120%, etc. Clicking any percentage value displays the contracts that have reached or exceeded the tier threshold.
Reached table: Lists the number of all contracts that have reached or exceeded the amounts needed to attain the upper boundary of their default tiers. These contracts range between those at the 100% threshold to 150%, or greater. These are contracts that have spend at or over their default tier boundary. As with the Approaching table, the count of contracts is for each interval: e.g., between 100%, but less than 110%; more than 110% but less than 120%, etc. Clicking any percentage value displays the contracts that have reached or exceeded the tier threshold.
The data in the Approaching and Reached tables is mutually exclusive: a contract is counted on one table or the other, but not on both.
Hint: Mouse over the Threshold column header in each table for an explanation of what is included.
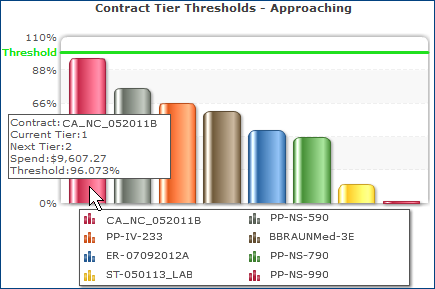
![]() The bar graph (Figure 32) displays the default tier threshold for each of your top ten contracts. The vertical direction (left side) is threshold. Each contract is assigned a color, and the contracts and colors are listed in the key at the bottom of the graph. The green line is the 100% threshold. It is a reference point for data on the graph.
The bar graph (Figure 32) displays the default tier threshold for each of your top ten contracts. The vertical direction (left side) is threshold. Each contract is assigned a color, and the contracts and colors are listed in the key at the bottom of the graph. The green line is the 100% threshold. It is a reference point for data on the graph.
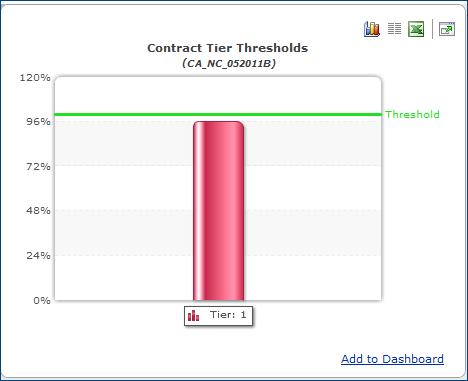
![]() Mousing over any bar (Figure 33) displays the contract number, the current tier, the next tier, the current spend, and the precise tier threshold represented by the current spend (Figure 33).
Mousing over any bar (Figure 33) displays the contract number, the current tier, the next tier, the current spend, and the precise tier threshold represented by the current spend (Figure 33).
 The bar graph can be added to a dashboard. Click Add to Dashboard. (See the online chapter "Using Dashboards" for details.)
Clicking Threshold % (Figure 31 ![]() on the left changes the bar graph to a line graph (Figure 34).
on the left changes the bar graph to a line graph (Figure 34).
In Figure 33:
![]() The links change the graph between a bar graph and a line graph.
The links change the graph between a bar graph and a line graph.
![]() The line graph displays spend threshold percentages on all of your contracts. The horizontal bar (bottom bar) is spend thresholds. The vertical bar (left side) is the number of contracts.
The line graph displays spend threshold percentages on all of your contracts. The horizontal bar (bottom bar) is spend thresholds. The vertical bar (left side) is the number of contracts.
Mousing over any node on the graph displays the number of contracts with spend at the threshold. In Figure 34, for example, four contracts are at the 50% threshold. That is, spend for four contracts is between 50% and 60% of the way to the tier's top boundary.
![]() Notice in Figure 34 that the green line again marks the 100% threshold, or tier boundary. In the figure, no contract has spend that has reached its upper tier boundary, although the graph does show spend for at one contract at the 90% level.
Notice in Figure 34 that the green line again marks the 100% threshold, or tier boundary. In the figure, no contract has spend that has reached its upper tier boundary, although the graph does show spend for at one contract at the 90% level.
![]() The line graph can be added to a dashboard. Click Add to Dashboard. (See the online chapter "Using Dashboards" for details.)
The line graph can be added to a dashboard. Click Add to Dashboard. (See the online chapter "Using Dashboards" for details.)
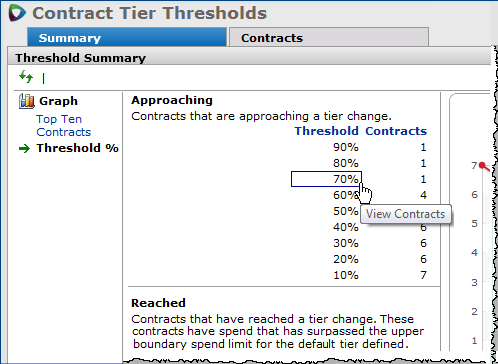
If you have selected a particular percentage on the Threshold Summary panel Approaching table (say 70%, Figure 35), click the Contracts tab to display all contracts with thresholds greater than the percentage (e.g., 70%) but less than the next percentage (e.g., 80%). The Contract Tier Thresholds panel (Figure 36) lists all contracts with a tier threshold percent in the interval selected in the Approaching list.
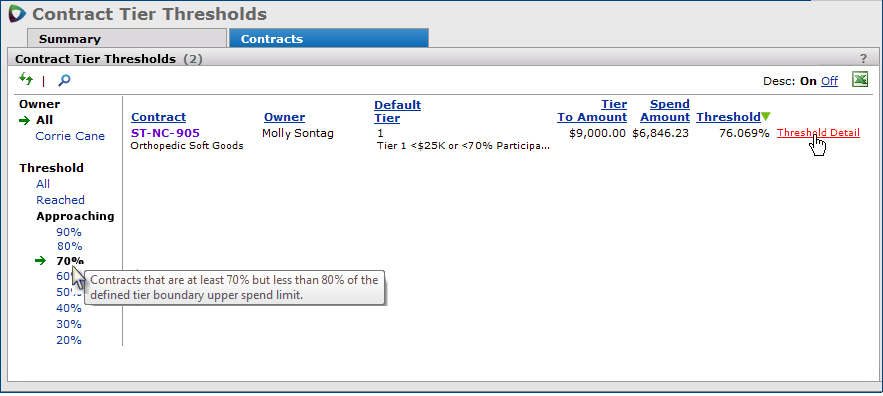
Alternately, you can click the Contracts tab directly, without making any selection in the Approaching table. The Contract Tier Thresholds panel (Figure 36) appears with contracts at a default threshold of 80%, but you can select a different percentage.
Columns in the Contract Tier Thresholds panel contain the Contract number and name, the Owner of the contract, and the currently active Default Tier number and description. On the right is the Tier To Amount -- the upper tier boundary for the current tier. The Spend Amount is the dollar amount currently spent at prices in the tier.
On the left side of the Contract Tier Thresholds panel (Figure 36) are a series of filters.
Owner displays contracts for All owners, or only for yourself.
Threshold filters the data among...
Note: A single contract only appears in this list once as either reached or within the selected range.
To display contracts with thresholds in a different percent interval, select a new percentage under Approaching.
In Figure 36 contracts within the 70% range are displayed. One contract has a 76.069% threshold. The spend amount is 76.069% of $9,000.00. When spend on the contract reaches $9,000, it will be at the tier boundary, and the Threshold will be 100%. Monitoring this contract will help you get pricing moved to the next highest tier.
Link to Threshold Details
On the Contract Tier Thresholds panel, the Tiers filter displays All tiers in the contract, and their spend thresholds, by default.
You can also filter the panel for tiers that have reached or are approaching tier boundaries. Figure 38 is an example of data from Figure 37.
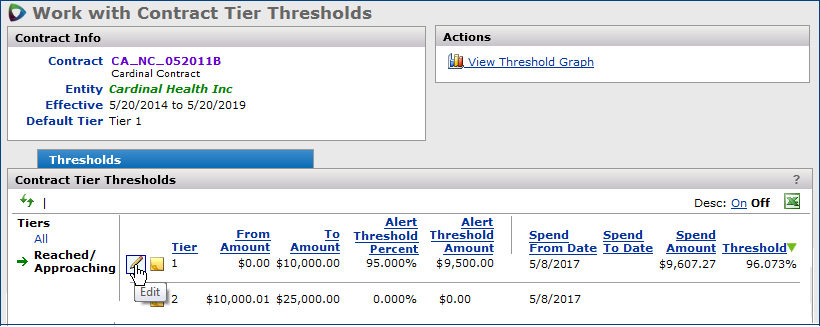
On the Actions panel, clicking View Threshold Graph displays a graph of all tiers for the contract that have either reached or are approaching the tier threshold. Figure 39 is the graph for the contract in Figure 37.
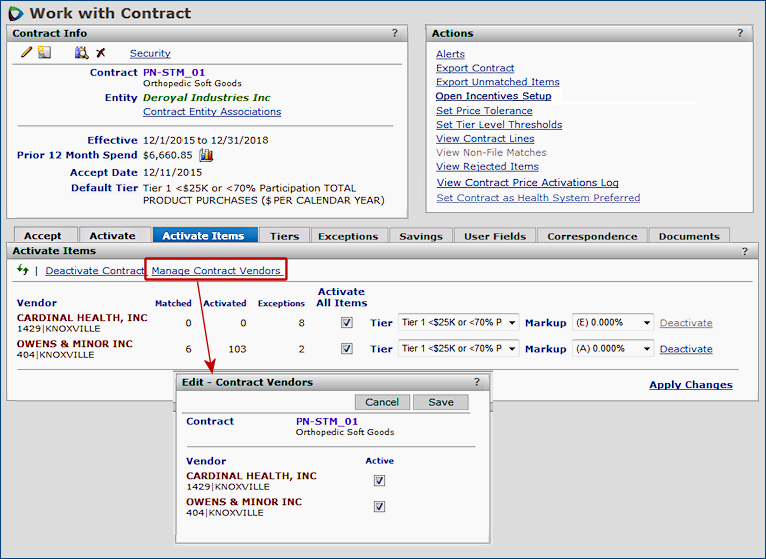
You can only use this feature when you have activated item prices using the Activate Items tab. This link does not appear on the Activate tab because the vendors on that tab are vendor entities.
- Click Manage Contract Vendors to set one or more vendor locations to "inactive" (Figure 40).
- The Edit - Contract Vendors panel appears (Figure 40).
- Uncheck the Active field for vendor locations that you wish to make inactive.
You can designate contract vendors as compliant. You can then use the "Spend Item Detail (CA)" report object to create reports that let you know whether purchases are being made from vendors designated "compliant."
The Help Desk must enable this feature for your site. Once enabled, all of your vendors will be flagged as "compliant," including any new vendors available when a contract has updates.
The report object "Spend Item Detail (CA)" -- for creating quarterly reports is available and can handle compliance reporting.
This report object provides a detailed version of the report object "Spend Item Summary (CA)."
If you use the overall vendor compliance setting, you can also monitor compliance using this report by including the Off Contract field.
The report object includes these fields:
|
|
|
- SpendMonth |
Restriction: You cannot delete a Managed Contract: that is, any contract created in SCA or synced via the Contract Sync process.
Before deleting a contract, make sure that:
Important: Be careful when deleting a contract and uploading a corrected version. If you try to upload a corrected contract file before the old contract is completely deleted, you may corrupt the data. It is important to make sure that the old contract is gone before importing a new, corrected version.
You can delete a contract in different areas of SCM:
If a contract has recoverable savings with any of the Recoverable Statuses including New, Recovery Pending, Recovered, Unrecoverable, or In Progress, you can delete the contract.
A managed contract is any contract created or synced between SCA and SCM via the contract sync process. Typically, these are contracts. Only the price-activation sync process can update SCA price-activated contracts.
The following discussion about contract synchronization applies only to members using both Supply Chain Advisor (SCA) and Sourcing and Contract Management (SCM).
The paragraphs below contain details about activation, start dates, and stop dates for managed contracts, including item and tier information.
Figure 42 is the Contract Info Panel for a managed contract.
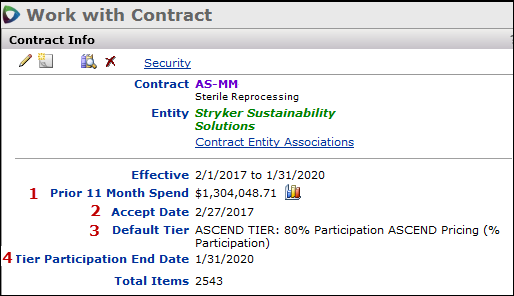
![]() Prior X Month Spend: Dollar spend on the contract during the prior “X” months. A contract must be accepted for this value to appear.
Prior X Month Spend: Dollar spend on the contract during the prior “X” months. A contract must be accepted for this value to appear.
![]() Accept Date: The date when the contract was accepted. If multiple SCA price activations exist, the Accept Date displays the price activation start date for the contract’s original price activation.
Accept Date: The date when the contract was accepted. If multiple SCA price activations exist, the Accept Date displays the price activation start date for the contract’s original price activation.
![]() Default Tier: The activated contract tier in SCM. If no prices are activated, the latest SCA price activation tier is the default tier. In that case, in SCM you can select a different tier to activate.
Default Tier: The activated contract tier in SCM. If no prices are activated, the latest SCA price activation tier is the default tier. In that case, in SCM you can select a different tier to activate.
When the default tier expires, Inactive appears next to the tier. The application continues to display the tier until a new tier activation message comes over from SCA. Sourcing and Contract Management (SCM) processes SCA tier price activations in the order that it receives them from SCA. The original tier processed defines the SCM Accept Date and the tier processed last becomes the Default Tier.
![]() Tier Participation End Date: The price activation end date for the current activated tier (only appears for managed contracts).
Tier Participation End Date: The price activation end date for the current activated tier (only appears for managed contracts).
Figure 43 is the SCM Tiers panel for a managed contract with one tier activated. In this case, the "Managed" flag is off. (See Display of Tier Dates.)
- For any contract item, only one tier’s prices are activated.
The Contract Header Edit panel is in Figure 44.
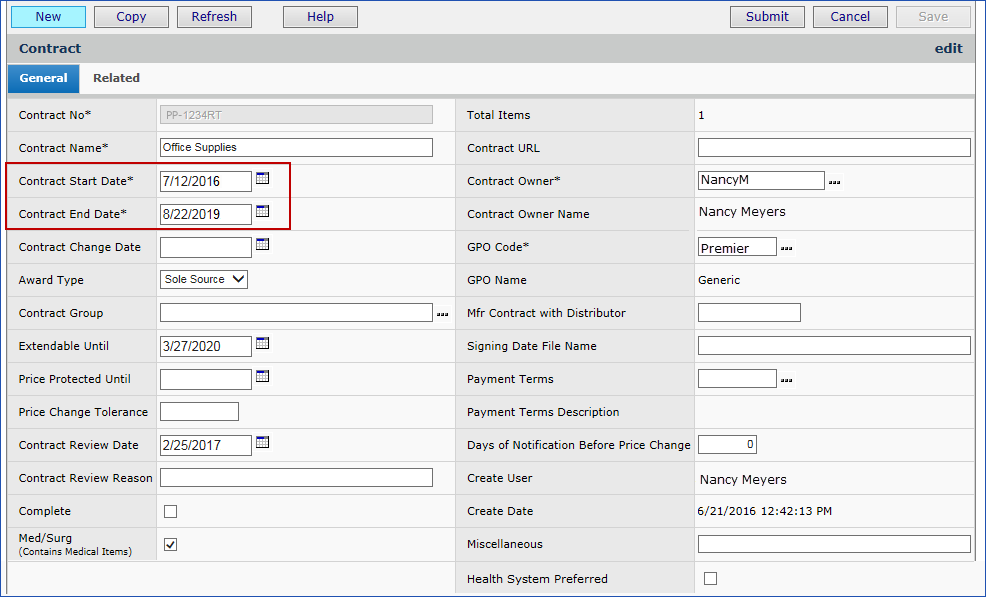
On the contract header for a Managed Contract,
Figure 45 displays contract lines in a managed contract with a tier activated.

Item prices and date(s) are mapped from the SCA contract tier’s item price dates for the last price activated tier. Sourcing and Contract Management (SCM) uses these dates to calculate contract savings, overpayments, and recoverable savings.
- The price start and end dates at the item level come from the contract details. A nightly process syncs the item price Start Date and End Date between the SCA and SCM contract.
The PA Status field on the Contract Lines panel contains the status of price activations for the contract.
This field only appears for parent-managed or local contracts for Premier GPO customers.
(The Solutions Center has enabled the customer property Premier GPO Customer for these customers.)
PA Status Values
Active:
The Price Activation End Date is the current day, or later than today, and the Item Price End Date is also either the current day, or later than today.
Inactive:
The Price Activation End Date is earlier than today;
or,
the Price Activation End Date is the current day or later, and the Item Price End Date is earlier than today.
Active:
The Tier End Date is the current day, or later than today, and the Item Price End Date is also either the current day, or later than today.
Inactive
The Tier End Date is earlier than today; or
The Tier End Date is the current day or later, and the Price End Date is earlier than today.
Table 1 is a summary of the date mappings displayed in SCM and SCA.
|
SCM |
SCA equivalent |
||
Dates that are mapped to SCM from SCA via the integration process. |
||||
Contract Effective Dates |
Contract Start Date (Effective Date) |
Contract End Date |
Contract Effective Date |
Contract Expiration Date |
Tier Dates |
Tier Start Date |
Tier End Date |
Tier Effective Date |
Tier Expiration Date |
Product/Item Dates |
Price Start Date |
Price End Date |
Price Effective Date |
Price Expiration Date |
Dates that drive SCM accept dates and SCM activation eligibility |
||||
|
Contract Accept Date |
Tier Participation Date |
Price activation Start Date of the first price activated contract tier |
Price activation End Date of the most recent contract tier |
Some restrictions apply for -managed contracts:
Imports: You cannot import updated -managed contracts when those contracts are already in SCM. Only the synchronization process can update SCA price-activated contracts.
Price Change Resolution:
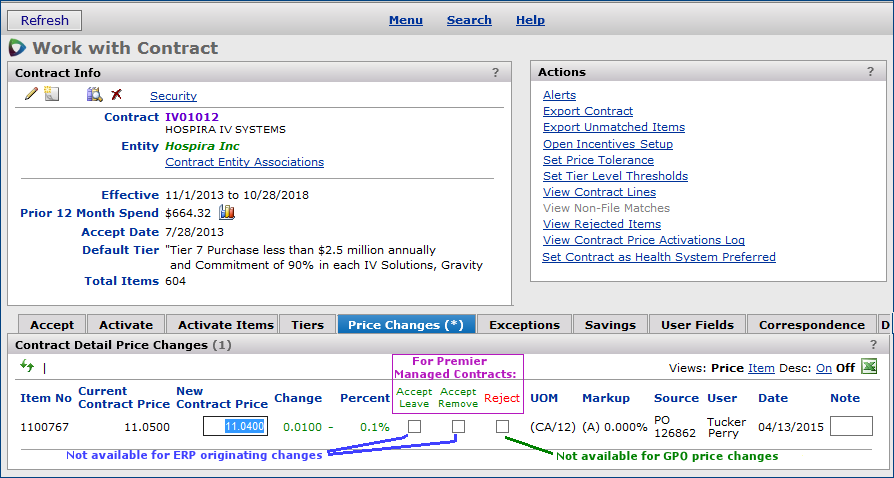
On the Contract Detail Price Changes panel (Figure 46):
- You cannot Accept/Leave or Accept/Remove price changes that originate in the ERP system (Materials Management or General Ledger, although the Reject option is available.
- You can Accept/Leave or Accept/Remove GPO price changes, but not reject them. The Reject option is grayed out.
A Health System Preferred flag for contracts can now be enabled from the “Work with Contract” page using one of the following methods:
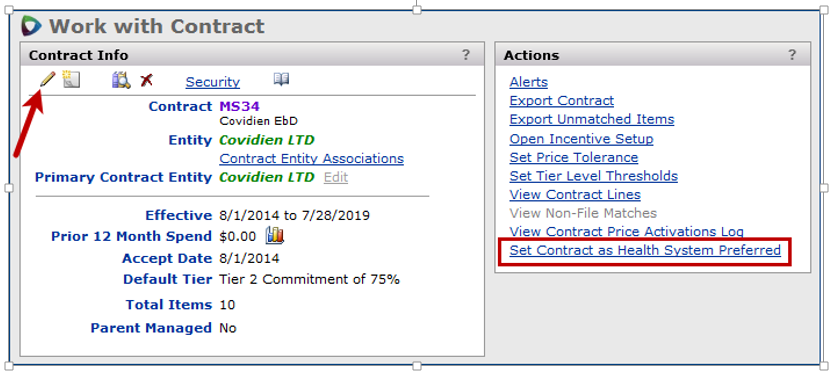
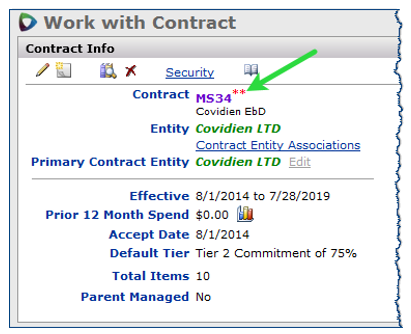
Contracts flagged as Health System Preferred are indicated by two red asterisks ** in the SCM panels and reports.
A visual indicator (**) identifies all "Health System Preferred" contracts in the SCM interface (see example in Figure 48). If a contract has the Health System Preferred flag enabled, the two red asterisks will appear next to it in searches, contract information panels, and all other locations where contract numbers are displayed.
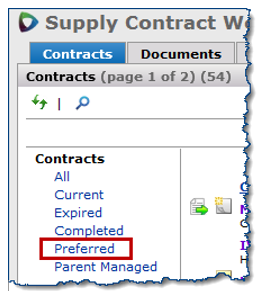
A Preferred filter (Figure 49) is located on the Supply Contract Workbench and other panels that list contracts. When this filter is selected, only contracts that have been flagged as Health System Preferred are displayed in the contract list.
The Health System Preferred contract flag (**) also appears next to the contract number on reports (Figure 49). The field Health System Preferred YN is available on reports and on the report export.
Figure 50 is an example of part of a report with the new flag ** and the new HealthSystemPreferredYN field.
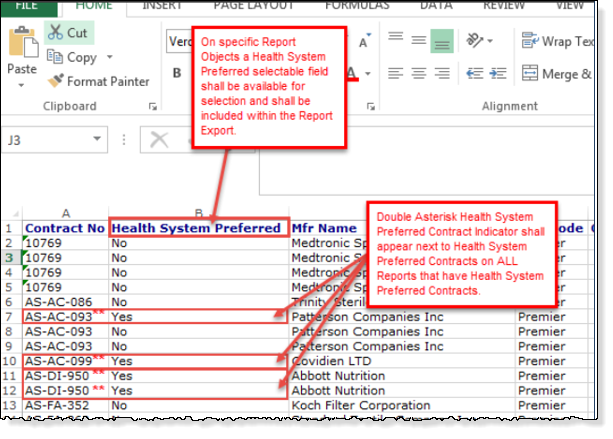
The ** flag appears and Health System Preferred YN is a selectable field on these report objects:
Contract |
CustDeptSpend |
ItemVendorUom |
ContractActivation |
DeptIssueSpend |
LotTrackInventoryTransactions |
ContractCaA |
DeptUsage |
Overpayments |
ContractDetail |
DeptUsageSummary |
POandReceipt |
ContractDetailAccepted |
InventoryTransactions |
PORequisitionAnalysis |
ContractDetailActivated |
InventoryTransactionsAll |
PriceChange |
ContractFeeInvoiceDetailPIL |
InvoiceMatchDetailPOLine |
PurchaseOrderDetails |
ContractHeaderDetail |
InvoiceMatchDetailPOLineView2 |
PurchaseOrderDetailsPlusInvoice |
ContractHeaderDetailCaA |
InvoicePO |
PurchaseOrderHeaders |
ContractHeaderDetailWithPrices |
ItemCatalog |
RecoverableSavings |
ContractPriceActivationLogLst |
ItemCatalogUserFields |
ServicesContract |
ContractPriceActivations |
ItemInventory |
ServicesContractApprovals |
ContractPriceChangeLog |
ItemInventoryAllVendors |
ServicesContractUserFields |
ContractSecurity |
ItemInventoryExtract |
ServicesContractUserFieldsAlt |
ContractStatistics |
ItemInventoryUsage |
SpendItemDetail |
ContractStatisticsSummary |
ItemInventoryUsageSummary |
SpendItemSummary |
ContractUserFields |
ItemInventoryUserFields |
VendorFees |
Copyright © 2023 by Premier Inc. All rights reserved.