
|
This topic discusses: |
Links to related topics: |
| Search Online Doc | |
| Current Release Notes | |
This topic describes how to print labels in the system. You can print the following types of labels:
Labels are printed on a sheet fed printer or a roll fed printer. Label printing jobs run as reports. You create the "label report" and then open it from My Archived Reports to view the labels, and send the job to a local printer. Printing labels requires that you use a sheet of labels in the printer in place of regular paper.
Prerequisite: You should be comfortable working with whatever kind of printer you use, and know how to operate any of its available adjustment features; for example, sizing an image, changing the lightness/darkness of the print, or adjusting the margins.
For printing labels (depending on the kind being printed), these role objects and settings must be included in the users' roles.
Features are built into the system to ensure the privacy of electronic protected health information (ePHI), in compliance with HIPAA requirements. One applicable area is patient labels.
On a User Profile, the Hide ePHI Data field determines whether a user can access patient data. When Hide ePHI Data is checked, a detailed series of restrictions apply to the user's access to ePHI records. Patient information in the ADT import feature is subject to restrictions governed by this User Profile field.
In sum, if Hide ePHI Data is checked, the user cannot access patient-identifying information.
The list of restrictions and examples is outlined in the ePHI documentation.
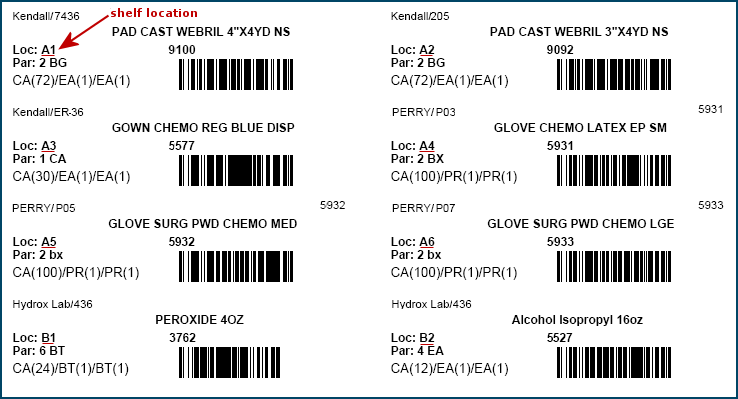
Note: All patient identifier fields in this document's figures contain fictional values, and are not associated with any actual individual.
Label layouts are configured in the system for the appropriate label sheet, and labels can be printed on a variety of printers. Printer settings affect text alignment on labels, and are dependent not only on the brand of printer, but also on the release of Adobe Acrobat Reader that you are using. This section contains printer option settings that work for many printers, but ultimately, you will need to print experimental sheets of labels so that you can adjust the settings for your own printer.
When you run the labels that you wish to print, they are output to Adobe Acrobat Reader. The Adobe Acrobat image is what prints on a local printer.
- A Print panel appears -- this panel differs from printer to printer.
On the Print panel, or on one of its tabs, you will find a Properties
button. Click the Properties button and set the options
as follows:
Print Range: All
Copies: 1
Page Scaling: None
Auto Rotate and Center: not checked
Choose Paper Source by PDF Page Size:
checked
You may need to try both settings (None
and Fit to Paper) for Page Scaling.
Fit to Paper centers the text better for some labels,
but also automatically adds top and bottom margins to the whole sheet. The margin
space sets the label text down from the top and up from the bottom of the sheet,
cutting off part of the text on the labels.
Be careful: If you try Fit to Paper
(or other settings), print only a few sheets of labels to check the alignment
on each subsequent sheet. This approach avoids wasting label sheets in a long
print job if the alignment is not right.
Note: If you try several option choices and
are still not getting acceptable alignment of text on label, try changing the
margins. (Some printers will not allow you to do this, however.) If your printer
supports the Margins property, try turning the Margins
setting from Standard to None
and see what happens.
You can print patient charge labels for any active inventory item.
When you print an item label, the bold number above the barcode is the item number / manufacturer's item number coded in the barcode. The Patient Charge Number (CDM) also prints on the label. Figure 1 is a sample patient charge label printed in the system.
Note: All patient identifier fields in this document's figures contain fictional values, and are not associated with any actual individual(s).
Sheet fed: Patient Charge labels print 44 to the sheet on a laser printer. Label stock for Patient Charges must be special ordered from a label manufacturer. Obtain the label format sheet from Technical Support, and print the sheet on a regular piece of paper. This step is important in order to have the labels align correctly. Then, you should send the custom label format sheet to your vendor to use as a template for creating the label sheets for your printer.
The label sheet specifications are:
Sheet size: 8 1/2 X 11-inch
sheets
Label size: 1 3/4 X 3/4 inch
Label type: Laser print, piggyback
Layout: 4 across
Roll fed: Labels can also be printed on a Zebra barcode printer.
Current models used at sites are the ZT230 or ZT240.
The Zebra "Stripe" printer has been discontinued by the manufacturer, although it should still work for roll printing of labels, if you have this old model.
Discuss label stock with your vendor.
Par cart labels print on Avery 5261 Laser labels, or on any laser label stock with label size 1"X 4", 2 labels across, and 10 labels down.
Long item descriptions are truncated on printed labels.
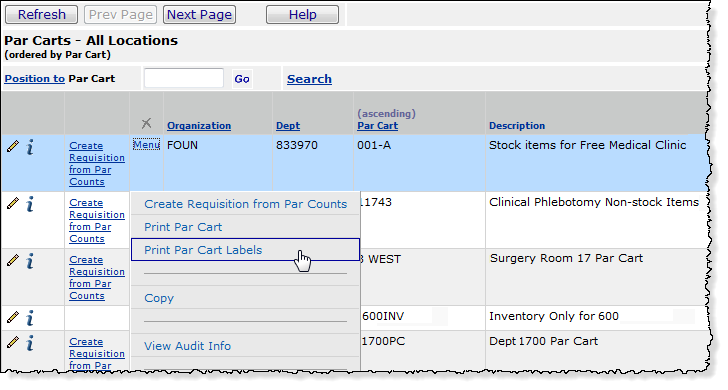
The system sends you a message that the labels are being printed,
and that you can access them from Reports > My Archived Reports.
Note: Par cart labels are printed in order of par cart shelf location.
Warehouse shelf labels print on Avery 5261 Laser labels, or on any laser label stock with label size 1"X 4", 2 labels across, and 10 labels down.
Note: Labels for inactive items are not printed. Long item descriptions are truncated on printed labels.
Copyright © 2023 by Premier Inc. All rights reserved.