Releasing Multiple Requisitions with Quick Release Version
Contents
Overview
Quick Release of Approved Requisitions streamlines the steps involved in releasing requisitions and building pick lists. The feature is designed for sites that have multiple requisitions to be released and picked in the same time frame. The feature eliminates the need to release each requisition and build pick lists one-by-one.
Security
The Quick Release feature is governed by user security. You need Administrator privileges in your user profile to adjust the security settings.
Under Work in Administration, do the following to make the feature accessible:
- Include the role object "ReleasePickAllReqs" in the user roles of staff members who will work with the Quick Release facility.
- Set the security level of "ReleasePickAllReqs" to Create or All, as appropriate for the users.
Note: Initially, the security level of the role object is None. If your site intends to use the Quick Release feature, you must change the setting for the affected users.
The user's data profile also controls the departments, organizations, and asset locations for which the user can create Quick Requisitions.
Viewing Quick Release Jobs
A menu selection in the Materials Warehousing contents displays a list of all Quick Release jobs that you have created, along with the status of each. Initially, of course, the list will have no data -- until you start using the feature -- but the section (below) illustrates the list and explains how to use it.
To view Quick Releases
From the Materials Management main Contents, select Warehousing > Quick Release of Approved Requisitions.
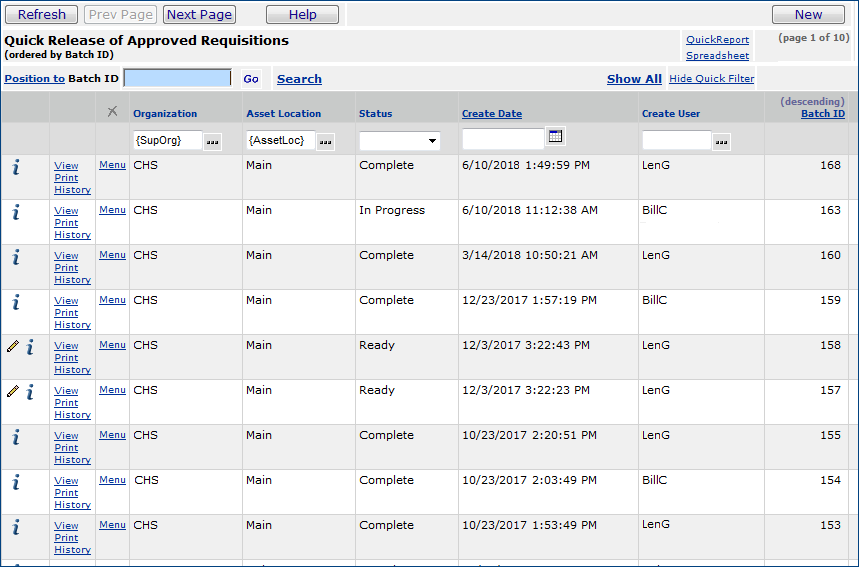
The list of Quick Release of Approved Requisitions (batch jobs) appears (Figure 1). (The list contains No Data if you have not created any Quick Releases.)

Figure 1 - Quick Release Jobs List
- Organization column: The list is pre-filtered for the Supplying Organization in the Current Settings box -- in this case CHS. Clicking Show All displays Quick Release jobs for other supplying organizations.
- Asset Location column: The list is also pre-filtered for the Asset Location in the Current Settings box -- in this case Main. Clicking Show All displays Quick Release jobs for other asset locations.
- Status column: options are:
Ready - The Quick Release job is pending.
In Progress - The Quick Release job is in progress: requisitions are being released.
Complete -The Quick Release job is is complete.
You can edit Quick Release jobs whose status is Ready. Once a job is In Progress or Complete, it cannot be edited, but you can inquire on the job. (Click the inquiry icon i or Menu > Inquiry.)
A history of pick lists for each Quick Release job is available by selecting Menu > View Print History. The Menu next to a Quick Release job also provides access to System Notes for the job. You can also use the menu to Copy a Quick Release job, and to Delete jobs from the list that are not In Progress.
View Messages and System Notes
If a Quick Release job cannot run, or runs, but generates errors, the system inserts a message on the list next to the job.
For example, you will receive a message if requisitions for the Quick Release have problems -- their items are on hold for a physical inventory, for instance. In this case, the requisitions cannot be released, and remain approved.
You can also access System Notes for each Quick Release job, which are helpful in reviewing requisitions that were released and the Pick List Numbers generated.
- To view System Notes for a Quick Release, select Menu > System Notes next to the Quick Release job. (See Figure 1.)
A table containing system notes appears.
- Click Display.
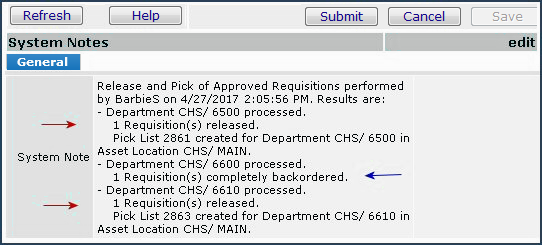
The System Notes appear. Figure 2 is an example of System Notes.

Figure 2 - System Notes for a Quick Release Job
Notice in Figure 2 that the Quick Release processed requisitions for Department 6500, Department 6600, and Department 6610. Two of the requisitions were released (red arrows) and pick lists created. One requisition (blue arrow) was backordered.
To create a Quick Release job
- From the Materials Management main Contents, select Warehousing > Quick Release of Approved Requisitions.
The list of Quick Release batch jobs appears (Figure 1) or No Data.
- Click New.
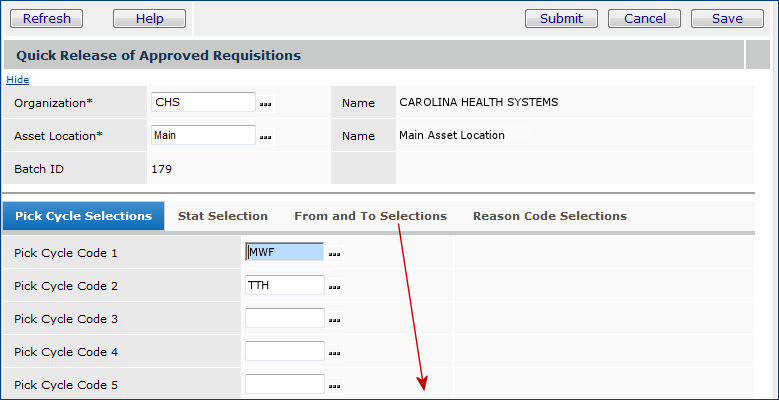
The Quick Release Selection panel appears (Figure 3).


Figure 3 - Quick Release of Approved Requisitions Selection Panel
- On the panel, enter characteristics of approved requisitions that you wish to include in the Quick Release job:
- The Pick Cycle Selections tab lets you specify up to five pick cycle codes. A Pick Cycle Code is a field on a requisition. The system selects the approved requisitions with the codes you specify.
- The Stat Selection tab includes approved STAT requisitions in the job when you check the Stat box.
- The From and To Selections tab lets you identify a department or a range of departments whose approved requisitions should be included in the Quick Release job. If you only enter a "From" department, the system builds a range of departments, beginning with the "From" department, and ending with the last department. If you only enter a "To" department, the system builds the range of departments beginning with the first department and ending with the "To" department.
- The From Priority and To Priority fields let you identify requisitions by priority.
- The Reason Code tab lets you select requisitions according to their Reason Code. You can enter up to five Reason Codes.
Using the Fields on the Tabs
The fields that you specify on the tabs are logically "ANDed" from tab to tab. This means that the Quick Release process looks for requisitions that match criteria on all of the tabs.
Fields that you specify within the Pick Cycle and Reason Code tabs are "
ORed." For example, suppose you have Pick Cycles MWF and TTH, and you specify both of them. the system will select requisitions that match either MWF or TTH.
Here is a scenario.
- On the From and To Selections tab, you enter the range of departments: from 3100 to 3300.
- On the Reason Code tab, you select the Reason Codes "OUT" and "SPEC."
The Quick Release process looks for requisitions for departments 3100, 3200, and 3300 that also contain either the OUT Reason Code or the SPEC Reason Code.
- In this case, the system will not select requisitions with other Reason Codes or with no Reason Code, even if the requisitioning department is 3100, 3200, or 3300.
- When you finish entering criteria, click Submit.
The system returns to the Quick Release jobs list, and displays the new Quick Release job with its status.
You may see messages that the job is pending, or running. After the job has run, its status is Complete, and you can print the pick list for the requisitions from Reports > My Archived Reports. You can also print pick list s and confirm picks from the Warehousing > Pick List panel. (See the subsequent discussion on pick lists.)
When a Quick Release job is complete, the system writes a system note that you can view from the Menu.
Processing Order for Quick Release Items
The system looks for requisitions by organization and department that match the selection parameters and have the supplying asset location listed in Current Settings. The system then releases all the selected requisitions that have an Approved Status. Next, using the selection parameters, for each department, the system looks for approved requisitions supplied by other asset locations. If any exist, they are released.
The Quick Release feature processes requisitions in the following order:
By department, in department Priority sequence,.
- Stat requisitions are processed first.
- Requisitions are then processed by Required Date, Requested Date, and Create Date.
-
For each approved requisition found by department, the Status after processing can be Released, Backordered, or Complete depending on the requisition's contents.
- If no approved requisitions are found, no further processing is done for the department, and processing moves on to the next department.
Note: For more information on the Priority field, see The Priority field.
View and Print Pick Lists for Quick Release Batch Jobs
As each requisition for a department is released, its item lines are added to a pick list containing released requisitions for that department.
- The pick list s are available, as always, from the Warehousing > Pick List panel in Materials Management. (See Building Pick Lists Manually and Picking Requisitions.) Following the usual process, warehouse personnel can print pick list s, pick items for delivery, and confirm picks.
- A pick list showing items for all the departments in the Quick Release is available from My Archived Reports.
- Additionally, you can view and print pick lists from the Quick Release list.
If a released requisition contains items supplied from an asset location that is different from the asset location in the user's Current Settings, a pick list for the items in the supplying asset location is not automatically generated and will need to be created manually.
Pick lists for Quick Release jobs are in .pdf format.
To view and print the entire Quick Release Pick List from My Archived Reports:
- On the Materials Management main Contents,
select Reports > My Archived Reports.
The list of reports that you have run appears. Quick Release pick lists have the report name "Pick and Delivery Document."
- Click View Report to view the pick list. The pick list opens in Adobe Acrobat Reader.
- Select File > Print to print the pick list.
To view and print a pick list for each department from the Pick Lists panel:
- From the main Materials Contents, click Warehousing > Pick List. Current
pick lists appear.
- Locate the pick list of interest. (System Notes for the Quick Release job provide Pick List Numbers.)
- Select Menu > Print Pick/Delivery Document.
A .pdf version of the pick list appears in Adobe Acrobat Reader.
- Select File > Print to print the pick list.
To view and print pick lists from the Quick Release list:
- From the Quick Release list, select View Print History.
The Reports Table appears with "Pick and Delivery Document" in the Report Name column.
- Select View Report to print the pick list.
Adobe Acrobat Reader displays the pick list.
- Select File > Print to print the pick list.
Copyright © 2023 by Premier Inc. All rights reserved.


