
User Access and Security
User Security
Your system administrator must create a user ID for you in Aperek before you can access Pulse. Your user settings must give you access to patient information. On the User Settings panels, the "Hide ePHI" flag must be unchecked. If this flag is checked, you will not have access to Pulse.
Login and Passcode
The first time you use the application, tap the (Other Users) avatar. In the login window, enter your assigned Aperek user ID and a self-selected password. (See Figure 1.) You may also enter a self-selected four-digit passcode that will allow you to open a locked screen without logging in (recommended).
If you wish to change your password during login, toggle the Change Password button to Yes. Enter your new password and confirm it. You may also change your optional passcode, although you are not required to do so in order to change your password.
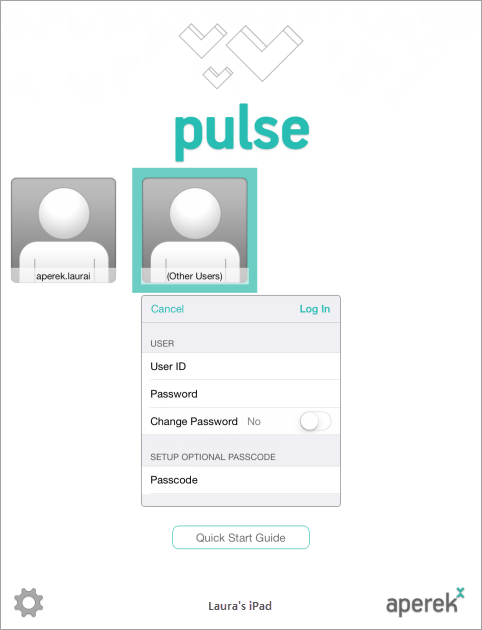
Figure 1: Initial Log-in
On subsequent logins, you can simply tap your User ID and provide your passcode to log in.
If you have saved your badge number in your user settings, you can log in by scanning your identification badge. ( > Users > Badge Number). (See instructions below).
Note: The Quick Start Guide is available on the home screen for initial log-ins, or in the Settings menu under Support.
Lock Screen
Automatic Lock
If your device has been asleep for fifteen minutes or longer, you will be required to enter your Pulse passcode. (See Figure 2 below.) If you have not set up a passcode, you will have to log in with your User ID and password.
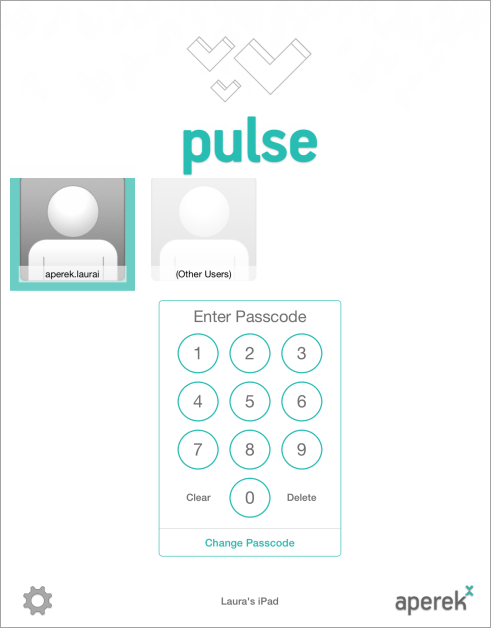
Figure 2: Re-entering a Locked Screen
Manual Lock
You can lock the screen by tapping the Lock Screen button in the upper right corner of the screen. To unlock, select your User ID and enter your four-digit passcode. (If you have not set up a passcode, you will have to log in with your User ID and password.)
Settings
On the Home screen, tap the ![]() icon in the lower left corner to go to the Settings screen.
icon in the lower left corner to go to the Settings screen.
On the Settings screen, tap a menu item to display the options available for it. (See Figure 3.)
About
The About menu lets you see Current Configuration information, including the Facility, if your organization has more than one facility using Pulse.
Note: The Reset option should only be used at the direction of Aperek Support or your IT staff.
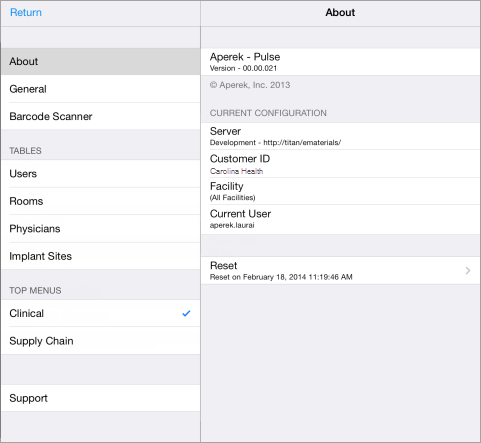
Figure 3: Settings - About
General
When you tap General in the Settings menu, controls for the Touch Bubble, Audio Prompts, and Enable Patient Verification will be displayed at right.
- Touch Bubble is optional.
- Audio Prompts must be turned on for voice confirmations to be audible when using the barcode scanner.
- Enable Patient Verification allows you to turn on the patient verification function. You may also choose to make
patient verification required.
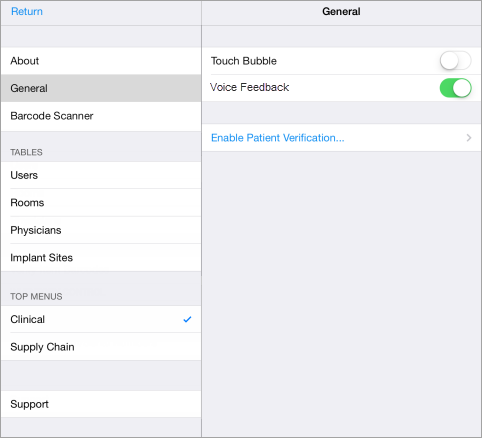
Figure 4: Settings - General
Patient Verification
To make patient verification required before the capture of case items, tap the menu item Enable Patient Verification in the Settings - General menu (see Figure 4). On the next panel that displays, toggle both the Patient Verification button and the Require button ON (see Figure 5).
(Note: To use this function, you must connect the barcode scanner.)
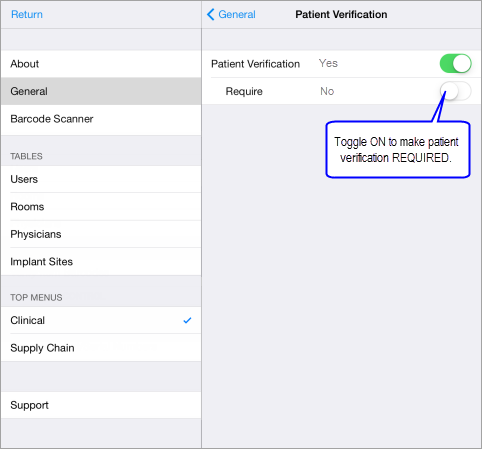
Figure 5: Enable Patient Verification
When patient verification is required, you will be unable to capture case items until the patient's barcode identification has been scanned. A warning message, Patient NOT Verified, will appear at the top of the screen, and the buttons at the bottom of the screen will be blocked by the words "Verify Patient to Enable." (See Figure 6 below.)

Figure 6: Patient NOT Verified
Even when patient verification is not required, you can still scan the patient's barcode as an easy, convenient way to open the case.
Barcode Scanner
When you tap Barcode Scanner in the Settings menu, a list of scanners connected to the device is displayed at right under Connected Scanners. If your scanner is not listed, you must connect it.
You can follow the guide to connecting the barcode scanner by tapping Connecting Barcode Scanner. (This guide is also accessible through the Support menu.)

Figure 7: Settings - Barcode Scanner
The guide to connecting the barcode scanner is a scrollable document. When you want to close the guide, tap the upper left corner of the screen (see Figure 8 below), and then tap Done to return to Settings.
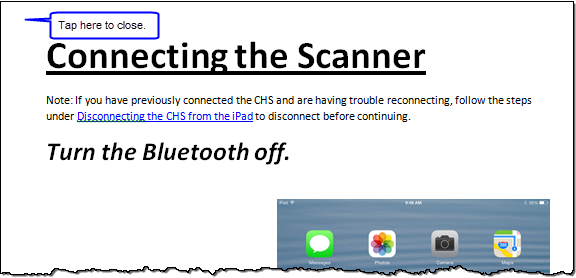
Figure 8: Connecting Barcode Scanner Guide
TABLES
These menu items are simply lists of data. Some data may be uploaded from your site's system, some may be scanned, and some entered manually. Items can be added to these lists, as well as edited or deleted, with some exceptions.Users
Tap Users in the Settings menu. A list of users who have been logged in to the device will be displayed at right. (See Figure 9 below.) To edit your user information, tap in the field containing your name.

Figure 9: Users
Edit User
Tap the the line containing your User ID. (See Figure 9 above.) After the expanded view displays, tap the Edit button in the top right corner. (See Figure 10 below.) On the Edit view, tap the field you wish to edit, and enter your new information.
Note: You can only edit your own user information.
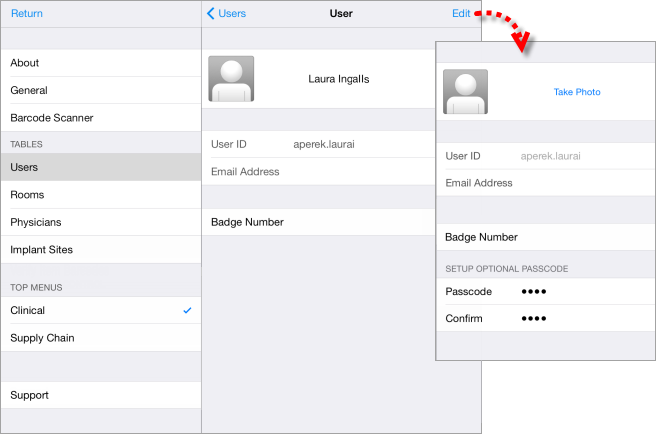
Figure 10: Edit User
Entering your ID badge number in the Badge Number field will allow you to log in to the application by scanning your badge.
Delete a User
To delete another user from the device, tap the line with the desired user's name. On the next screen (Figure 11A, below), tap the Remove button at top right. A Slide to Remove button displays (Figure 11B, below). Slide to delete the user, or press Cancel if you hit the Remove button in error.
Note: You cannot delete yourself from the device.
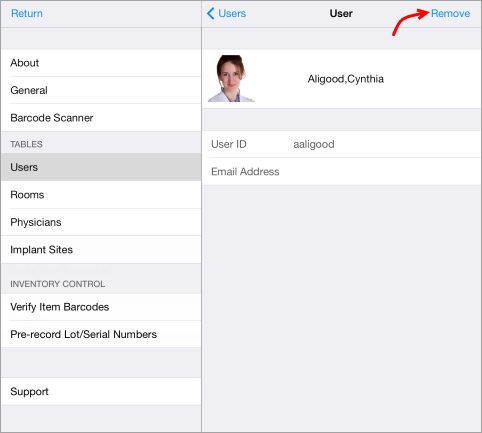 | 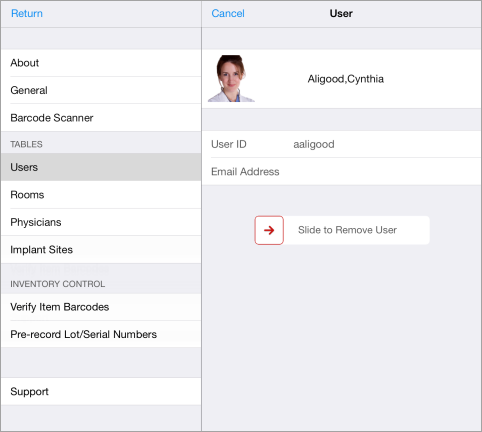 |
Figure 11A: Remove User | Figure 11B: Slide to Remove User |
Add a picture of a user
On the Edit view, tap the Take Photo button, then select either Take Photo or Choose Photo. (See Figure 12 below.)
If you select Take Photo, the iPad's camera will be activated. Focus your picture, then tap the camera button ![]() . You may then
. You may then
choose to use or retake the photo.
To take a picture of yourself, tap the camera reverse icon  in the top right corner of the screen. Then focus and tap the camera button.
If you select Choose Photo, two choices will display: From Defaults and From Camera Roll. (See Figure 12 below.) Selecting From Defaults
gives you a menu of avatars from which to choose. You may delete or change your selected image later if desired.
Selecting From Camera Roll will cause the images from your previously taken pictures to display, and you may select one of these.

Figure 12: Add a Picture of a User
Rooms
Tap Rooms in the Settings menu. A list of rooms and descriptions will be displayed at right. (See Figure 13 below.) To search for a room, tap in the Room field under SEARCH FOR and just begin typing.
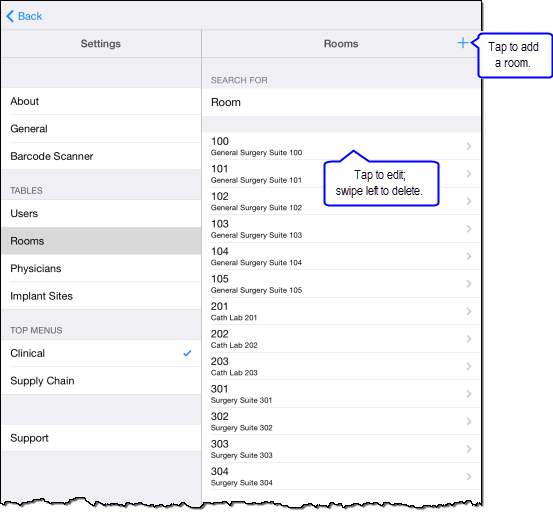
Figure 13: Add or Edit a Room/Location
Add a Room
Tap the + icon in the top right-hand corner of the screen. (See Figure 13 above.) Fill in the required fields using the keyboard at the bottom of the screen. Tap Save at the top right of the screen.
Edit a Room
On the list of rooms, tap the line with the desired room. (See Figure 13 above.) After the expanded view displays (see Figure 14 below), tap the field you wish to edit. Use the keyboard at the bottom of the screen to enter your changes.
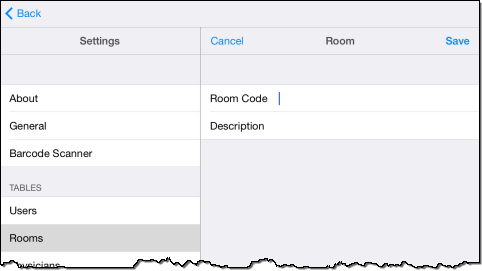
Figure 14: Edit Room
Delete a Room
On the list of rooms, SWIPE LEFT on the line with the desired room. (See Figure 13 .) A  button will display.
Tap to delete.
button will display.
Tap to delete.
Physicians
Tap Physicians in the Settings menu. A list of physicians will be displayed at right. To search for a physician, tap in the Physician field under SEARCH FOR and just begin typing.
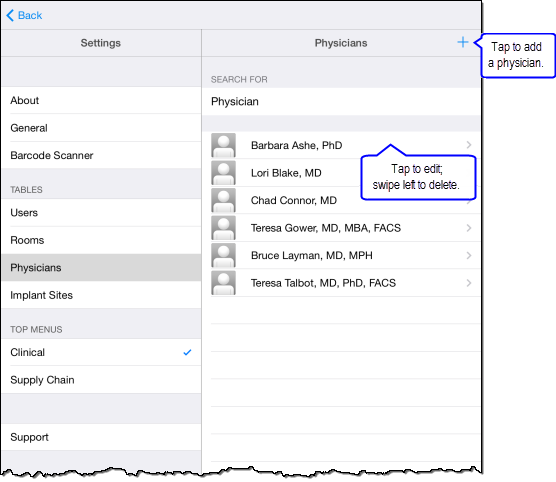
Figure 15: Add or Edit Physicians
Add a Physician
Tap the + icon in the top right-hand corner of the screen. (See Figure 15 above.)
The Add Physician panel displays. (See Figure 16 below.) Fill in the required fields using the keyboard at the bottom of the screen.
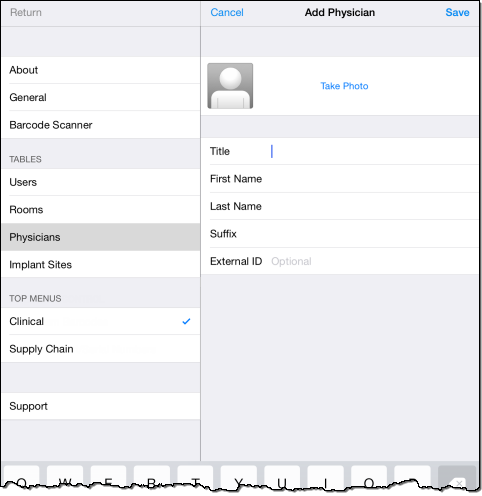
Figure 16: Add Physician
To add a photo of the physician, tap the Take Photo button. Then follow the same procedure outlined above under Add a picture of a user.
Edit a Physician
On the list of physicians, tap the line with the desired physician’s name. (Refer to Figure 15.) After the expanded view displays, tap the field you wish to edit. Use the keyboard at the bottom of the screen to enter your changes.
Delete a Physician
On the list of physicians, SWIPE LEFT in the line with the desired physician’s name. (Refer back to Figure 15 .) A ![]() button will display. Tap to delete.
button will display. Tap to delete.
Note: A physician cannot be deleted once he or she has been associated with a case.
Implant Sites
This table lists anatomical implant sites. To search for an implant site, tap in the Implant Site field under SEARCH FOR and just begin typing.
Sites can be added to this table by clicking the + icon at the top right of the screen (see Figure 17 below).
An Implant Site field on the Case Item Edit screen will allow you to select from the sites listed on this table when you are entering item information.
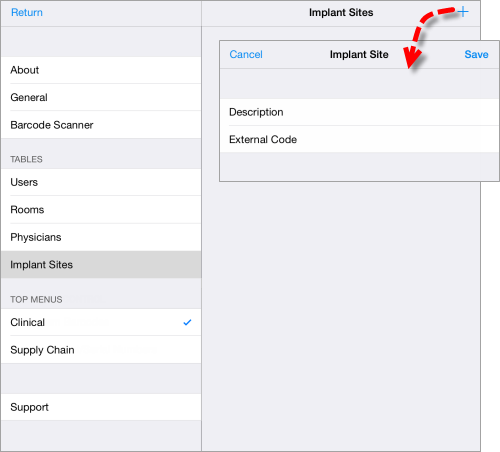
Figure 17: Add Implant Site
TOP MENUS
Because the Pulse functions used in the OR are different from those used in supply, you can choose the top menu that best suits your workflow.
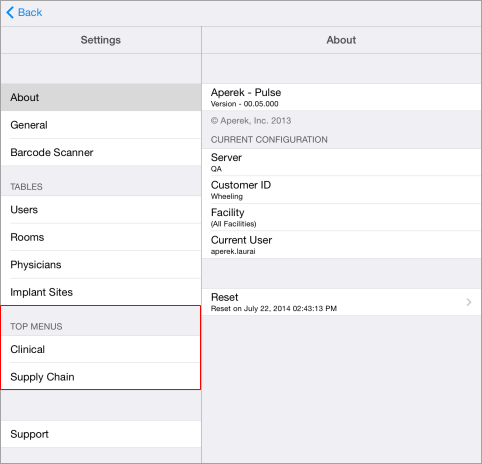
Figure 18: Top Menus
Clinical
Select this top menu to see the Today's Cases button displayed on the home screen. The functions performed via the case screens include the capture and resolution of case items, reviewing case data, and setting cases as "reviewed" or "closed." These functions are discussed in detail in the Cases section, below.
Supply Chain
Select this top menu to see the Barcodes and Lot Numbers buttons displayed on the home screen. The Supply Chain menu includes inventory control functions performed outside the OR, like scanning and verifying barcodes or receiving and reviewing lot numbers. These Pulse features help to expedite the item capture process in the OR by allowing for some item information to be recorded or verified in advance of the case.
Figure 19: Supply Chain Home Screen
Barcodes
Tapping the Barcodes button causes two new buttons to display: Verify Barcodes and Manually Resolved. (See Figure 20, below.)
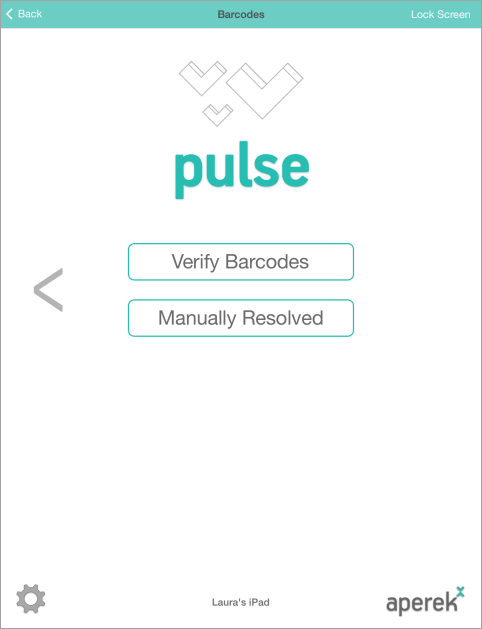
Figure 20: Barcode Action Buttons
Verify Barcodes
This feature allows a user to identify which items have barcodes that are recognized by the application and which do not.
Tap Verify Barcodes. When the screen below appears (see Figure 21), begin scanning. If the item is found, a popup will display showing the item and then disappear. If the item is not found, it will appear on the list. You can then tap on a row to take a picture of the actual product and associate it with an item.
You may choose to view items found or items not found (Unknown), as well as items that were initially not found, but have been resolved manually.

Figure 21: Verify Item Barcodes
Manually Resolved
Tap to see a list of barcodes that were not recognized, but have been resolved manually (via item search or manual entry of data). This is the same view accessible by tapping the Verify Barcodes button on the home screen, and then choosing the Resolved Items view.
Lot Numbers
To expedite the process of recording lot and/or serial numbers for items not in their original packages, items and their lot numbers can be pre-recorded prior to issue/pick, making this list of lot numbers available when adding the pre-recorded items to a case. To work with lot numbers, tap the Lot Numbers button on the Supply Chain top menu. (See Figure 19, above.) Three action buttons display: Receive Lot Numbers, Show All, and Expiring Lots. (See Figure 22 below.)
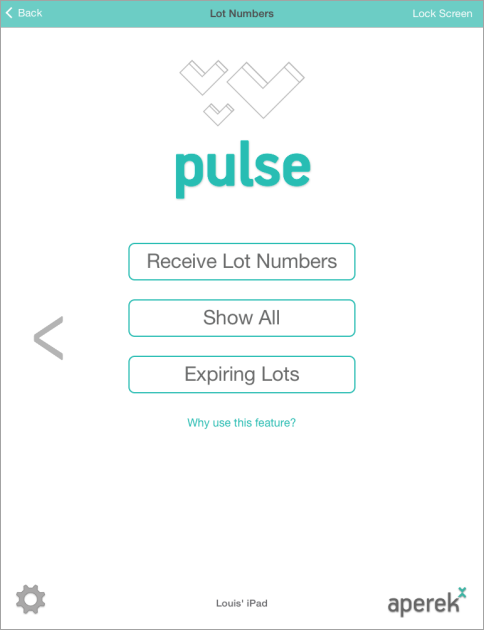
Figure 22: Lot Number Action Buttons
Receive Lot Numbers
Tap to display a list of items that have been received today, with the message Ready to Scan (see Figure 23 below). (If your barcode scanner is not connected, the message Waiting for Scanner will display.) As you scan lot numbers, they will be added to the list.
To receive an item, scan the item barcode first, and then the lot number barcode. (If the lot number barcode is scanned first, you will be prompted to scan again.)
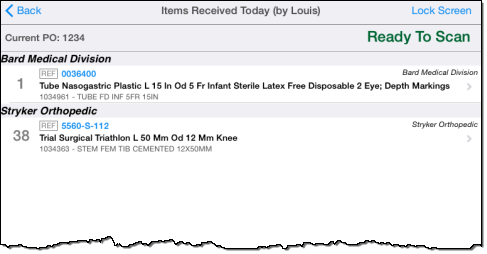
Figure 23: Receive Lot Numbers - Items Received Today
After the item number and lot number are received, a keypad will display. (See Figure 24 below.) You can enter a quantity, a PO Number, transaction date, and condition of the package. Tap Accept.
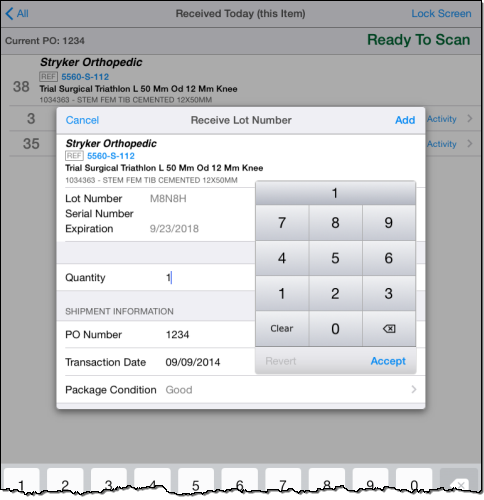
Figure 24: Add Quantity to Scanned Information
Note: You may change the quantity of the scanned item or delete it, but otherwise, scanned information is not editable.
To view activity for an item, tap the item in the list. When the detail panel opens, tap Show Activity. (See Figure 25 below.)
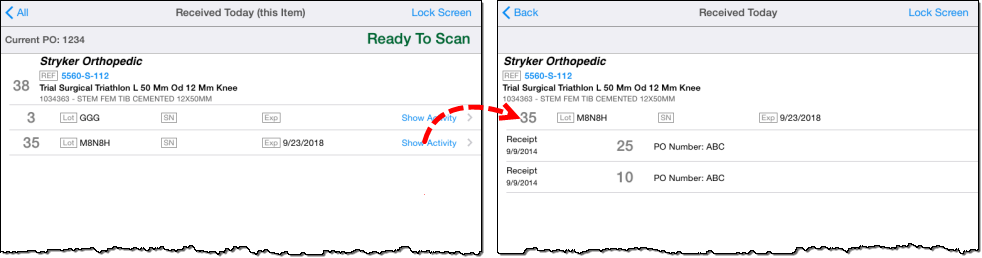
Figure 25: View Item Details and Activity
You can view all of the items received today by tapping All in the upper left corner of the panel. This is not the list of all items received; this is the list of all items received today by the currently logged-in user. To see all items received (regardless of user or date received), tap the Show All button on the home screen.
Also, as items are captured in case lists, the quantity is decremented. When the quantity reaches zero, the item drops off the list.
Show All
Tap this button on the home screen to see a list of all lot numbers that have been scanned -- today's items as well as items scanned on previous days. Tap an item in the list to see details for the item, to adjust the quantity, or to view activity for the item.

Figure 26: Show All Lot Numbers
When you tap an individual lot number, a new panel will display (see Figure 27 below). To adjust the quantity, tap Adjust. On the Lot Number Adjustment panel, you will not only adjust the quantity, but you will have to specify an Adjustment Type. In the Action field, tap the Select Action... line. On the Adjustment Types panel, select the desired adjustment type. You may perform this step before or after entering an adjustment quantity, but you must select an adjustment type in order to save the adjustment.
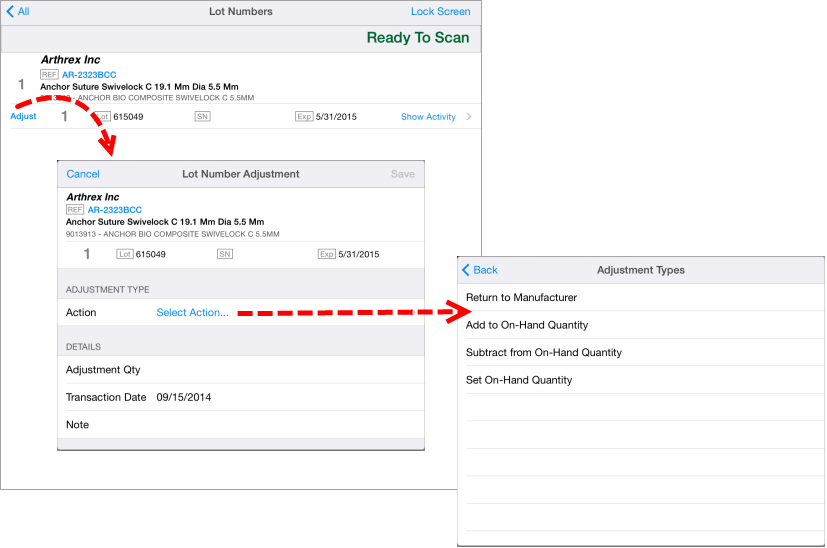
Figure 27: Adjust Quantity
Expiring Lots
Tap this button to see a list of lot numbers whose expiration dates fall within six months of the first day of the current month. Tap an individual lot number to view details. Figure 28A (below) shows an item that has not yet expired. Figure 28B shows expired items; expiration dates are displayed in red. Tap Show Activity to see activity for that individual item.
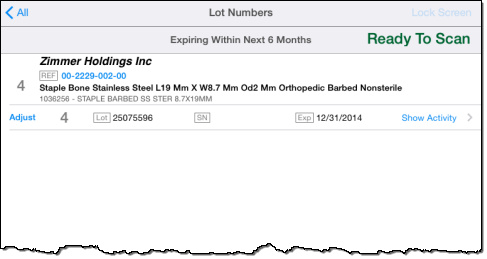 |  |
Figure 28A: Item Not Yet Expired | Figure 28B: Expired Items |
Support
Tap Support in the Settings menu. The menu options Quick Start Guide, Connecting Barcode Scanner, Logs, and Send data to Aperek Support will be displayed at right.
Quick Start Guide
The Quick Start Guide is accessible from the initial Log-in screen prior to your first log-in. It is always accessible through the Settings menu, under Support.
The Quick Start Guide is a scrollable document. To exit the document, tap the upper left corner of the screen; the word Done will display. Tap Done to close the document and return to the Support menu.
To view/print the Quick Start Guide, click here.
Connecting the Barcode Scanner
Connecting Barcode Scanner is a scrollable document. To exit the document, tap the upper left corner of the screen; the word Done will display. Tap Done to close the document and return to the support menu.
To view/print the Connecting Barcode Scanner guide for 1D scanners, click here.
To view/print the Connecting Barcode Scanner guide for 2D scanners, click here.
Cases
To view cases, tap the ![]() button on the Pulse Home screen. Today’s cases, imported from your site's OR scheduling system, will be displayed. (See Figure 29 below.)
button on the Pulse Home screen. Today’s cases, imported from your site's OR scheduling system, will be displayed. (See Figure 29 below.)

Figure 29: Today's Cases
Open Case
Scan the patient's barcode to open your case. (The case can also be opened by tapping the case on the display panel.)
Add a Case (Optional)
To add a case, tap an empty space in the desired time slot. Enter the Case Number and complete all required fields: Patient Number (limit 10 characters), Physician, Procedure Type, and Booking Number. Tap Save. (See Figure 30 below.)

Figure 30: Add Case
If you wish to edit or delete a case you have created manually, begin by tapping the case to open it. When the case opens, tap the tab to bring up the edit panel. (See Figure 31 below.) On the edit panel, you can tap any field to make it active for editing. If you wish to delete the case, scroll the panel up and use the Slide to Delete button located below the room number. (Note: You cannot delete a case that you have not created manually.)
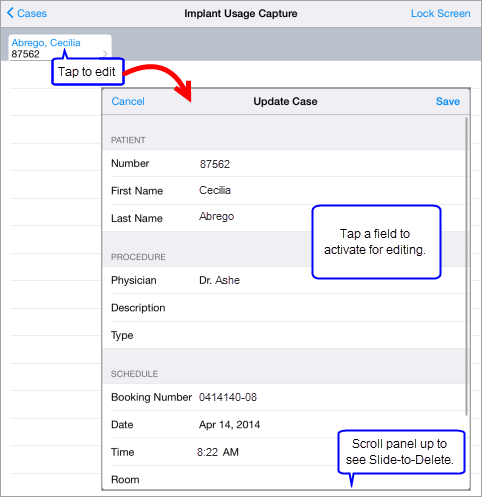
Figure 31: Edit or Delete a Manually Created Case
Supply a Corrected Patient Number
On a case that you have not created manually, the only information that can be edited is the patient number. Activate the edit panel by tapping the tab on the case list. (See Figure 31 above.) The only field where you can input information on the newly displayed panel is the Corrected Number field. Tap the field to activate the keypad. (See Figure 32 below.)
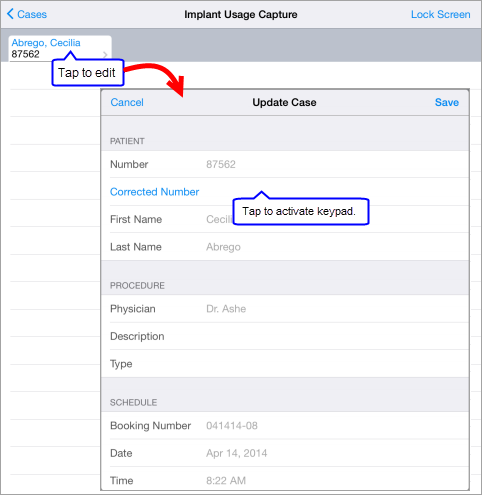
Figure 32: Corrected Patient Number
View Prior Cases
Pulse stores up to 30 days of case history. To access a prior case, go to the Today's Cases panel. Drag the case display panel down to reveal the current week's cases. (See Figure 33A, below.) From this view, you may choose to view all cases, or only those with unresolved items. Items listed in note form but not yet associated with their catalog information are said to be unresolved. Instructions for resolving these items are provided in a later section called Resolving Items. The total number of items recorded for each case is listed at the bottom left corner.
When you select a prior day, the screen title displays the date selected, rather than "Today's Cases." (See Figure 33B, below.) The default view is cases with incomplete items, but you may select to view all cases or cases that need review. The cases that need review are all closed cases. When cases are set as Reviewed, they will fall off the list.
To return to Today's Cases, tap the word Today.
 | 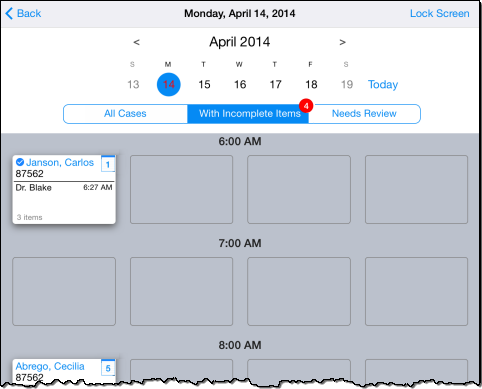 |
Figure 33A: Today's Cases | Figure 33B: View to Prior Cases |
Capturing Items
Pulse enables you to capture items used in a case by recording the items and matching them with the correct manufacturer information for each.
Pulse allows you to record items using a barcode scanner, which automatically provides the manufacturer information. If a barcode scanner is not available, you may use one of the alternate methods listed below. (Refer to Figure 34 below.)
 Search for the item in the Aperek database .
- Make a note of the item and search for the associated manufacturer information later.
- Record a barcode with the iPad camera.
- Type or jot a note.
- Make a voice-to-text recording.
- Take a picture.
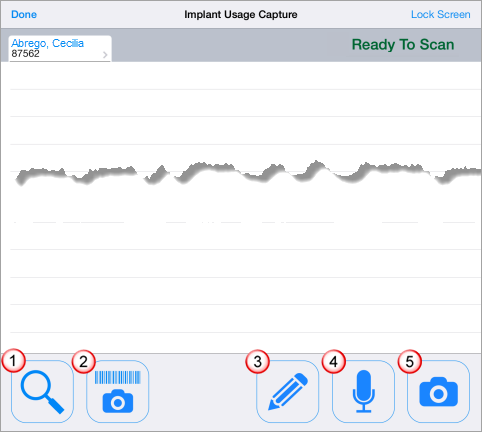
Figure 34: Capture Items
Using the Barcode Scanner
Once a case has been activated, you are ready to start recording items. If the barcode scanner is connected, you may begin scanning. The Ready To Scan message appears at the top of the screen. (If the scanner has not been connected, see the section entitled Connecting Barcode Scanner.)
Pulse records the item reference number as well as the lot/serial number. If the item information is found in the database, the item will be added to the list, and you will be prompted to scan again to capture any remaining information. ( If Audio Prompts are turned on, a voice prompt will be heard.)
If the item is NOT found in the database, the barcode will be saved in a note. You will need to look up the item using Item Search. (See Figure 35 below.)
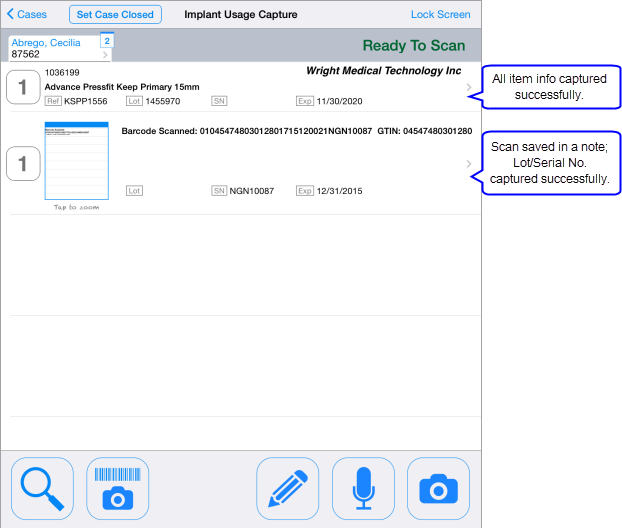
Figure 35: Scanned Items Recorded in Case List
Other Methods of Capturing Items 
If it is not possible to use a barcode scanner, you can use the Item Lookup to find the item, or make a note of the item (text, voice-to-text note, or photo) and look it up later.
 Item Lookup
Activate the search by tapping magnifying glass button. You will direct the search using keywords and/or the manufacturer name.
The blue Suggestions panel automatically displays a list of manufacturers. (See Figure 36 below.) If you have selected a manufacturer in a previous search, it will appear at the top of the list, highlighted in yellow.
If you have typed a note, you may select the Keywords & Note view; the words on your note will automatically be listed. You may also type keywords in the search window.
When you select a manufacturer or keyword(s), your selections will appear in the gray Selections panel. You can tap a selection to deselect it and redirect your search. Search results appear in the area to the left of the blue Suggestions panel. Selecting one of these items ends the search.
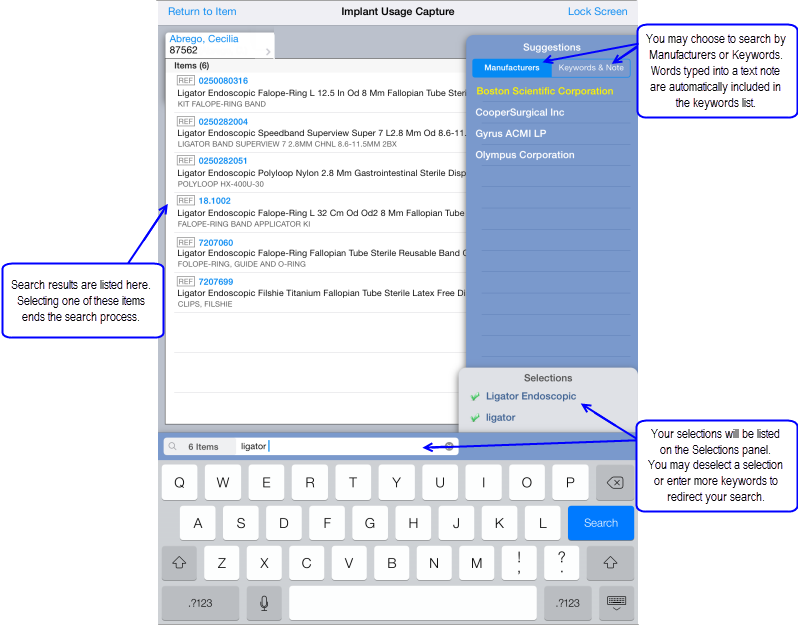
Figure 36: Search by Manufacturer or Keyword
If the item you're searching for does not appear on the list after you've selected a manufacturer, you may expand your search to include other manufacturers within the same entity family. Toggle the Expanded Search button ON. (See Figure 37 below.)

Figure 37: Expanded Search
When you select from the search results, the selected item will appear on the case item list with all necessary information. (See Figure 38 below.) Tap the item line to activate the edit panel and add lot and serial numbers. (See Add Lot and Serial Numbers below.)
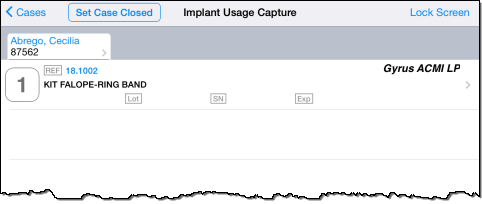
Figure 38: Selected Item on Case Item List
If you have selected the wrong item, tap the item line to activate the edit panel. Tap the Wrong Item? button, as shown below in Figure 39. A Slide to Remove button will display. When you remove the item, the note and all other information will remain.
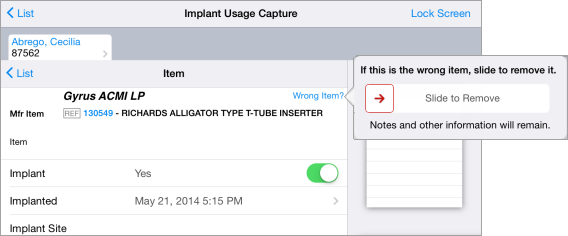
Figure 39: Slide to Remove Wrong Item
Make a Note
If there is not time to look up an item, you can make a note of the item and search for its manufacturer information later. By using the action buttons at the bottom of the Implant Usage Capture screen (refer to Figure 34), you can create a written or typed note, a voice-to-text note, or a picture. In the absence of a barcode scanner, you can even take a picture of a barcode.
 Record a Barcode with the iPad Camera
- Tap the camera barcode button. This will activate the iPad's camera.
- Focus the camera on the barcode and hold steady until you see a green frame over the barcode and hear a beep.
- If the barcode is recognized, the item information is added to the case item list.
- If the barcode is not recognized, the item edit panel displays with the scanned information in a note (see Figure 40A below). You may enter information add text to the note or take a picture (of the item packaging, for example) to add to the note (see Figure 40B below).
Instructions for creating these notes can be found in the sections entitled Jot or Type a Note and Picture Note. - You may enter information manually on the edit panel (implant site, quantity, tissue information).
- The barcode will be listed on the case's item list, along with any additional information or notes you have provided.
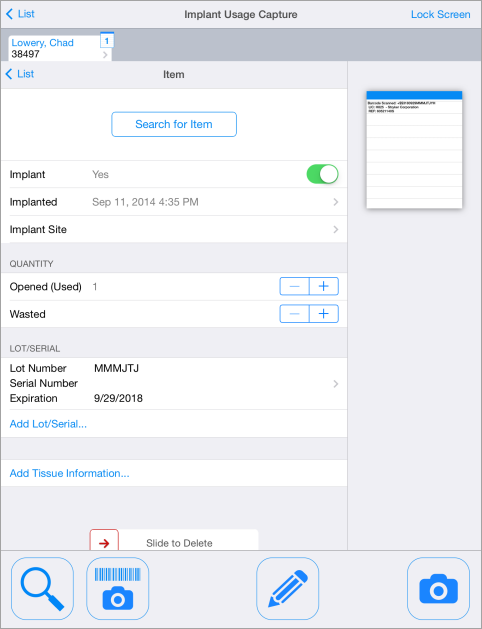 | 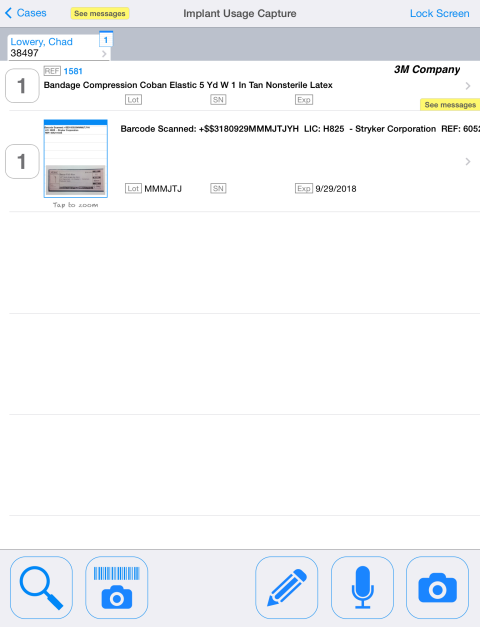 |
Figure 40A: Picture of a Barcode Not Recognized | Figure 40B: Barcode and Notes in Item List |
 Jot or Type a Note
- Tap the pencil button.
- Jot anywhere on the note page, OR
- Tap the words "Jot below or touch here to type" to activate the keyboard (Figure 41).
- Tap Save.
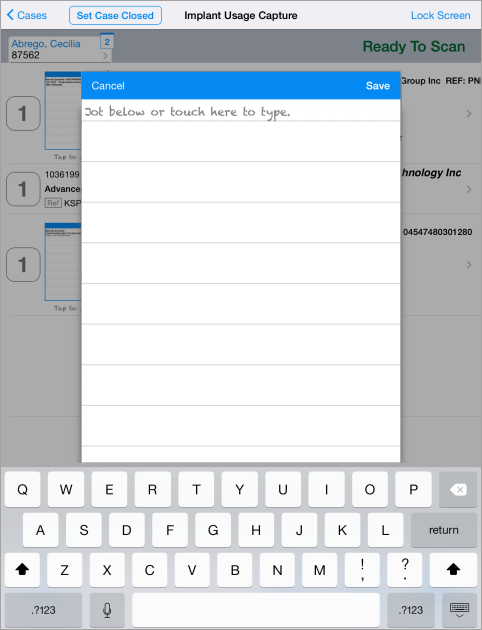
Figure 41: Jot or Type a Note
 Voice Recording Rendered as a Text Note
- Press and hold the microphone button while speaking. (See Figure 42 below.)
- Release to stop recording.
- Your vocalization will be rendered as typed text on a note (see Figure 43 below), to which text can be added. (To review the procedure for adding text to a note, see Edit Text Note.)
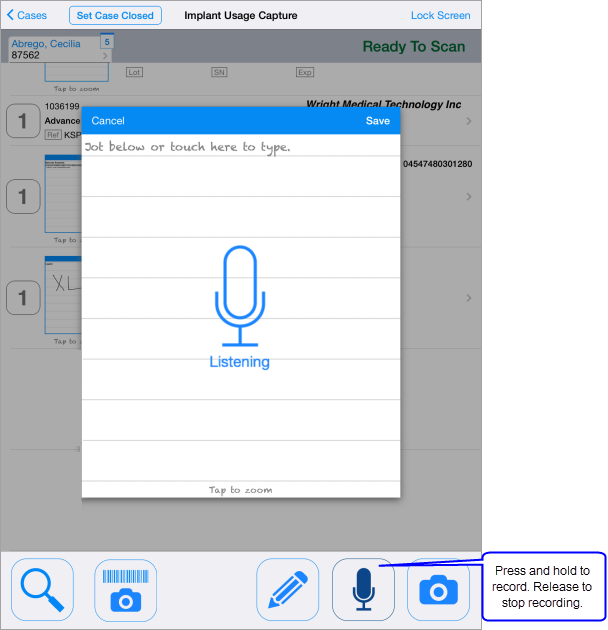
Figure 42: Record a Voice Note
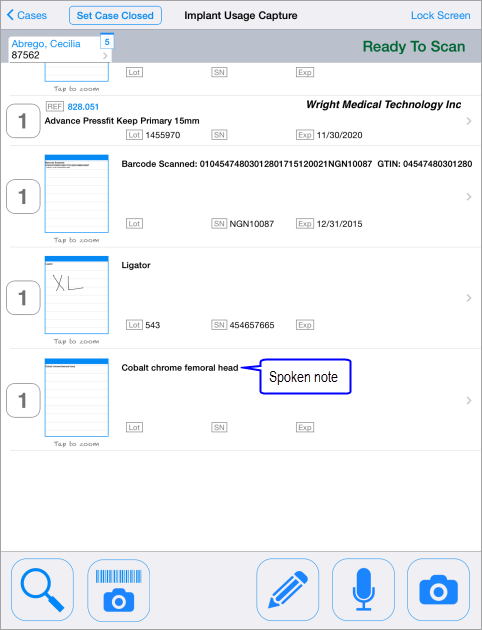
Figure 43: Voice-to-Text Note
 Picture Note
- Press and hold the camera button to focus, keeping the desired object of your photo in the clear area at the center of the window. (See Figure 44 below.)
- Release to snap a picture.
- Your picture will be displayed in a note (see Figure 45 below), to which text can still be added. (Refer to Edit Text Note.)
Note: If the picture is not clear, you may simply press the camera button and retake the picture.
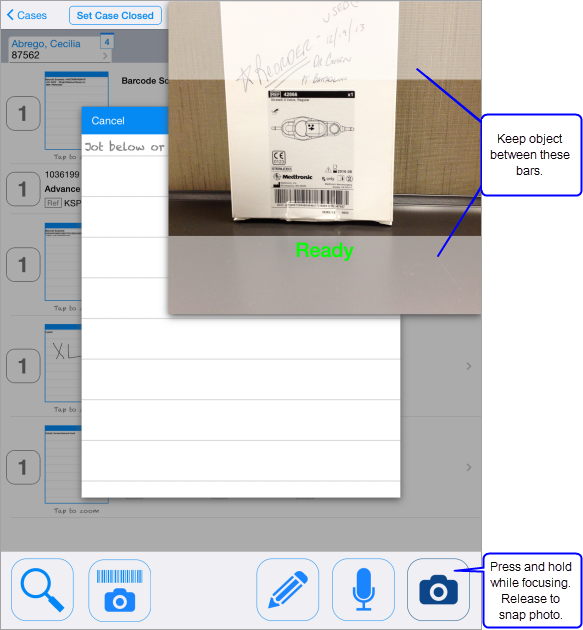
Figure 44: Focus Photo
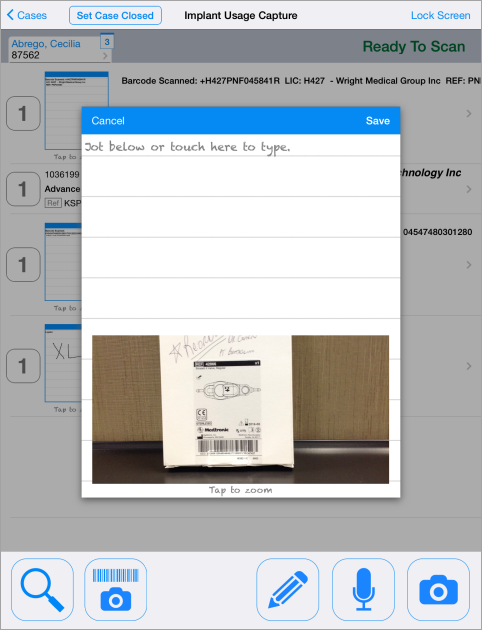
Figure 45: Photo Note
Editing Items
Whether an item is captured by a barcode scan, identified by item lookup, or recorded in a note, it will be listed on the Implant Usage Capture screen as seen below in Figure 46. On this screen, you may change the item quantity or make changes to a note. To make other changes, tap the item line to display the Item Edit screen.
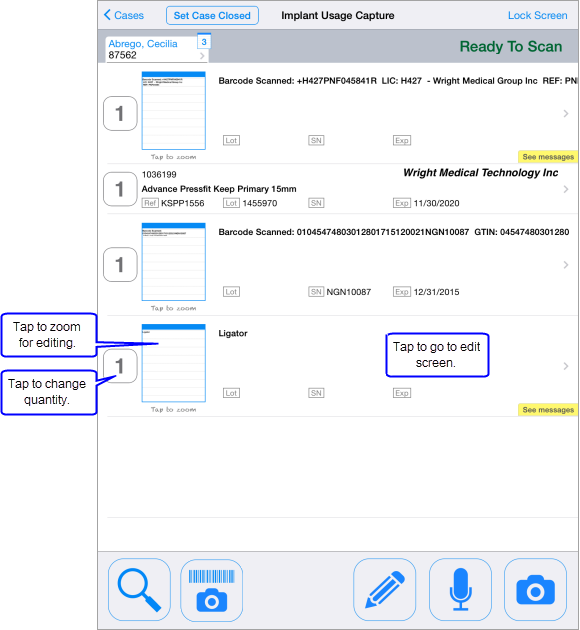
Figure 46: Item List View
Item Edit Panel
Tap the item on the case item list (see Figure 46 above) to activate the edit panel.
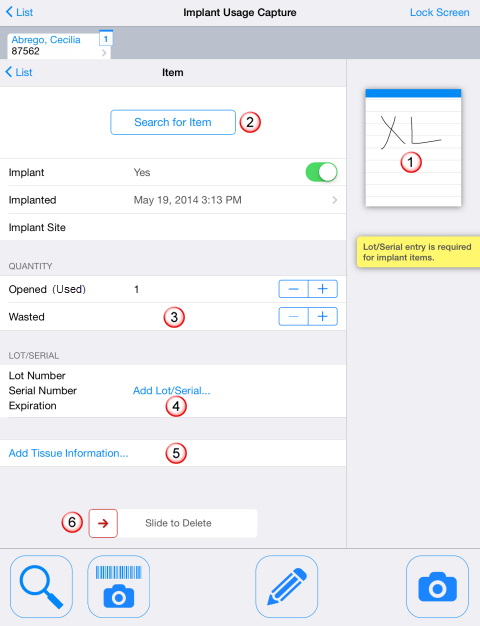
Figure 47: Item Edit Screen
On the Item Edit panel (Figure 47, above), you may do the following:
- edit a text note,
- search for the item,
-
record wasted items,
- add lot number, serial number, and expiration date to the item,
- add tissue information, or
-
 delete the item.
Note: You may have to scroll to make the Slide to Delete action visible.
The action buttons at the bottom of the screen (search, note, camera) remain active.
Edit Text Note
Text can be added to a note. On the edit view, tap the note to enlarge it. You can then tap the existing line of text to activate the keyboard and begin typing, or simply jot anywhere on the page (see Figure 48 below).
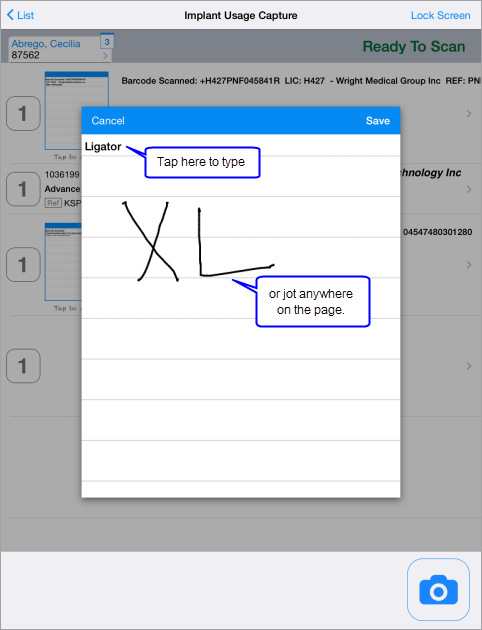
Figure 48: Edit Text Note
You can also clear your jot from the note. Tap and hold anywhere on the page to bring up the Clear jot button. (See Figure 49 below.) Tap to clear.
![]()
Figure 49: Tap to Clear Jot
Search for the Item
Tapping the "Tap to Search for Item" message (see , Figure 47) activates the same search as tapping the magnifying glass icon at the bottom of the case item list screen.
To search for an item, follow the procedure outlined in the above section on Item Lookup.
Record Wasted Items
To record wasted items (see , Figure 47 tap the Wasted field. On the Lot/Serial panel, enter the wasted quantity. A Reason field will appear. (See Figure 50 below.) Tap in the field to select from a list of reasons, or leave the value "Unspecified."
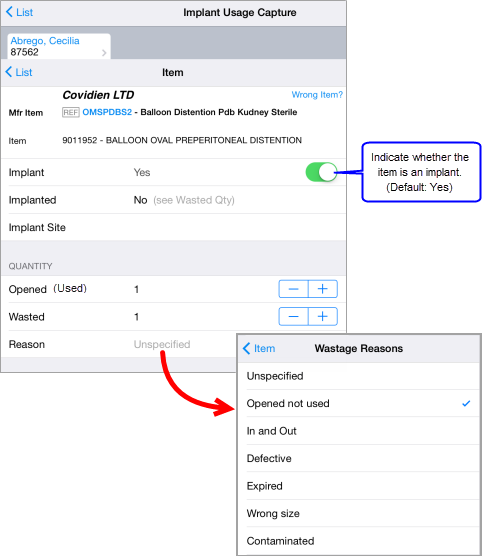
Figure 50: Record Wasted Items
Add Lot Number, Serial Number, and Expiration Date
Lot number is required for all implant items and optional for all other items. An item is treated as an implant item if the Implant button on the Item Edit panel is toggled ON (see Figure 50, above). An implant item is not resolved, and the case cannot be closed, until the lot number is provided.
If the lot number is not available on an implant item, toggle the Available button OFF. (See Figure 51, below.) This will allow the item to be resolved, and the case closed, without the lot number.
To enter the lot number manually, go to the item edit panel and tap the Lot/Serial field (see , Figure 47). On the Lot/Serial pane (Figure 51, below), the cursor will appear in the Lot Number field. Type in the lot number, then tap Next to move the cursor to the Serial Number field. Tap Next again to move the cursor to the Expiration Date fields. When finished, tap the < Item button to return to the Item Edit panel.
Important: If you have multiples of a particular implant item with a different lot number for each, DO NOT enter the quantity before entering the lot numbers. Each lot number entered after the first will cause the quantity to be adjusted by +1. If possible, use the barcode scanner to scan each item with a unique lot number separately.
If you have multiples of an item for which no lot/serial number is required (for example, non-implant items or implant items with no lot/serial number available, such as screws or staples), you may enter the item information and simply adjust the quantity as appropriate. Similarly, if an implant item is packaged in multiples with the same lot number, you may record the item information and simply adjust the quantity.
Note:
- If you have supplied a serial number, you can only enter a quantity of 1.
- If you enter a lot number that already exists within the case for the same resolved item, the lot number will display in red to alert you
to the possibility of a duplicate scan.
- If you enter an expiration date prior to the current date, the date will display in red.
If you wish to change or delete a saved lot or serial number, return to the edit panel. Tap the Lot/Serial Number field. You may edit or delete a number within its field, or delete both numbers using the Slide to Delete button. (See Figure 51 below.)
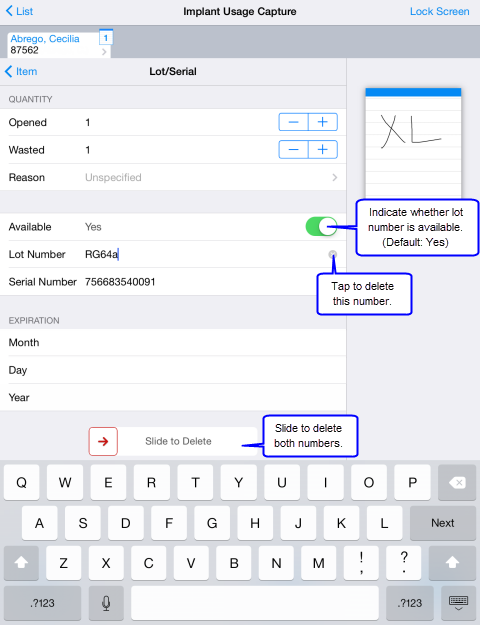
Figure 51: Edit or Delete Lot/Serial Number
Look up Lot/Serial Number
When a case item is not in its original packaging, it may have only manufacturer's information available. The Pulse feature Pre-record Lot/Serial Numbers allows the lot/serial numbers for such items to be recorded in advance of issue. When the item is captured during the procedure, the lot/serial number can be selected from the pre-recorded list.
After the item is captured, the Item screen will display with the manufacturer's information (supplied by either a barcode scan or item lookup). Tap the Add Lot/Serial... line (Figure 52, below) to display the Lot/Serial panel. Tap Look up Lot/Serial... to view a list of pre-recorded numbers for the manufacturer of that item.
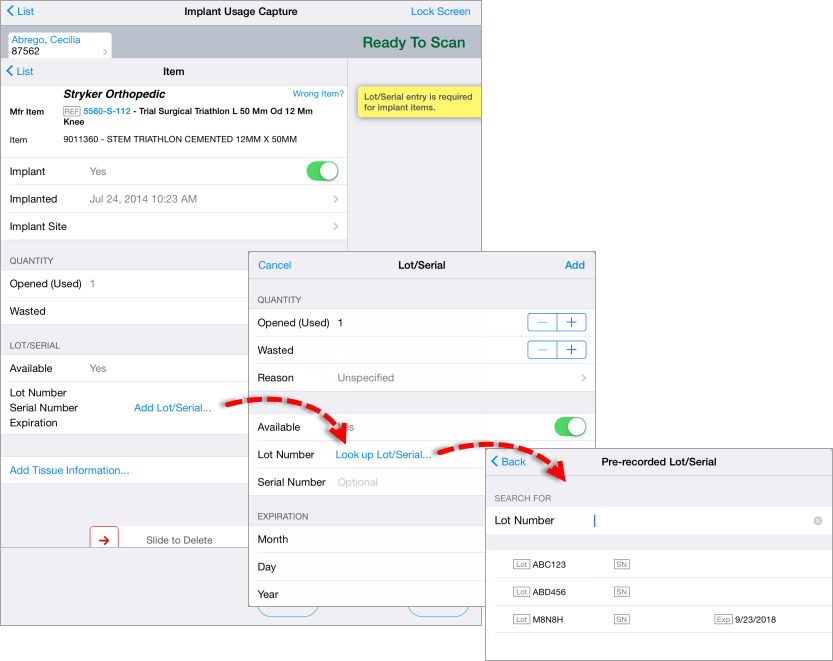
Figure 52: Select a Pre-recorded Lot/Serial Number
You may select a number from the list or type in the Lot Number line. Tap Add to add it and return to the Item panel (Figure 53, below).
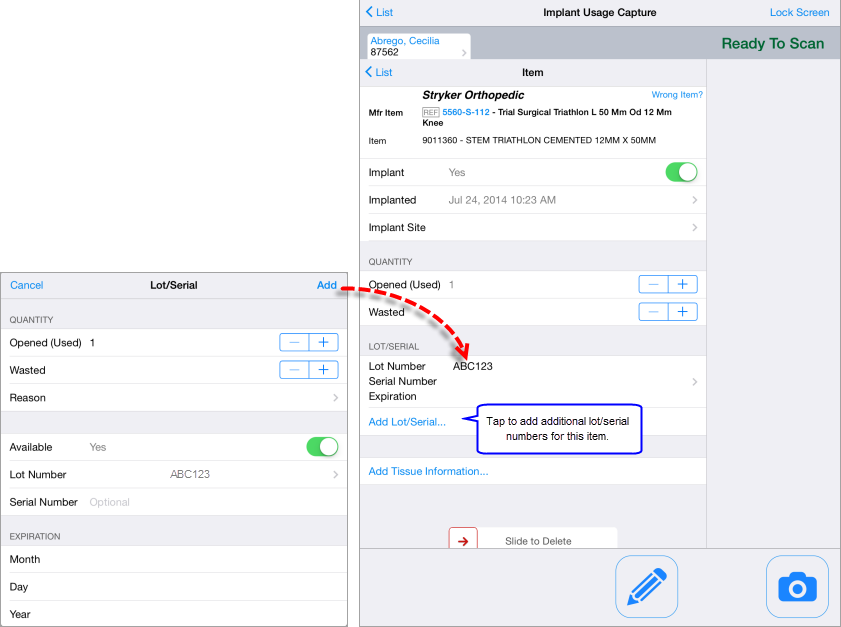
Figure 53: Add Pre-recorded Lot/Serial Number
In this example, there are three lot numbers recorded for the same manufacturer item (see Figure 52). You may continue to add lot/serial numbers, by by tapping Add Lot/Serial... on the Item panel and following the above procedure.
Note: When an item has a serial number, the lot number is optional information, and the entered quantity may be no more than 1.
Add Tissue Information
Tap the Add Tissue Information field (See , Figure 46). On the popup panel that displays, enter the required information and tap Add. (See Figure 54 below.)

Figure 54: Add Tissue Information
Delete an Item
To completely delete an item (see , Figure 47), use the Slide to Delete button displayed at the bottom of the item edit panel. (You may have to scroll to reveal the button.) This action deletes all the information for the item, including the note, and it cannot be undone.
Resolving Items
An item is resolved when it has been matched with item manufacturer information from your site's database. Items scanned with a barcode scanner are automatically resolved. Items recorded in notes or pictures are unresolved because they have not yet been matched with manufacturer item information.
Unresolved Items
Items recorded as notes must be resolved by searching the database for the associated manufacturer information. When you search for an item in Aperek Pulse, the application works with Sourcing and Contract Management (Ellipse) to access catalog and contract information for the items used in your case.
Unresolved Items in Today's Cases
Cases with unresolved items are denoted with a flag on the Today's Cases screen. In Figure 55 below, Dr. Blake's 6:00 AM case has one unresolved item, and Dr. Connor's 7:00 AM case has two. (Cases with no items recorded will have no status message.)
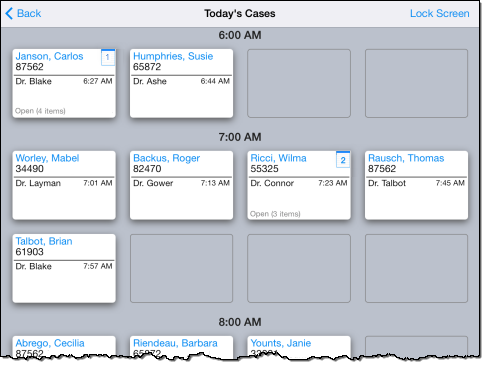
Figure 55: Cases with Unresolved Items
Viewing Unresolved Items in Cases from Previous Days
To view cases from a prior day, drag the the Today's Cases screen down to reveal the current week. (See Figures 33A-B.)
You may select a different week by tapping the forward and backward carets next to the month/year. Select the desired date. You may choose to display all cases or only those with unresolved items. (See Figure 33B.) Tap the case to activate it.
Search Item Records
On the case's item list, tap the line with the unresolved item to go to the edit panel. (See Figure 56 below.) On the edit panel, tap Search for Item and follow the search procedure outlined in the section above entitled Item Lookup.
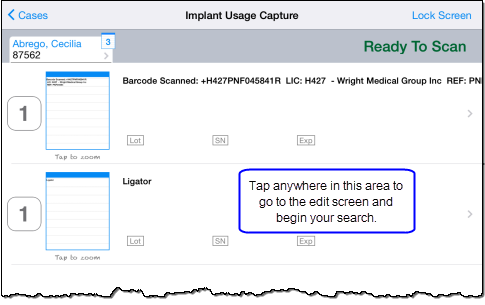
Figure 56: Begin Search
Closed Cases
When all case items have been captured and you have resolved as many of them as possible, providing lot numbers for ALL implant items, you are ready to close your case. By setting the case status to "Closed," you make the case available for review. Any unresolved items can be resolved in the review process. To set the case closed, tap the Set Case Closed button at the top of the case list page. Tap Set Case Closed on the confirmation panel that displays (See Figure 57 below.)
Note: The Set Case Closed button will not be available if you have any implant items without lot numbers.
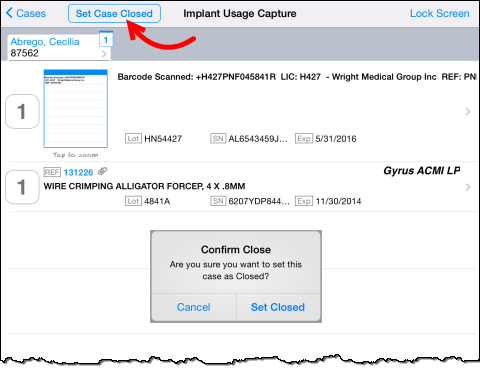
Figure 57: Set Case Closed
On the Today's Cases screen (Figure 58, below), the case will display with a "Closed" indicator.

Figure 58: Case Closed Indicator
You may still make changes or additions to a case that has the "Closed" indicator, and the indicator will remain.
Reviewed Cases
After a case has been set to closed and all items have been resolved, it can be reviewed and its status reset.
Open the closed case by tapping it on the case display panel. At the top of the case list panel, the Set as Reviewed button will appear. (See Figure 59A below.) Tap it to reset the status to "Reviewed."
The case will now appear on the case display panel with a status of "Reviewed." (See Figure 59B below.) Setting the case to Reviewed is the final step required before requisitions can be created, as discussed in the next section.
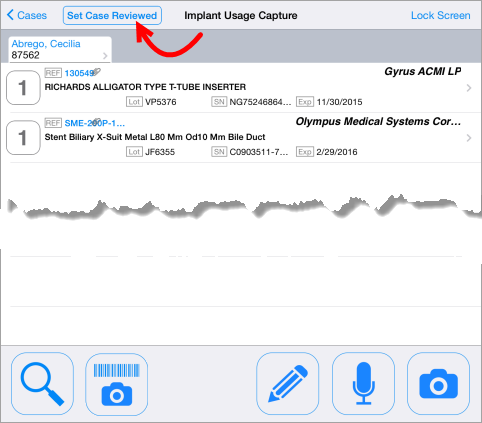 | 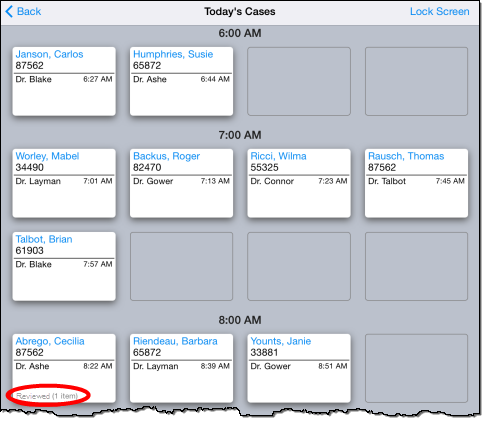 |
Figure 59A: Set as Reviewed | Figure 59B: Case Status - Reviewed |
Creating Requisitions for Pulse Cases
When all case items are resolved and the case is set to Reviewed, Pulse pushes the items to the Pulse requisitioning feature. From the Aperek Table of Contents, click Materials Management > Requisitioning > Work in Pulse.
For a detailed discussion of creating requisitions for Pulse case items, click here.
Aperek Support
In the event that you need to contact Aperek Support for help, you may need to view activity on Pulse or send data to Aperek Support. Tap the Settings icon to go to the Settings menu. Tap Support, as in Figure 60 below.
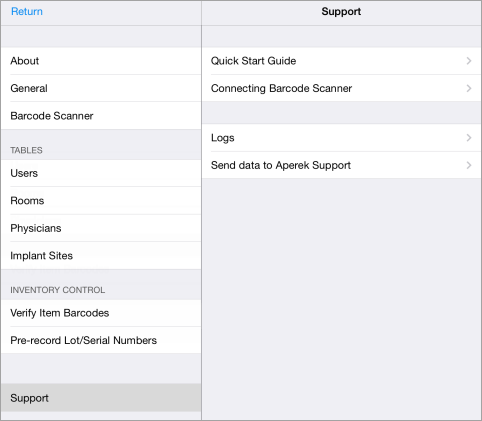
Figure 60: Settings > Support
Logs
Tap this menu item to see a history of Activities (things occurring in the foreground of the application), Errors (occurring in the background), and instances of Sync (when the application has pushed information to or pulled information from the server). (See Figure 61 below.)
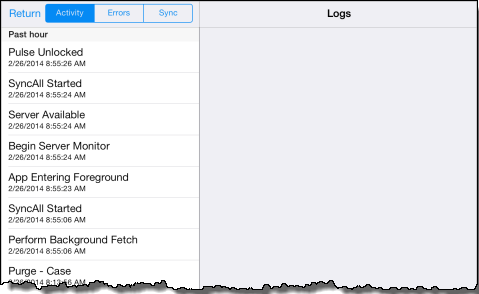
Figure 61: Logs
Send data to Aperek Support
If you are experiencing an issue with your data and have contacted Aperek Support for help, you may be requested to send your data to Aperek Support so that they may analyze the problem. Aperek Support will supply a single-use code that will allow you to proceed with this function. (See Figure 62 below.) You will not be able to send your data without this code.
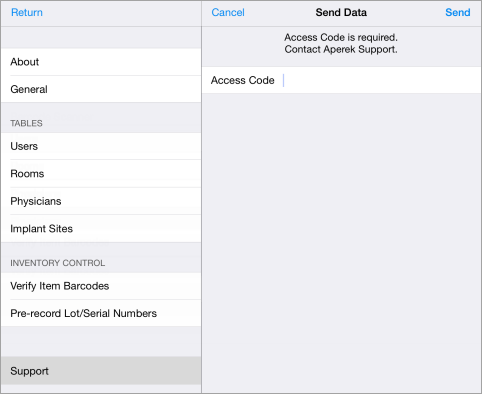
Figure 62: Send Data to Aperek Support
Copyright © 2022 by Premier Inc. All rights reserved.