The Mobile Implant Tracking application was previously called "Pulse." This name is used below, and in several images, but will eventually change. The reason for the change is that Pulse is also the name of a different product created by , Inc. that handles gateway imports and exports to ERP and SCM.
During or shortly after a procedure, OR staff work with mobile implants and related supplies on a tablet computer to capture information about items used in the case. When the items have complete enough information, the system migrates the case to the mobile requisitioning feature. A requisition is the point where the items used in cases enter the billing and invoicing stream in a hospital's supply chain. Requisitions also initiate the ordering process for items that need to be replenished.
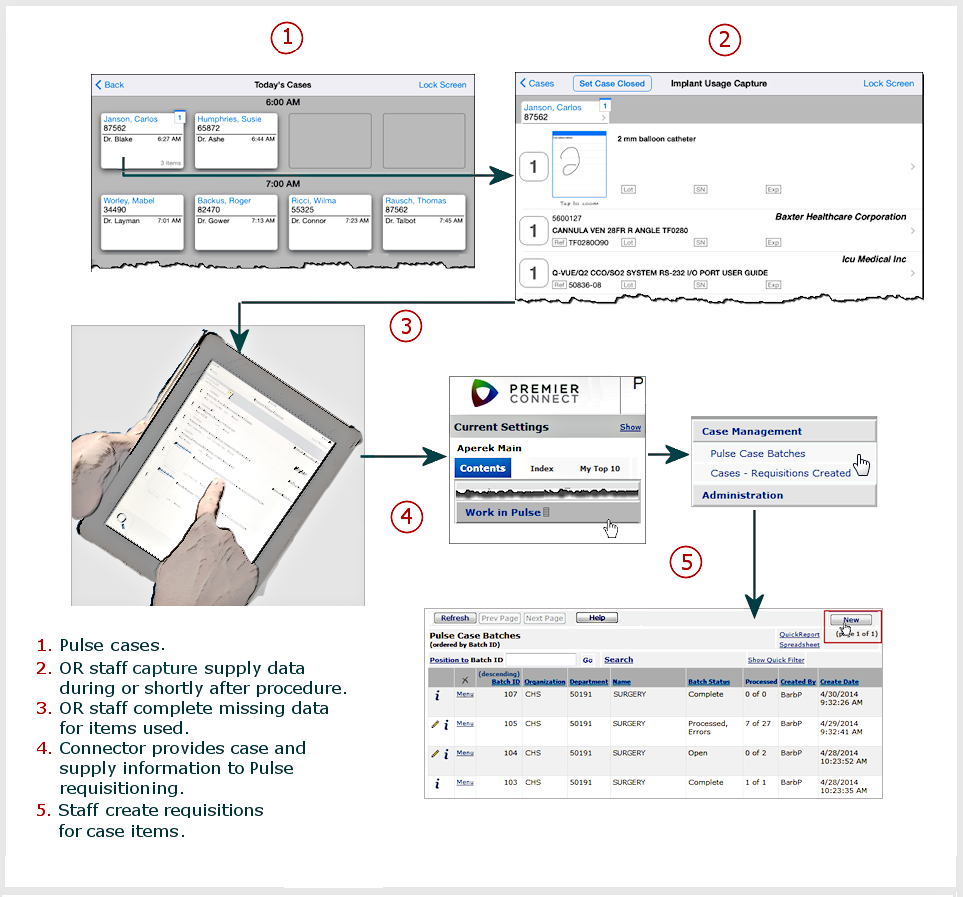
Figure 1 shows the relationship between the mobile application's item capture in a site's OR and the parallel requisitioning feature in Materials Management (on the server).
Mobile implant requisitions are created in batch jobs.
With batch processing, an application bundles data from online files and processes several bundles at a time. Batch jobs run asynchronously; that is, independently of a main program in an application. "Async" processing is sometimes called processing "in the background." The normal application features are available to users while asynchronous processes run.
You can create mobile implant requisitions for several cases, for a single selected case, or for all available cases.
Figure 2 overviews the steps.
Requisitions created for mobile implant cases follow the normal path in Materials Management. Mobile implant requisitions may optionally enter an approval process, then proceed directly to unauthorized purchase orders. A buyer reviews and authorizes the purchase orders, which then go to vendors. A separate purchase order is created for each requisition. When associated invoices arrive, they can be matched and paid through Accounts Payable.
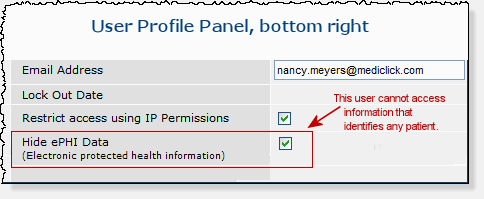
When Hide ePHI Data is checked, a detailed series of restrictions apply to the user's access to ePHI records. The list of restrictions and examples is in the ePHI documentation.
In sum, for mobile implant users and requisitioners:Note: All patient identifier, case, and physician fields in this document's figures contain fictional values, and are not associated with any actual individual.
Mobile implant cases generate bill-only requisitions and associated bill-only purchase orders. A bill-only requisition or PO can contain both bill-only and bill-and-replace lines.
In requisitions for mobile implant cases,
On the Item Inventory panel (Figure 3, bottom right):
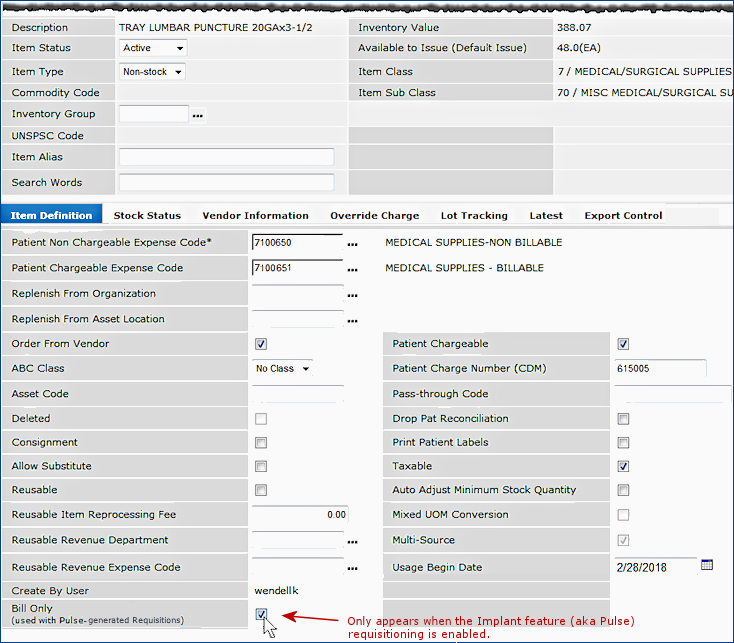
The Bill Only field's setting also appears on the item inventory report objects: "Item Inventory," "Item Inventory All Vendors," and "Item Inventory User Fields."
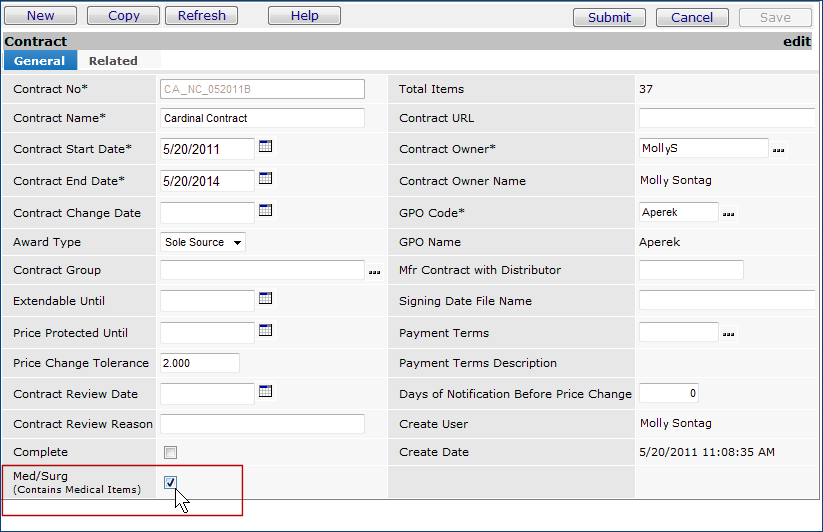
The Med/Surg flag lets you specify that a contract contains medical and/or surgical items.
When checked (the default), this flag prevents a contract from being loaded into mobile implant tracking so that your lists of items do not contain irrelevant items, such as office supplies, plumbing supplies, or cleaning products.
This flag is also available on these contract report objects, so that you can run reports for only your medical/surgical contracts:
- Contract Header and Detail (CaA)
- Contract Header (CaA).
Figure 4 displays the field on the Contract header panel.
Open the Mobile Implant Case Management menu (Figure 5).
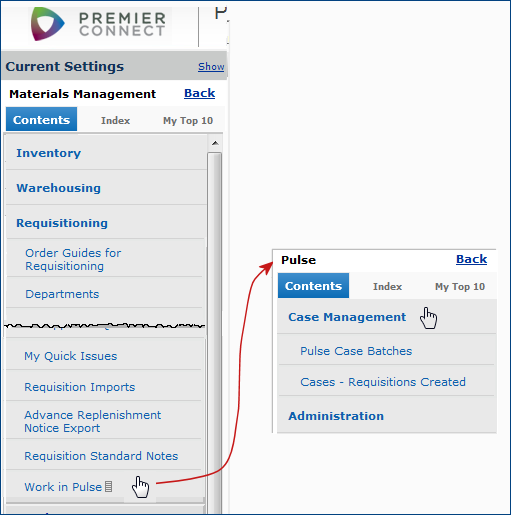
Note: Most sites have Mobile Implant Case Management at the bottom of the Materials Management > Requisitioning contents. However, since menus can differ among facilities, if the application is not in that location, you may need to ask your Supply Chain consultant or system administrator.
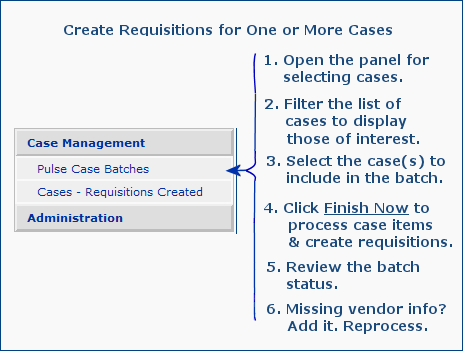
On the menu under Case Management (Figure 2),
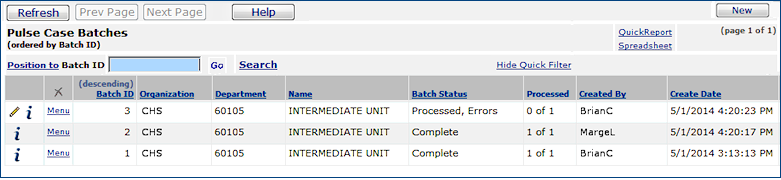
Mobile Implant Case Batches lets you create case requisitions for one, several, or all cases, and lists existing batch requisition jobs.
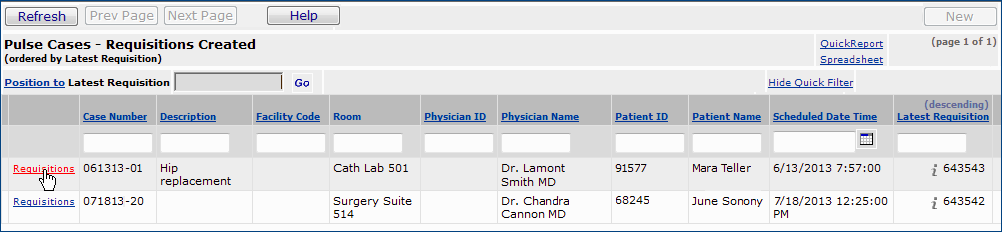
Cases - Requisitions Created lists cases that have one or more requisitions already created. The requisitions can be viewed, and you can drill down to item lines.
You can create requisitions for non-stock items and non-file items used in cases. Stock items are ineligible for requisitions as they have been previously requisitioned by the department and issued.
To find item prices, if they exist in any of the site's data, the system looks for a contract that contains the item, and if found (even if unactivated), Supply Chain uses the contract price.
Non-file item lines are created by Mobile Implant Tracking for the following:
- Non-file purchase order spend. The system looks for purchasing data for a non-file item.
- Contract lines with no equivalent item records
- Items entered manually into Mobile Implant Tracking.
Non-stock and non-file items for a case are grouped together on requisitions by Vendor Number.
In general, purchasing and invoicing require these data elements for items used in cases:
- The item description
- For non-stock items, the Item Number from the hospital's catalog
- The manufacturer's ID
- The manufacturer's item number -- MIN
- The vendor's ID
- The vendor's buy-from location
- The vendor's item number -- VIN
- The ordered quantity and ordered UOM (default is "each" EA)
- The unit cost of the item
- The UOM used for purchasing.
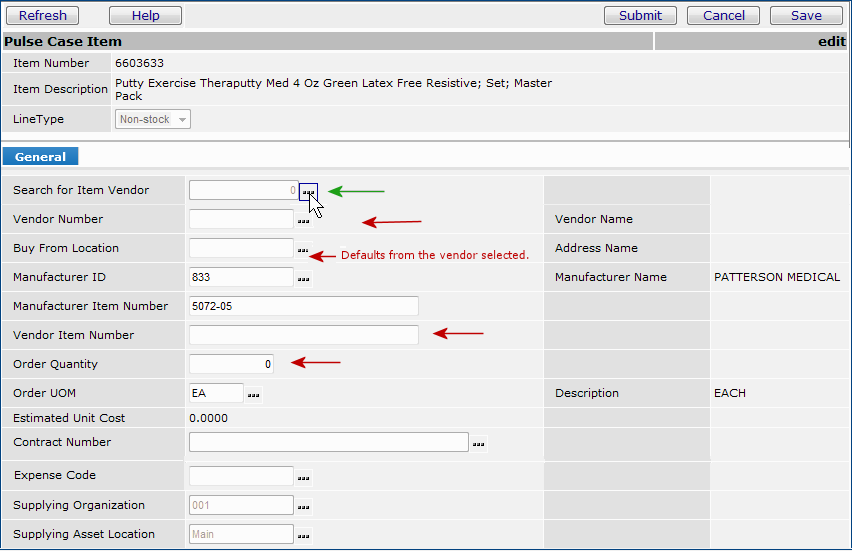
When a case item is scanned or selected from a Mobile Implant item list, ordering information is usually included. However, an item used in a case may also have very little data captured in the OR. For example, a hand-written Mobile Implant note may be the only data recorded about an item during a procedure. Or, the ordering information available may be incomplete, and needs to be checked and filled in. Missing vendor information is a common problem.
When a procedure is over, OR staff can go back to the Mobile Implant case and enter any missing item data. Missing information -- such as an item's Vendor Buy-From Location and ordering UOM -- can be also added when requisitions are created.
Downstream, information on the purchase order associated with a requisition can also be changed or added (as long as the purchase order is unauthorized). For example, since multiple vendors can exist for the same item, if a vendor is listed on a Mobile Implant case purchase order, the buyer will want to review the vendor information to ensure that the vendor is correct.
Below is a summary of how to create requisitions for multiple cases. Details about using the panels follows the summary.
Click Finish Later when you want to come back to the batch job and add more cases.
Click Finish Now to begin processing the case item information into requisitions.
You can display all requisitions for all/any cases in a batch and requisition lines. You can edit item lines with missing information.
(Note: you can display, but not edit the item information when the Batch Status is Complete.)

If you wish, you can also display the requisition on the Materials Management Requisitions list. See Displaying Mobile Implant Requisitions in Materials Management.
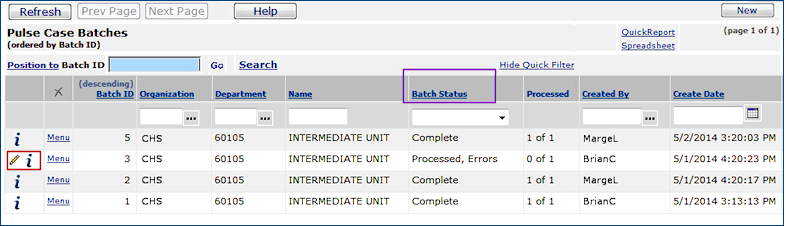
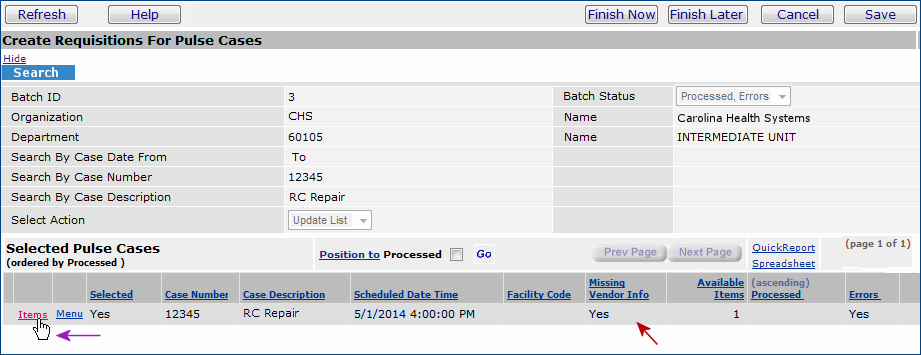
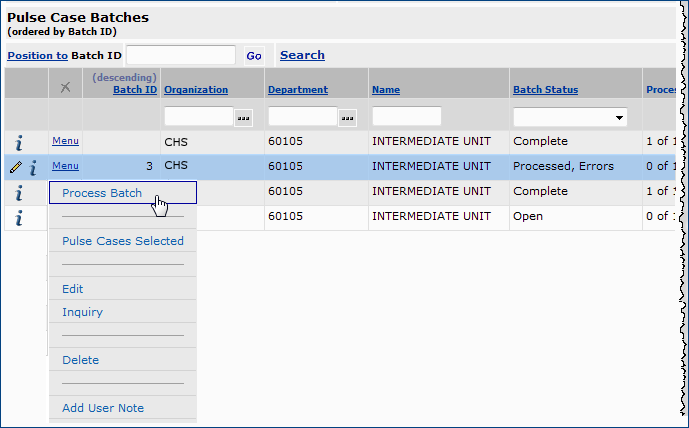
In Figure 8 , the second job has a Batch Status of Processed, Errors. Requisitions could not be completed because some items are missing critical vendor information.
- Icons in the first column for this job Figure 7 (red box), let you display the batch (i) , or edit it (![]() ).
).
-
When you correct or add item information as needed, you can reprocess the batch.
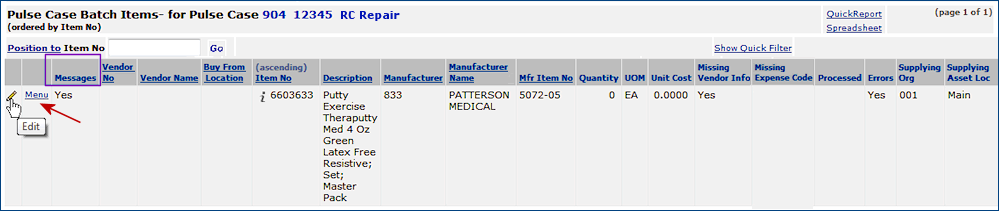
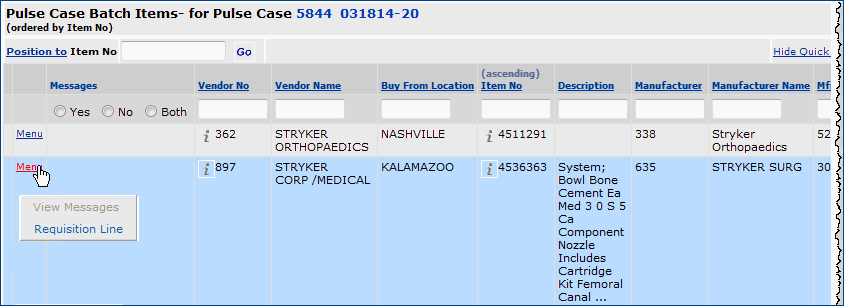
Notice in Figure 12 that the Messages column contains Yes.
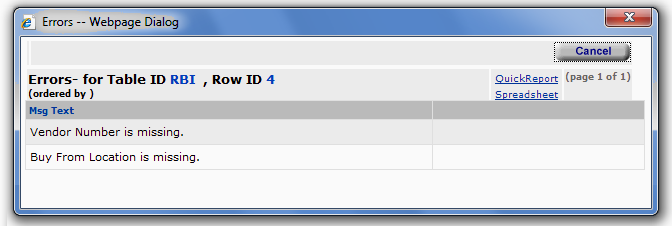
- Click Menu > View Messages. Figure 13 is an example message:
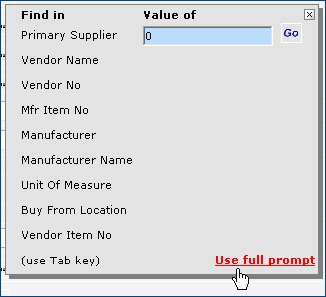
The resulting list displays vendors for selection (Figure 16). If none appear, the search has not found matches for the Value of data that you entered. Enter different values and search again.
- On the results list, click Select next to the correct vendor.
Note: You can sort the resulting Vendors list by any underlined column header: click the column header. Quick Filters and the Position to box are also available to help you find a vendor on the list. (See Working with Lists if you need help with the list tools.)
Figure 16 - The Vendors List
When you select an item vendor from the list, the system populates the other vendor fields on the panel. For example, the vendor Buy From Location defaults when you select the vendor. However, you can change the Buy From Location by clicking the prompt (...) and selecting a value from the list.
Note: Instead of using the search, you can also enter the vendor information manually. However, if the vendor that you enter does not exist or is not valid for the item, the batch will not process.
If all the item information is complete, you can reprocess the batch job to create requisitions.
In Figure 14, the user is editing an item line to add missing information. When the correct item vendor, buy-from location, vendor item number, and quantity are added, the batch job can be reprocessed.
To reprocess a batch after making corrections, on the Pulse Case Batches list (Figure 17), click Menu > Process Batch.
When processing finishes, if the errors were corrected, the Batch Status is Complete. Requisitions for cases in the batch job are created.
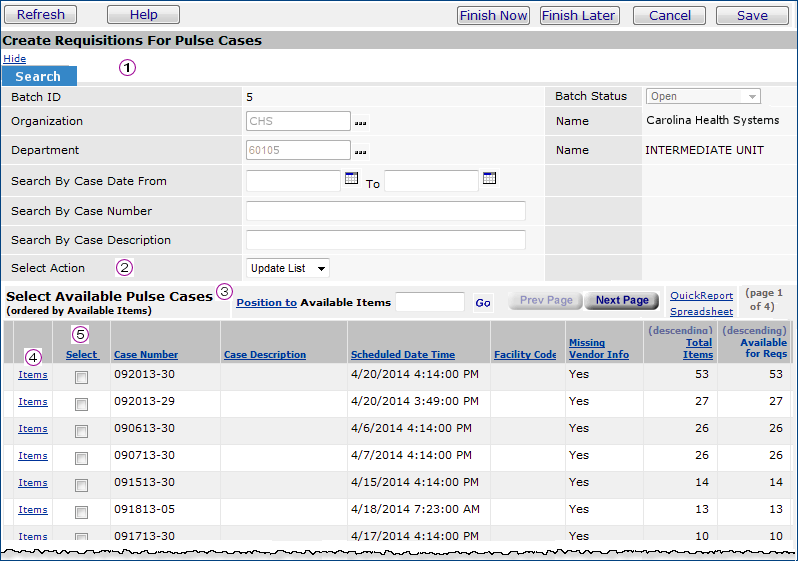
For the section below, refer to Figure 7 Create Requisitions for Batch Cases.
The Batch ID is the identifier for the batch requisitioning job. It is assigned by the system.
- The Organization and Department default from the Current Settings.
Click the prompt (...) to select a different organization and department. (The list of Pulse Cases in the bottom part of the panel will change, of course.)
- To search for cases by date, enter the beginning date of a range in Search by Date From. Enter the ending date of the range in the To field.
- To search for a cases by case number, enter a case number - or the first few characters of a case number -- in the field Search by Case Number. You can enter as many characters as you need to identify a case, or cases. For example, in Figure 7, 091 would find the last three cases: 091513-30, 091813-05, and 091713-30.
- To search for cases by case description, enter characters from the case description in the field Case Description.
With Select Action set to Update (the default), click Enter. If the cases exist, they are displayed in the bottom panel. Otherwise, No Data appears.
The Select Action field applies several actions to the bottom list of cases.
- Update filters the list of cases according to the values that you enter in the Search fields; e.g., cases within a certain date range.
- Select All marks the Select box for all the cases.
- Unselect All unselects any cases that are currently selected.
- Show All turns off any filtering done on the cases list, and displays all cases.
- To use the Select Action field, click the down arrow and select an action. Then click Enter.
The bottom list displays cases that are available for requisitioning (Case ID and Case Description) based on the search, and whether items in each case have enough information to be put on requisitions. (The Available Items column contains the quantity of items in each case that have complete purchasing information).
- You can order the list by any underlined column heading in ascending or descending order. The list in
Figure 7 is ordered by Available Items, descending. The cases with the largest number of available items appear at the top.
The column Missing Vendor Information contains Yes when items do not have a vendor buy-from location or vendor item number.
- You can display item information for a case before you run the batch requisitioning job (Figure 7). Click Items ![]() .
.
From Pulse Case Management, the Pulse Case Batches panel (Figure 7) displays a list of batch jobs, from which you can drill down to requisitions. If you just want to quickly view requisitions created for cases, you can use the Cases - Requisitions Created panel.
You can also display Mobile Implant requisitions in Materials Management.

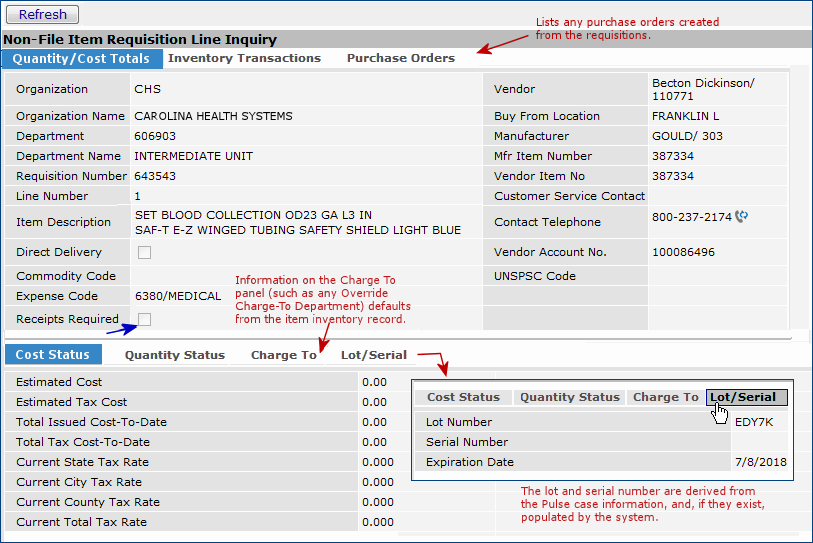
In Figure 20, on the lower left of the top panel (blue arrow), notice that Receipts Required is unselected. The item is a non-file item. For file items, the setting for this flag defaults from the item inventory record. When Receipts Required is checked, the item is bill-and-replace. Approvers can override (i.e., change) this setting when the requisition routes for approval.
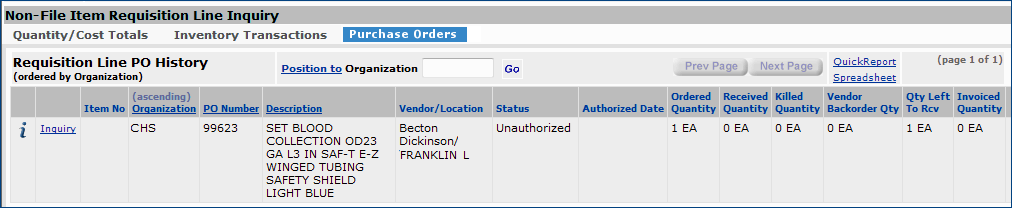
Tabs on the panel, such as Purchase Orders display more information about the line.
The online chapter Viewing Requisition Details contains additional material.
Requisitions are available from the Materials Management Requisitioning menu (Figure 21).
The Quick Click menu appears.
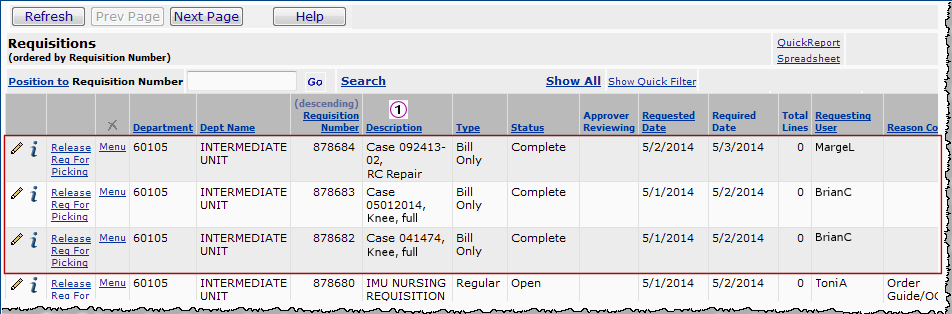
On the Requisitions list in Materials Management, you can click i to drill down to requisition line summaries. From any line summary, clicking i again displays line details.
This section overviews the requisition approval process and underlines some specifics for Mobile Implant requisition approvals. If the approval process is new for your site, details and setup instructions are in these online chapters:
Depending on the structure of your hospital, you can set up different configurations for requisition approvals. You can assign a direct approver to each user; or assign a direct approver to each department. You can create approval groups, made up of several approvers. In an approval group, requisitions are routed among the group members in a specified order. You can assign each department an approval group or a single direct approver (but not both).
Each user profile contains dollar limits on requisitions. Requisition lines or total requisition dollars that exceed the user's limits must be approved. Dollar limits may be set for each item type (stock, non-stock, and non-file). For departments, you can create similar approval profiles that specify dollar limits. A department's approval profile governs all the users in a department. It overrides any individual's dollar limits (in his/her user profile). A department can have two separate approval profiles: one for bill-only requisitions and one for all other requisitions. Mobile Implant requisitions use the department's bill-only profile.
Approvers are designated as buyers in their user profiles. Their user profiles also contain the buyers' approval limits.
Separate approval paths can be established for commodity items on requisitions. Normally, requisitions that need commodity approvals are split if some lines on the requisition are not commodity-coded items. The exception is for commodity items on Mobile Implant requisitions: Mobile Implant requisitions are not split.
Requisition reviews proceed through these stages: costing, commodity code, and item type as follows:
Here is a link to display a diagram of a requisition's flow through approvals.
Non-file items on requisitions and purchase orders require an Expense Code. This value allows Supply Chain to point item expenses to the correct department and organization. Expense codes are stored in a Supply Chain table. (See the Expense Codes documentation for details.)
No default expense codes exist for use on Mobile Implant requisitions. So, requisition lines are created without expense codes. However, an expense code must be entered on a requisition by the costing buyer. Requisitions with non-file lines that do not have expense codes cannot be approved.
You can display purchase orders created for requisition lines from the requisition line inquiry panel.
Follow the instructions to open a requisition line for a case. In summary:
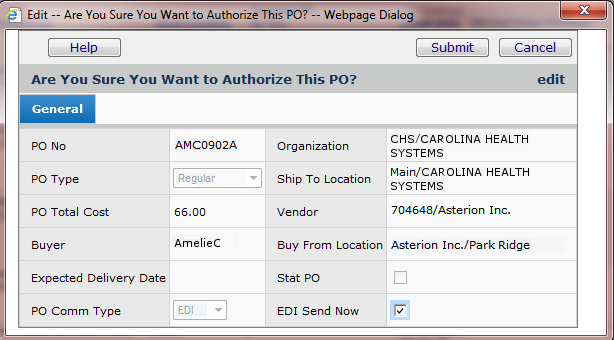
Purchase orders created from Mobile Implant requisitions have the Status: Unauthorized. The purchase orders must be authorized before they can be matched with invoices, and before any bill-and-replace lines can be received.
Note: If, for some reason, the department record does not contain a ship-to address, you will get an error message when you try to authorize a bill-only PO. In this case, you can manually enter a Ship-To address and authorize the PO, or you can complete the address on the department record and authorize the PO.
Once authorized, the Status of a bill-only purchase order (when all lines are bill-only) is Fully Received. When a purchase order contains bill-only and bill-and-replace lines, the Status is Part Received until the bill-and-replace lines are received.
You can display and authorize Mobile Implant bill-only POs from the menu on the Authorize Purchase Orders list.
With Materials Management, you can also match receipts to invoices. (See "Handling Receipts.") The bill-and-replace lines on a bill-only PO have receipts that you created when the items were delivered. The bill-only lines are receiptless. For any receiptless line on a purchase order, the system creates a receipt header and a receipt line with a quantity of zero. The receipt is not completed, however. The invoice matching panels let you enter an invoiced quantity and a dollar amount. See "Notes on Receiptless PO Lines" for more discussion.
A discussion of invoice matching is in the online topic "Matching Purchase Order Receipts with Invoices."
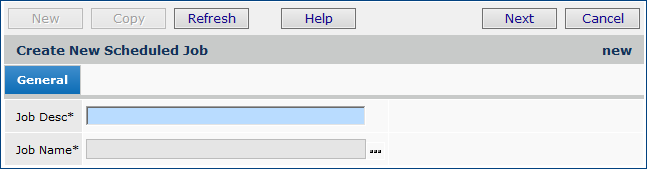
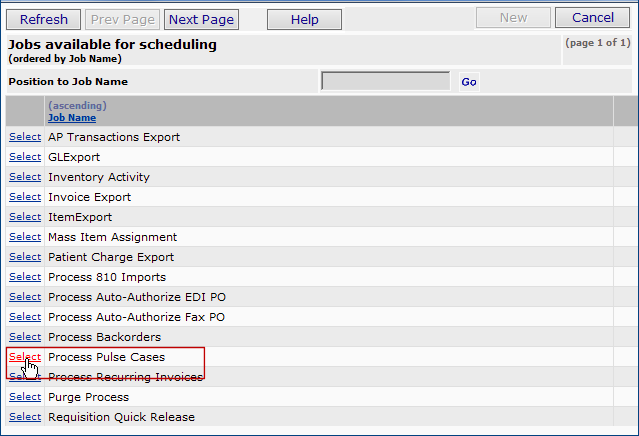
You can use the job scheduler to create batches of requisitions on a regular schedule. Below is a summary of the steps. For details, see the instructions on using the job scheduler.
Copyright © 2022 by Premier Inc. All rights reserved.
requsition requistion reqisition requstion