Using a Mobile Device to Confirm Deliveries Version
- This topic covers the use of ProTrack on a hand-held computer running the Windows Mobile operating system.
- The iPad application has a Quick Start Guide on the iPad. The topic Viewing Confirmation Data in Materials Management, below, may be of interest to materials managers whose staff use the iPad.
Contents
Overview
Hospital staff can be required to "sign for" deliveries that are
brought to their departments. The Delivery Confirmation Application (on an iPad) and ProTrack (a hand-held computer application) track deliveries within a hospital by capturing signatures and associating
the signatures with delivery information. You can use the applications to acknowledge
delivery of requisitioned items, documents such as checks, direct delivery packages,
and anything that needs delivery confirmation.
- You can enter delivery records on the iPad or in a hand-held computer when you make the deliveries and
get signatures.
- On the hand-held computer, you can create and store expected delivery information. Then, for each delivery, you can display the stored record, get a signature,
and save the signature with the record.
Instructions for using an iPad for delivery confirmations are on the iPad itself, in the Quick Start guide. The instructions below are for ProTrack on a hand-held computer.
For both the iPad application and ProTrack, you can display delivery confirmation records in table format in PCSC Materials Management. See Viewing Confirmation Data in Materials Management.
Security
For you to access any of Supply Chain's hand-held applications
(such as ProTrack), a system administrator must install applications, configure
the hand-held computer, and establish your user settings. Security settings include user Role and login/password.
Before you can collect digital signatures, you must synchronize the hand-held computer with Supply Chain. Synchronization downloads information to the hand-held computer. When you
are finished entering package information and collecting signatures, you run the synchronization again. ProTrack
uploads the signatures and the data associated with them. Supply Chain creates a
record of the digital signatures and the associated delivery information. You
can view the delivery records in Supply Chain, if you wish.
Using ProTrack
- Turn on the hand-held computer.
- Using the stylus, press Start in the upper left corner.
The Start Menu appears.
- Click
 Aperek Mobile on the menu.
A login screen appears (Figure 1)
Aperek Mobile on the menu.
A login screen appears (Figure 1)
Figure 1 - Mobile Login Screen
- Log in to the mobile application.
- If you need to use the keyboard, press the keyboard icon
 (located on the bottom of the display).
- Click OK when you are finished entering login information.
The Mobile Applications screen appears (Figure 2).
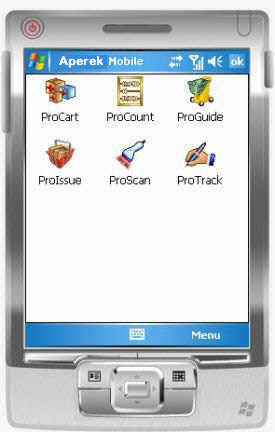
Figure 2 - The Mobile Applications Window
- Select ProTrack by pressing its icon --
 -- with the stylus. The ProTrack Main screen appears (Figure 3).
The Main screen shows
a blank form for delivery information.
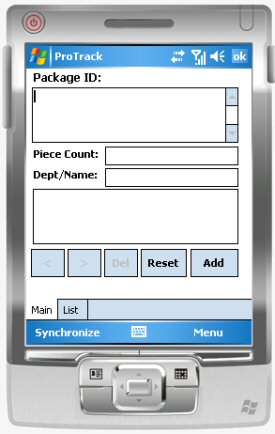
Figure 3 - ProTrack Screen
- Connect to Supply Chain and download data to the hand-held computer.
-
Computer cradle users:
Connect: Place the hand-held computer in the cradle to establish the ActiveSync connection. On the desktop PC running Supply Chain, the Microsoft Active Sync icon  spins while the connection routine runs. When the connection is made, ActiveSync plays a tone. Next, you can synchronize the hand-held with Supply Chain to upload and download data.
Synchronize: Press Synchronize (on the lower left) with the stylus.
When the synchronization finishes, remove the hand-held computer from the cradle. ProTrack is ready to use.
-
Wireless users:
Press Synchronize. The upload/download runs.
- ProTrack displays a log while the synchronization is running. When the synchronization is complete, the last two lines of the log are:
***End ProTrack Sync
Response Processing Complete.
Note: Figure 13 is a sample log.
- Click Close to close the log when the synchronization process is complete.
About Log Information
ProTrack saves the log (which contains a summary of information exchanged in the synchronization). You can access the log from the Application Window Menu.
Note: Log information
is also available to system administrators from the Supply Chain desktop:
- From the Work in Administration main Contents, select Administration > HandHeld Log
When the synchronization is complete, begin to scan package barcodes.
To record packages and delivery signatures:
- Open the ProTrack application on the hand-held computer.
The Main panel appears with empty fields for entering delivery information
(Figure 3).
- Synchronize the hand-held computer with Supply Chain.
- Scan the
barcode on the first package for delivery.
ProTrack enters the barcode number in the Package ID field (Figure 4).
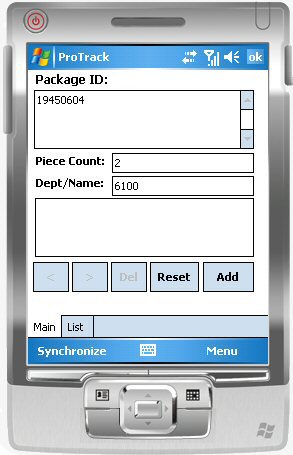
Figure 4 - ProTrack Screen with a Scanned Package ID
- In the Piece Count field, unless you are scanning multiple packages for one signature, enter the number of individual
pieces (e.g., "3" for
two boxes and an envelope) for the delivery.
- Reset: If you make a mistake, use the stylus to erase characters,
or press Reset to clear the fields.
- Optional: Enter the department number (Dept), if you wish.
-
You can enter a Name (for the department, or for a person)
in addition, or instead of a department number.
-
Do not write the value for this field;
key it in.
Suggestion: Since signatures are sometimes not legible, you may wish to enter the signer's name in the Dept/Name field.
- "Sticky" fields: If you press either the Dept/Name field or the Piece Count field, a ! appears following the field name. This mark indicates a field with "sticky" data: the entry in the field does not change.
- By pressing the field name once, you can instruct ProTrack not to change the data in the field. The data in the field "sticks."
For example, if you wish to scan several items for the same department, you enter the department number, and press the Dept/Name field name. Then, each item that you scan afterwards is recorded for that department.
-
Press the field name once again to change the field back to normal. The ! disappears. The data in the field can now change with each scan.
- Ask the person receiving the delivery to sign in the box underneath the
information fields (Figure 5).
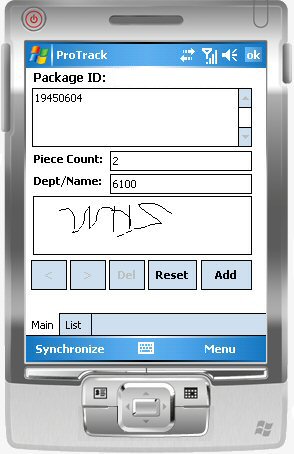
Figure 5 - Delivery Information with Signature
- Click Add.
ProTrack saves the delivery record with the signature. The fields on the display
are emptied.
- Pressing Del deletes a delivery record.
- You can press forward > and backward < to scroll through delivery records that you have added.
- Repeat Steps 3 through 7 for other packages.
Note: You can also create a list of delivery records
in advance, and only get signatures when you deliver packages. See To
enter and store delivery information before collecting signatures.
- When you have finished, synchronize the hand-held computer to send the delivery
records to Supply Chain.
Scanning Multiple Package Barcodes for One Signature
You can scan multiple package barcodes for delivery to the same person or department, if you wish.
- Scan the barcodes on the packages one after another.
- Do not press Add between scans. The application lists all the Package IDs together. (Figure 6).
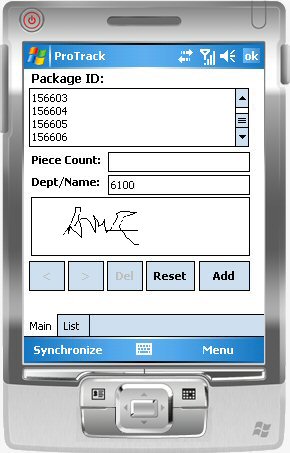
Figure 6 - Multiple Package Bar Codes for Signature
- You do not need to enter a Piece Count.
ProTrack ignores the piece count (if you enter any) when the data is uploaded. The uploaded piece count is always 1 for each package scanned as a part of a group.
If you do need an actual, accurate piece count of the number of packages, you will need to scan each Package ID, enter a Piece Count, and click Add to create an individual record for each Package ID. The person signing for the packages will need to sign for each one on its individual record.
- Solicit a signature, as usual.
- Click Add.
When you upload the information to Supply Chain, the delivery record is similar to Figure 7. Each package is listed individually, with a Piece Count of 1. See Viewing delivery confirmations in Materials Management.
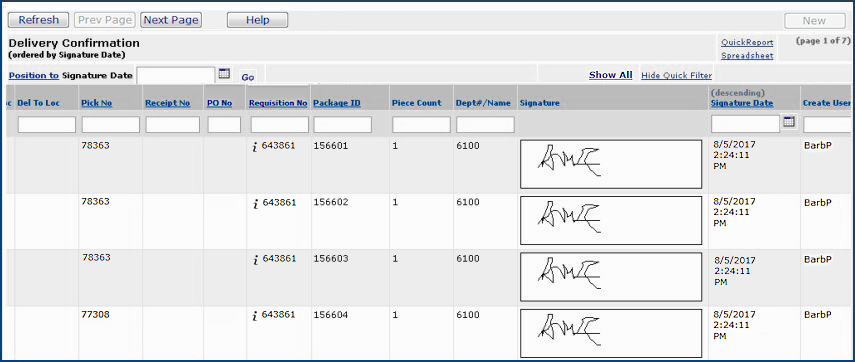
Figure 7 - Supply Chain Delivery Confirmation for Multiple Packages with a Single Signature
To record delivered items from a pick or from a
receipt
- Print the appropriate Pick / Delivery document from Supply Chain.
- If you are delivering items from an inventory pick...
- From the Materials Management main Contents, select Warehousing > Pick
List.
- Locate the pick you need on the Pick List.
- Next to the Pick Number, select Menu > Print Pick/Delivery Document.
- A Pick/Delivery document appears.
- If you are delivering items on an Supply Chain receipt...
From the Materials Management main Contents, select Receiving > All Receipts.
- Locate the receipt you need on the Receipts List.
- Next to the Receipt Number, select Menu > Print Delivery Document.
- A Receipt Pick List document appears.
- Click the printer icon to send the document to your local printer.
- Open the ProTrack application on the hand-held computer.
The Main panel appears with empty fields for entering delivery information.
(Figure 3)
- Synchronize the hand-held computer with Supply Chain.
- Scan the bar-coded field on
the upper right of the document that you printed for the pick or for the receipt.
The scanned number appears in the Package ID field.
-
Only the barcode from the Receipt or the Pick and Delivery Document appears on ProTrack in the Package ID field.
-
When you upload the ProTrack data to Supply Chain, you can go to the Delivery Confirmation Panel to view all the individual items on the receipt or in the pick and delivery document.
Using Package Association
Package Association lets you associate an external barcode (such as a Fed Ex code) with a Package ID.
To use Package Association in scanning barcodes:
- Select Menu > Package Association.
The Package Association header appears at the top of the ProTrack screen.
- Select Package Association.
- Scan the barcode first.
- Scan the second of the two barcodes.
ProTrack puts a tilde (~) between the barcodes (Figure 8) .
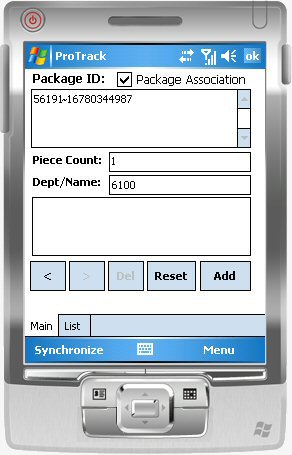
Figure 8 - Delivery Record Using Package Association
Notes:
- The Package ID field is the only field on
the ProTrack screen where information can be added on the same line, and only when Package Association is selected. If you move the cursor back to any other field after entering data in the field, ProTrack will overwrite
data you had entered.
- When Package Association is selected, if the entry in the Package ID field exceeds the size of the actual database field, the value is truncated and a message is written to the sync log.
- Move to the next field - Piece Count and/or Dept/Name - and add more information, if needed.
- Solicit a signature.
- Click Add.
To enter and store delivery information before collecting
signatures:
- On the ProTrack Main panel, enter delivery information such as Package
ID, Dept, Name, and Piece Count,
as relevant. (Package ID is a required field.)
- For items in a pick or packages with a receipt, scan
the barcode on the top right of the pick document that you printed. (See
Step 1 in To record delivered items from a pick
or from a receipt for instructions about printing the document.)
- For other items, any bar-coded delivery ID on a package, such as a UPS
number, can be scanned. Or, you can manually enter a Package ID
using the keypad.
- Click Add after entering each delivery record.
(After you click Add,
ProTrack saves each delivery record and displays a blank screen for you to scan another package.)
- When you are ready to make deliveries, press List to view the delivery records (Figure 9).
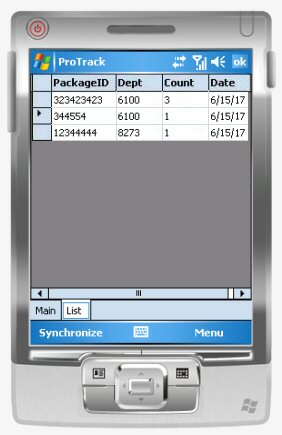
Figure 9 - List of Packages to Be Delivered
- Press the position box (the first box) in front of a delivery line to select the line.
For example, in Figure 9, the line containing Package ID 344554
is selected.
- Press Main.
The information appears on the ProTrack screen.
- Solicit the signature in the box below the delivery information.
- Click Update.
ProTrack saves the signature with the information, and clears the Main
panel.
When you finish working with ProTrack, be sure to synchronize
the hand-held computer to upload the information to Supply Chain.
Tools on the ProTrack Screen
Figure 10 is a diagram of the ProTrack screen. Several tools are on the bottom of the display.
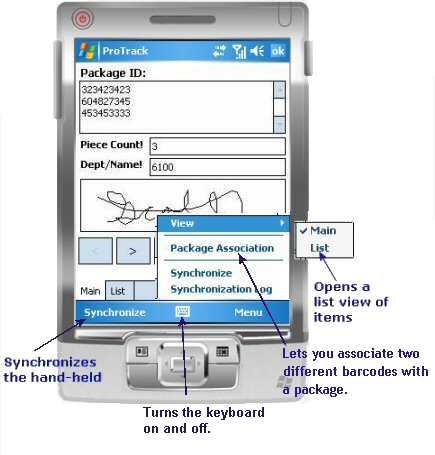
Figure 10 - ProTrack Screen Tools
Using the Applications Window Menu
Pressing Menu on the Applications Window provides access to the features: User Settings, Server Settings, Synchronization Log, Options, and Utilities (Figure 11).
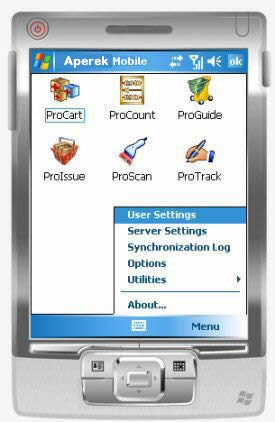
Figure 11 - The Mobile Application Window Menu
- Pressing User Settings opens the User Settings screen (Figure 1) for entering login information (User ID, Password, and Organization).
- Pressing Server Settings lets you view and, if needed, reset the Server URL field (Figure 12).
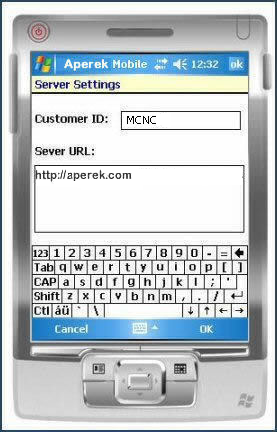
Figure 12 - The Server Settings Screen
- The Synchronization Log is the log that was generated during synchronization. Figure 13 is an example.
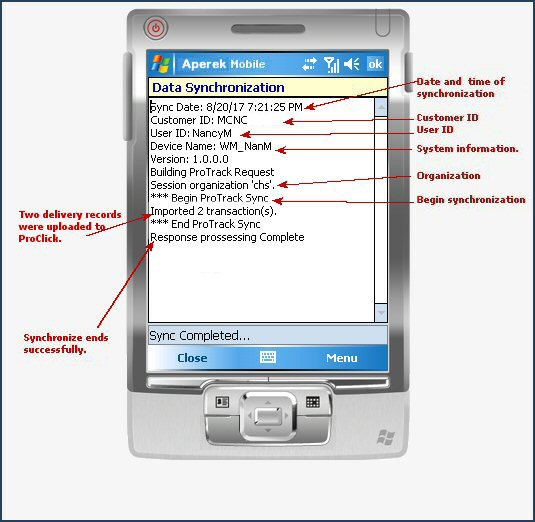
Figure 13 - ProTrack Synchronization Log
- Options lets you set the Auto Input Panel field. When this field is set, the mobile application automatically opens the on-screen keyboard for any screen that requires you to enter text.
- Utilities contains Network and IP Address information, and lets you test barcode scanning.
- About displays the mobile application release level.
Viewing Delivery Confirmations in Supply Chain
After you collect signatures on the iPad and collect/upload the ProTrack data to Supply Chain, you can view the delivery information
and signatures.
(The iPad applications upload data automatically.)
From the Materials Management main Contents, select Warehousing >
Delivery Confirmations.
The list of delivery confirmations appears (Figure 14).
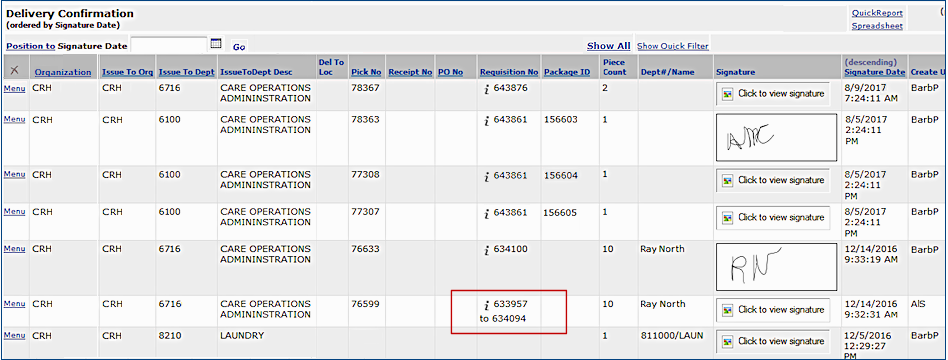
Figure 14 - List of Delivery Confirmations in Supply Chain Uploaded
from ProTrack
- To view a signature, select Click to view signature.
- Click Show Quick Filter and the Organization column can be used to pre-filter the list. When you pre-filter the list, Show All appears.
- Clicking Show All, unfilters the list. (Show All disappears.) Delivery confirmations for all organizations allowed by in your User Profile appear. You do not need to go back to Current Settings to specify an organization.
Note: The organizations and departments in the list are only those allowed by your User Profile.
- When only one requisition exists for a pick, its requisition number appears in the Requisition No column. When multiple requisitions are on the pick, the "From(lowest)...To(highest)" range of requisition numbers is displayed.
- For items in an Supply Chain inventory pick, selecting Menu > Requisition
Lines displays the item lines in the requisition that were delivered.
Note: When a range of requisitions appears in the Requisition No column (e.g., as in Figure 14 , red box), you cannot use the inquiry (i). If you click i, a message appears.
- To display the requisitions, go to the Requisitions List (Materials Management > Requisitioning > Requisitions - Current Department or Requisitions - All Departments) and open the requisitions of interest.
Automatic Updates of Supply Chain Mobile Applications
When an update for a mobile application is released, the system automatically applies the update to your hand-held computer when you synchronize the hand-held for the first time after the release. The process is:
- After the new release is available, synchronize a hand-held computer as usual.
The New Updates panel appears (Figure 15)
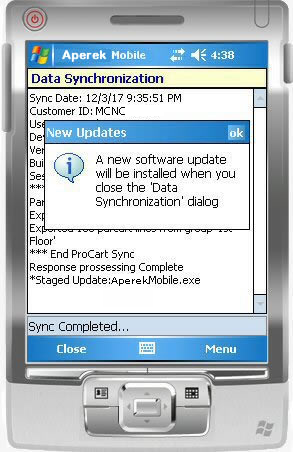
Figure 15 - The Mobile Application New Updates Panel
- Click OK in the top right of the New Updates panel to close it.
- When you finish synchronizing and leave the Data Synchronization panel, the application automatically closes.
- The mobile application displays an hourglass while files are being copied.
- The application re-starts with the new, updated version.
Copyright © 2019 by Premier Inc. All rights reserved.