Using a Mobile Device to Record Par Cart Item Counts Version
- This topic covers the use of ProCart on a hand-held computer running the Windows Mobile operating system.
- The iPad application has a Quick Start Guide on the iPad. The topic View
imports / requisitions created from mobile uploads (below) may be of interest to materials managers whose staff use iPads
Contents
Overview
ProCart is a data collection tool for par carts that
runs on a hand-held computer. Your materials organization
sets up a schedule to identify which par carts are counted on each day of the
week. ProCart contains information for each par cart item so that when you visit
par locations to count items, you can record the current quantity of each item.
Before beginning a count of par items, you must synchronize
your hand-held computer with Supply Chain. This
step downloads item information and par levels to the hand-held computer. The
information is downloaded by par group. Once you perform the download, you can
visit the par carts in a par group and enter the actual quantity of each item into
ProCart.
When you are finished with the item count, you again
synchronize with Supply Chain. This step uploads the quantity that you counted
for each item. The application records the count, determines if the quantity is at
par level or not, and creates requisitions to replenish the par cart items as
needed.
Security
For you to access any of Supply Chain's hand-held applications
(such as ProCart), a system administrator must install applications, configure
the hand-held computer, and establish your user settings. Security settings include user Role and login/password.
- The Supply Chain system administrator gives access to ProCart by specifying
the Distribution Technician User Role in the appropriate User
Profile(s).
- The system administrator must also identify users'
IDs and passwords.
Processing Par Cart Items with ProCart
- ProCart can be used by several people sharing
a hand-held computer.
- After changing to a different par group, users must again synchronize the hand-held computer
with Supply Chain.
- Par cart information is downloaded according
to the schedule set up for the par group. The day(s) of the week when a par
cart's item records should be downloaded are defined in Supply Chain. (See To
create par groups.)
- Par carts are loaded into ProCart according
to the sequence they are assigned in the par group.
- A par cart's item records are sorted by shelf
location in ProCart. ProCart provides several strategies for locating items, as described below.
- Since one item can be supplied by several sources,
a single shelf location can have items from two or more manufacturers. The
user can scan any of the items at the shelf location and ProCart will position
to the correct item record.
- Once an item count is complete and data from
ProCart is uploaded, Supply Chain starts the process of creating departmental
requisitions. Only items whose actual count is less than par level are processed.
- Any difference in quantity between an item's
par level and the actual count is placed on a requisition, unless the quantity
has already been backordered, or has been issued during the current day. In
this case, Supply Chain ignores the quantity. If subsequent counts of the item
show a further difference in quantity, however, the additional difference
is requisitioned.
- If problems with the units of measure from the
hand-held count are identified after an upload, the corresponding par cart
items are not requisitioned. A message signals the problem. You can view the
errors on the Materials Requisition Imports list.
- When an override charge department is needed, and no Override Charge Department is specified for the import, Supply Chain uses the Override Charge Department from the item inventory record (if the record includes the override charge department).
- Each requisition created for the par cart has
the status of Released. Stock items are allocated or backordered, non-stock
and direct delivery items are backordered and added to purchase orders.
- Supply Chain creates a pick list containing items
for all the requisitions created.
To use ProCart on the Mobile computer:
- Turn on the hand-held computer.
- Using the stylus, press Start in the upper left corner.
The Start Menu appears.
- Click
 Mobile on the menu.
A login screen appears (Figure 1).
Mobile on the menu.
A login screen appears (Figure 1).
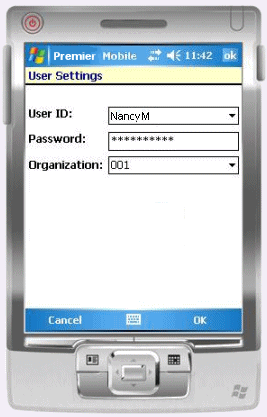
Figure 1 - Login Screen
- Log in to the mobile application.
-
If you need to use the keyboard, press the keyboard icon
 (located on the bottom of the display).
- Click OK when you are finished entering login information.
The Applications screen appears (Figure 2).
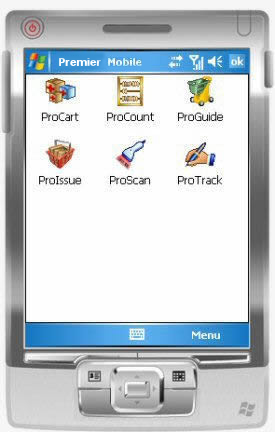
Figure 2 - The Applications Window
- Select ProCart by pressing its icon
 with the stylus. The ProCart screen appears.
- Connect to Supply Chain and download data to the hand-held computer.
Connect:
Place the hand-held computer in the cradle to establish the ActiveSync connection. On the desktop PC running Supply Chain, the Microsoft Active Sync icon  spins while the connection routine runs. When the connection is made, ActiveSync plays a tone. Next, you can synchronize the hand-held with Supply Chain to upload and download data.
Synchronize:
- Press Synchronize (on the lower left) with the stylus.
This step makes par groups available for selection.
- Remove the hand-held computer from the cradle. ProCart is ready to use.
About Log Information
ProCart saves the log (which contains a summary of information exchanged in the synchronization). You can access the log from the Application Window Menu.
Note: Log information
is also available to system administrators from the Supply Chain desktop:
- From the Work in Administration main Contents, select Administration > HandHeld Log
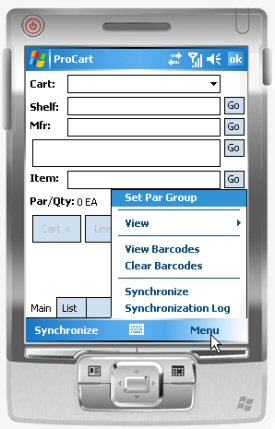
- Click Menu in the lower right of the ProCart screen (Figure 3) and and select Set Par Group.
Figure 3 - ProCart Screen with Menu Open
The Par Group selection screen appears (Figure 4).

Figure 4 - Par Group Selection Screen
- Select a par group.
- Press the down arrow in the Select Par Group box.
A list of par groups appears.
You can use the scroll bar if needed to scroll down the list of par groups.
- Press the name of par group that you wish to use.
- Press OK.
You will be counting items in the par carts that belong to the selected par group.
-
Synchronize the hand-held computer again at this point to get data for the par group you selected.
When the synchronization is complete, press Close.
- Whenever you change par groups, re-synchronize the hand-held computer.
The Main item view appears. The screen contains the first item line in first par cart for the group (Figure 5).
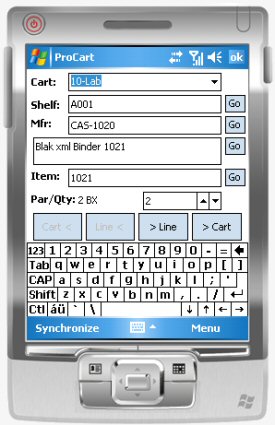
Figure 5 - A Par Cart Item Line
Cart contains the par cart name.
- To work with a different par cart, press the down arrow in the Cart box.
A drop list appears.
Select a different
par cart from the drop list.
- Note: You can also move forward to the next par cart, or backward to a previous cart by pressing > Cart or Cart < , respectively.
Shelf is the shelf location of the item in the storeroom.
Mfr is the Supply Chain manufacturer number for the item.
The middle area , with no label, is the item description.
Item. is the Supply Chain Item No.
Par/Qty is the established par quantity.
The Par/Qty information is followed by a box for entering the current count of the item. You can key in a value, or use the up and down arrows to increase or decrease the quantity.
Locating Par Cart Item Lines
Use any of the following methods to find an item line.
Position to any item
-
Scan the barcode on the item packaging.
- Scan the barcode on the inventory shelf.
ProCart responds to a barcode scan with different sounds:
- A single "up tone" indicates that ProCart has found the
item, and has positioned to it.
- Two "down" tones means that ProCart does not recognize or cannot
find the barcode in the current par cart (the item is not in the
par cart). The Assign button appears. See the discussion below about assigning barcodes to items.
- Enter a value in one of the fields: Shelf, Mfr, (manufacturer number), item description, or Item number.
Press Go.
- For Shelf, Mfr, and Item, the application looks for the first match to the value that you entered, and displays the item information.
- For item description, the system locates an item whose description contains any word that you entered.
Scroll through item lines
- Press Line < or > Line until you reach the item that you want.
To collect
count data for each item in a par cart
- For each item line in the par cart that you are working with, enter the count in the count field (to the right of Par/Qty, Figure 5).
- Press the up arrow or the down arrow to add or take away from
the count. In Figure 5, for example, you could enter 1
by tapping once on the down arrow, since the par level is 2.
- To reset the count field, use the stylus to press and hold in the field.
- When you have entered the count for an item, move on to the next item until
you have counted the entire par cart.
When you get to the last item line in a par
cart, you cannot move forward any further. You must then move to the next par cart.
- To move forward to the next par cart, press > Cart.
- To move backward to the previous par cart, press Cart <.
After you have counted items for all of the par carts
in the par group, you must synchronize the hand-held computer with Supply Chain
to upload the count data. Follow the process described
previously.
If you wish to change to a different par group and count item quantities in its par carts, you must re-synchronize after you select the par group.
To assign
a scanned barcode to an item:
- Scan the barcode. An Assign screen appears.
- With the stylus, press the Assign button.
A panel appears that contains the barcode and item information.
The application asks you to verify that you wish to assign the barcode to the item
record.
- Press OK to assign the barcode.
The barcode is associated with the current item displayed on the screen. The
barcode will be uploaded the next time you hot-sync the hand-held computer.
Tools on the Main Item Window
Figure 6 is the Main ProCart view. Several tools are on the bottom of the screen.
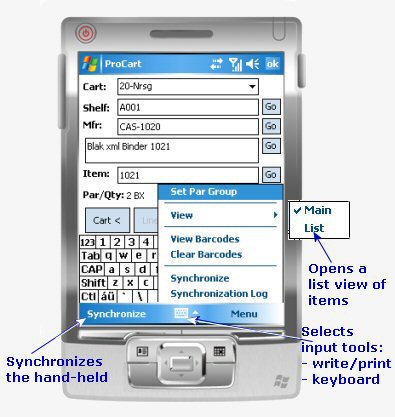
Figure 6 - ProCart Main Window Tools
Pressing Menu (Figure 6) offers these selections:
- Set Par Group - lets you change the par group. (Don't forget to re-synchronize the hand-held if you change groups.)
- View - changes to a List view of par cart items, and back to the Main view.
- View Barcodes - displays an inset panel containing the barcode for the current item.
- Clear Barcodes - removes the current barcode.
- Synchronization - synchronizes the hand-held computer with Supply Chain running on the server.
- Synchronization Log - displays the log from synchronization.
Pressing the keyboard icon turns the keyboard on and off.
Pressing the arrow next to the keyboard icon selects input options, such as writing or printing.
Using the Applications Window Menu
Pressing Menu on the Applications Window provides access to the features: User Settings, Server Settings, Synchronization Log, Options, and Utilities (Figure 7).
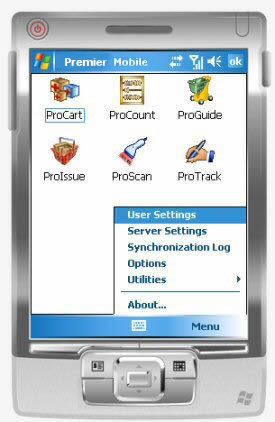
Figure 7 - The Applications Window Menu
- Pressing User Settings opens the User Settings screen (Figure 1) for entering login information (User ID, Password, and Organization).
- Server Settings lets you view and, if needed, reset the Server URL field (Figure 8).
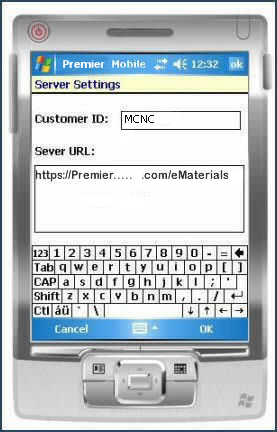
Figure 8 - The Server Settings Screen
- The Synchronization Log is the log that was generated during synchronization. Figure 9 is an example.
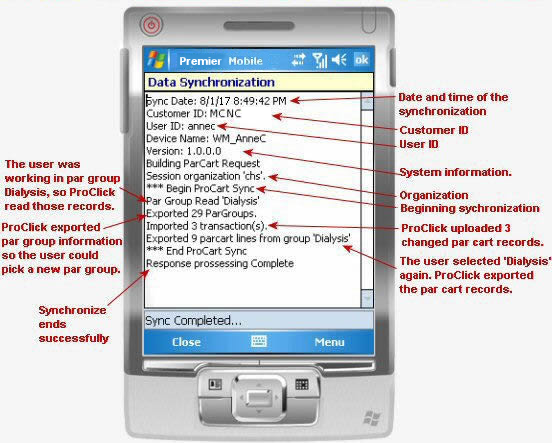
Figure 9 - Sample ProCart Synchronization Log
- Options lets you set the Auto Input Panel field. When this field is set, the mobile application automatically opens the on-screen keyboard for any screen that requires you to enter text.
- Utilities contains Network and IP Address information, and lets you test barcode scanning.
- About displays the mobile application release level.
Viewing
Imports and Requisitions Created from ProCart Uploads
You can view par cart item information in Supply Chain
after you have uploaded it from ProCart or from the iPad application. For each update, Supply Chain processes
the data, importing it into the item records and creating requisitions.
To view imported par cart item information:
- From the Materials Management main Contents, select
Warehousing > Par Cart Imports.
The Par Cart Imports list appears The list shows import files, each with an Import ID and Import Date. The import files contain items that
need to be requisitioned to replenish par levels.
- Click Menu > View Import Details next
to an Import ID to view the par cart items and quantities that
were imported into Supply Chain in that file on the Import Date.
The par level and the counted quantity appear in the information for each
item.
- Click View Messages to view problems
or messages for any item.
To view requisitions created from ProCart imported items:
- From the Materials Management main Contents, select
Requisitioning > Requisitions - Current Dept or Requisitions
- All Depts. The Quick Click menu appears.
- Next to Advanced Search, click Search.
The Search screen appears.
- In the Search Words field, enter: Created
from Requisition Import.
- Click the down arrow in the box next to the
Search Words field and select Exact Phrase.
- Click Submit. The Requisition list appears.
Requisitions generated by the ProCart upload / import process are at the top
of the list (if any exist). For each requisition, the Description field
contains: Created from Requisition Import.
Automatic Updates of Mobile Applications
When an update for a mobile application is released, the system automatically applies the update to your hand-held computer when you synchronize the hand-held for the first time after the new release. The process is:
- After the new release is available, synchronize a hand-held computer as usual.
The New Updates panel appears (Figure 10)
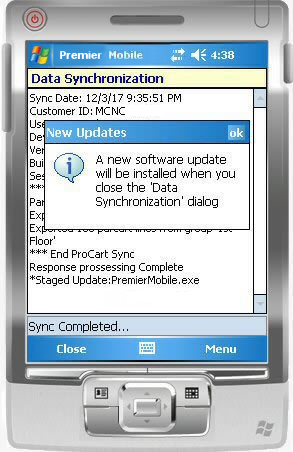
Figure 10 - The Mobile New Updates Panel
- Click OK in the top right of the New Updates panel to close it.
- When you finish synchronizing and leave the Data Synchronization panel, the application automatically closes.
- An hourglass appears while files are being copied.
- The application re-starts with the new, updated version.
Copyright © 2019 by Premier Inc. All rights reserved.